Documentation Index
Fetch the complete documentation index at: https://launchdarkly-preview.mintlify.app/llms.txt
Use this file to discover all available pages before exploring further.
Overview
This topic explains how to configure your LaunchDarkly account for SAML SSO. If you’re a LaunchDarkly administrator or account Owner, you can configure LaunchDarkly to use your IdP when account members authenticate. This topic includes:- how to configure your IdP and how to configure SAML within LaunchDarkly
- details on user provisioning
- details on the custom attributes available during provisioning
Configure your Id
P To set up a LaunchDarkly connection, follow the instructions for your chosen IdP. We provide support for the following IdPs: You can only use one identity provider per LaunchDarkly account. You can use other identity providers with LaunchDarkly, but we do not provide support or configuration guidance for other providers. To learn more, read Supported external identity providers.Configure Launch
Darkly SAML To configure SAML within LaunchDarkly:- Log in to LaunchDarkly with a LaunchDarkly Admin organization role, or an Admin or Owner base role.
- Click the gear icon in the left sidenav to view Organization settings.
- Click Security and scroll to the “SSO management” section:
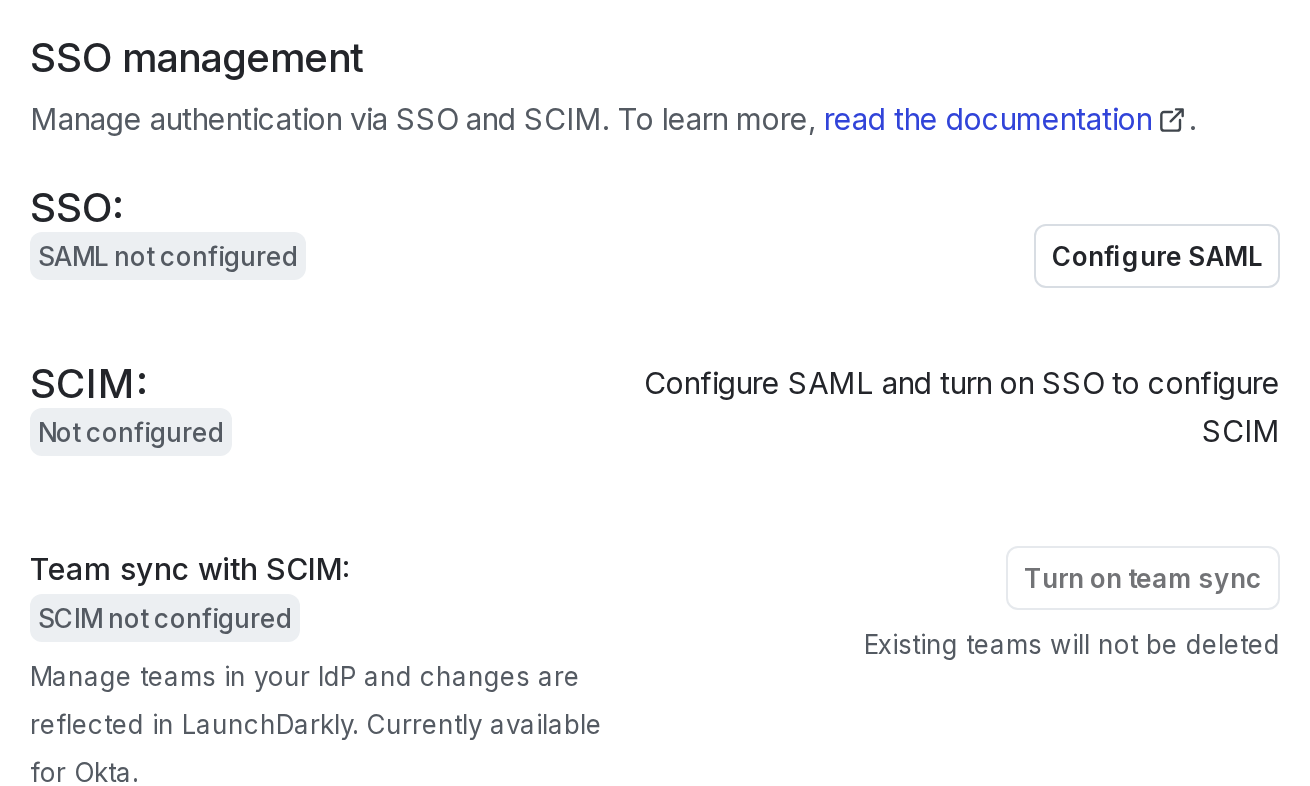
- Click Configure SAML. The SAML configuration panel appears, pre-populated with information you need to set up LaunchDarkly as a SAML application with your identity provider:

- Create the SAML application in your IdP. To do this, follow the instructions in the documentation for your IdP.
- Copy the SAML configuration metadata from the IdP into LaunchDarkly’s SAML configuration panel on the Security page.
- Click Save.
Encrypt SAML assertions
If you choose to encrypt SAML assertions, LaunchDarkly uses a private/public key pair for encryption and provides the public key as an X.509 certificate. You can copy this, upload it into your IdP, and configure your IdP to encrypt SAML assertions. To encrypt SAML assertions sent by your IdP:- Click the gear icon in the left sidenav to view Organization settings.
- Click Security and scroll to the “SSO management” section.
- Click Configure SAML. The SAML configuration panel appears.
- Click Advanced settings.
- Check the Enable encrypted SAML assertions checkbox.
- LaunchDarkly uses a public/private key pair for encryption and provides the public key as an X.509 certificate. Click the copy icon to copy the certificate contents. You’ll need to upload this into your IdP and configure your IdP to encrypt SAML assertions.
- When the existing certificate is close to expiring, LaunchDarkly provides a new one. Select the newer certificate and copy its contents.
- Click Save.
Manage expired SAML certificates
If your SAML certificate expires, you may not be able to log in to your LaunchDarkly account through SSO. If this happens, start a Support ticket. We will disable SSO for your account, allowing you to log in with your original email and password. If you have only ever logged in through SSO, you can use the “Forgot your password?” link to log in. To learn how, read Resetting your password. You can then update your SAML certificate and re-enable SSO.Enable signed authentication requests
If you choose to enable signed authentication requests, your IdP will have the ability to verify that requests are authentic and originate from LaunchDarkly. To enable signed authentication requests:- Click the gear icon in the left sidenav to view Organization settings.
- Click Security and scroll to the “SSO management” section.
- Click Configure SAML. The SAML configuration panel appears.
- Click Advanced settings.
- Check the Enable signed authentication requests checkbox.
- Click Save.
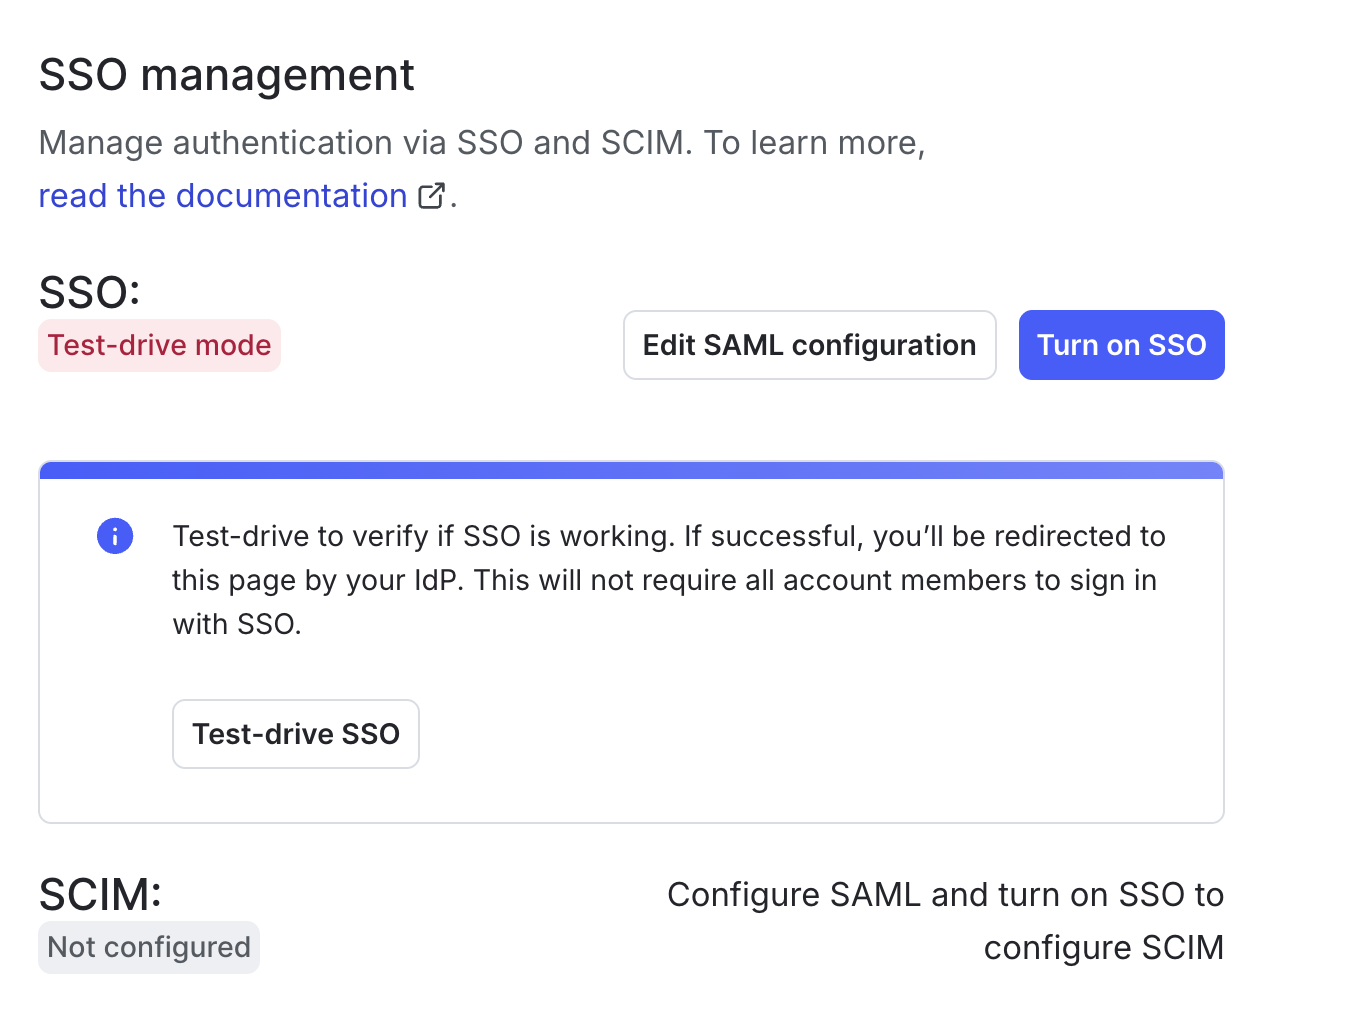
Test-drive mode
When LaunchDarkly receives a valid SAML configuration, SSO enters test-drive mode. Test-drive mode lets you test the SSO integration before deploying the change to the rest of your organization. When SSO is in test-drive mode, you can test authentication through your IdP, but LaunchDarkly’s login screen will continue to use regular password-based authentication. To use SSO in test-drive mode:- Log in to LaunchDarkly with a LaunchDarkly Admin organization role, or an Admin or Owner base role.
- Click the gear icon in the left sidenav to view Organization settings.
- Click Security and scroll to the “SSO management” section.
- Click Test-drive SSO. This performs the same authentication request flow that occurs for LaunchDarkly-initiated SSO logins:
User provisioning with SAML
LaunchDarkly automatically creates accounts for new account members who sign in through your IdP. Every time an account member signs in, LaunchDarkly also updates the account member’s profile with user attributes from the IdP. To learn more, read Default initial role. When you have SSO enabled, you cannot add new members through the LaunchDarkly UI. You must add them through your IdP. You can configure your identity provider to send attributes when the account member signs in to LaunchDarkly. Each attribute is optional. Specify attribute names with the “basic” format. You can also manage custom attributes in LaunchDarkly. To learn how, read Set custom attributes, below.Remove members
If SSO is enabled without SCIM provisioning, removing a member from your IdP does not automatically remove the member from LaunchDarkly. You will also need to remove the member in the LaunchDarkly app or using the REST API. The member will no longer be able to log in to LaunchDarkly, but any access tokens you have created for that member will still be valid. To learn how to remove access tokens, read Cloning and deleting access tokens. For more information about automatic user provisioning and deprovisioning, read Enable SCIM provisioning.Name
ID field formattingLaunchDarkly only supports the use of email addresses in the NameID field. Do not use other types of identifying strings.
<saml:NameID Format="urn:oasis:names:tc:SAML:1.1:nameid-format:emailAddress">admin@test.com</saml:NameID>
Set custom attributes
These attributes are available for SAML SSO provisioning and SCIM provisioning:| Attribute name | Attribute format | Availability | Description |
|---|---|---|---|
| role | string | SSO and SCIM | One of the base LaunchDarkly roles: reader, writer, admin, and for some customers, no_access. If unspecified, the default role is reader. If you prefer to continue to manage member roles within LaunchDarkly, you can leave this blank.SCIM attribute name: urn:ietf:params:scim:schemas:extension:launchdarkly:2.0:User:role |
| customRole | String array, or comma-separated string | SSO and SCIM | A list of the keys of the custom roles to assign to the account member. These replace the member’s existing custom roles. If a member has any custom roles, they supersede the base role. The elements of the customRole list are case-sensitive, and each element of the list must match a custom role key in LaunchDarkly exactly. If you prefer to continue to manage member roles within LaunchDarkly, you can leave this blank.SCIM attribute name: urn:ietf:params:scim:schemas:extension:launchdarkly:2.0:User:customRole |
| teamKey | String array, or comma-separated string | SSO only | A list of the keys of the teams that the account member belongs to. These replace the member’s existing teams. The elements of the teamKey list are case-sensitive, and each element of the list must match a team key in LaunchDarkly exactly. If you prefer to continue to manage team membership within LaunchDarkly, you can leave this blank. To learn more about Teams, read Teams. To learn about managing teams with SCIM, read Team sync with SCIM. |
firstNamelastName
givenNamefamilyName