Documentation Index
Fetch the complete documentation index at: https://launchdarkly-preview.mintlify.app/llms.txt
Use this file to discover all available pages before exploring further.
Creating your own roles is only available to customers on select plans. To learn more, read about our pricing. To upgrade your plan, contact Sales.
Overview
This guide explains best practices for creating and managing roles, and how to use a single-sign-on (SSO) provider for cross-domain identity management (SCIM) provisioning. You can enforce permissions or restrictions regarding projects, environments, and other resources using roles. After you configure them, you can manage roles with your SSO administration rather than in the LaunchDarkly application. This guide covers:- Understanding preset roles in LaunchDarkly
- Creating your own roles
- Mapping your current roles
- Using teams to manage permissions
- Using roles with specific IdPs
Prerequisites
To complete this guide, you must have the following prerequisites:- An Admin or Owner base role in your LaunchDarkly account, or another role with team management permissions.
- A basic understanding of roles within LaunchDarkly. To learn more, read Roles.
- Access to the SSO and SCIM configuration at your organization and the identity provider (IdP) you use. To learn more, read Single sign-on.
Using SSO with custom roles is only available to customers on select plans. To learn more, read about our pricing. To upgrade your plan, contact Sales.
Concepts
You should understand these concepts before reading this guide:Members
Account members are people who work at your organization or have access rights to your organization’s LaunchDarkly environment for another reason, such as contractors or part-time employees. To learn more about members, read Members.Teams
Teams are groups of your organization’s members. A LaunchDarkly account administrator can give specific permissions to teams with roles that let them perform actions on different resources, such as projects or flags. To learn more about teams, read Teams.Roles
Roles enable organizations to define granular permissions of actions that an account member is allowed to perform, or is blocked from performing, in LaunchDarkly. Every LaunchDarkly account has several preset roles. To learn more about preset roles, read Organization roles and Project roles. Some organizations prefer to use roles that they create instead of LaunchDarkly’s preset roles. To learn more, read Roles.Policies
A policy in LaunchDarkly is a set of actions a role can or cannot take. Each policy is a list of statements allowing or denying an account member access to resources and actions within LaunchDarkly. Policies can be direct or inverse. A direct policy allows or denies access to the resource defined. An inverse policy allows or denies actions for all resources except the one listed.Expand direct policy example
Expand direct policy example
This policy allows all actions within the production environment:
Expand inverse policy example
Expand inverse policy example
This policy allows all actions across all environments except production:
Identity provider
An identity provider (IdP) is a service that creates, maintains, and manages members’ digital identities and permissions to use applications and services. It functions as a directory, sharing credentials with digital services and devices. IdPs communicate over Security Assertion Markup Language (SAML) or Open Authorization (OAuth). To learn more about IdP configuration, read Configure SAML SSO.Single sign-on
Single sign-on allows members to access multiple applications with a single set of login credentials. SSO can be deployed with an IdP to manage credentials and authentication to applications.SCIMSCIM is a standard for automating the exchange of information between identity domains, or IT systems. The SSO workflow within Launch
Darkly creates a new member if they sign in with the IdP and the IdP can pass a role. SCIM allows you to pass a role when creating and managing members as an admin. To learn more about SCIM, read Enable SCIM provisioning.Review Launch
Darkly preset rolesWhen you are ready to configure roles for your organization, start by reviewing LaunchDarkly’s preset roles. This way, you can determine whether the provided roles meet your organization’s needs. In some cases, the preset roles use role scope to specify resources. A role scope is a resource type by which a role is a parameterized. When you assign the role to a member or team, you specify the parameter, which is a called a role attribute. For example, the preset project role “LaunchDarkly Developer” can perform all actions on projects specified in thedeveloperProjectKeys parameter. This means you can assign the Developer role to a member and give them access to a one or more projects of your choosing using the preset role.
In many situations, the LaunchDarkly preset roles will provide all the custom access you need.
You can also use the preset roles as a starting point. For example, you can add additional policy statements to them.
Create your own roles
If you have reviewed LaunchDarkly’s preset roles and determined that your organization needs something different, you can also create your own roles. When you create a new role, the role allows no access to any resources. You must explicitly grant access to a resource for a member with the role to view or edit that resource. To learn how to create your own roles, read Creating roles and policies. For additional examples of roles you may find useful, read Example roles and policies. For some actions, access must be granted across all environments to function properly. These actions include:createFlagdeleteFlagupdateIncludeInSnippetupdateNameupdateDescriptionupdateTemporaryupdateTagsupdateMaintainerupdateFlagVariationsupdateFlagCustomPropertiesTo learn more, read Using actions.
Map Launch
Darkly roles to your organizationNow that you are familiar with LaunchDarkly’s preset roles and know how to create your own roles, you can begin thinking about your organization’s specific needs. Scoping the different roles, teams, and permissions your organization uses will help you create a policy structure that’s scalable and easy to implement. Some questions to consider include:- How are units at your organization structured?
- Do you use LaunchDarkly’s teams feature?
- Do you have separate QA, Dev, and Production units?
- What level of access do you need for Engineering leads, QA, support, etc.?
- Do you have a tech lead for each project?
- Do your members need access to multiple projects?
- Should members be able to view projects that aren’t their own, or that they aren’t working on?
- What environments do you use within each project?
- Do projects change frequently or do they last indefinitely?
- Do you need separate roles for permissions at the flag level, project level, and environment level?
- Do you have an internal approval process for enabling flags in Production?
- Do external organizations ever toggle flags?
- Who will be responsible for maintenance and future access control?
- Do you need policies for service tokens?
- Who should be able to rotate keys?Account members can have more than one role. This is useful if one person performs multiple roles, or performs the same role for many different teams. For example, if an engineer works on several projects but should have no access to projects they are not working on, you could assign them LaunchDarkly “Developer” preset role and specify the projects they have access to. If an engineer is also a tech lead on only certain projects, you may want to assign them both a “Tech lead” role and a “Developer/QA” role that you create. Assigning multiple roles can make it easier to add and remove sets of permissions as an account member’s duties change. If two roles have conflicting permission levels, the more permissive level of access is applied. For example, if a member has one role that allows access to a resource, and another role that denies access to that resource, the member is granted access. If you don’t want to worry about conflicting permissions within multiple roles, you may want to create additional roles, such as a “Tech lead + QA” role, that includes access needed for both. This eliminates the complexity of managing multiple roles per member, but requires that you create more roles up front to cover all of the possible role combinations.
Write your own roles
There are a few ways to approach writing your own roles:- Allow no access by default, then strategically allow actions as needed
- Allow all actions by default, then strategically deny actions as needed
Expand No access by default
Expand No access by default
Allowing no access by default is the most secure. LaunchDarkly roles are no access by default, so your LaunchDarkly administrators must modify your role policies to allow individual actions. However, this can create additional work for your administrators, as they must explicitly add permissions to roles each time LaunchDarkly releases a new feature.Here is an example of a role that explicitly allows actions only on certain resources:
By default, new roles cannot take any actions on any resources. However, roles created prior to October 2024 had the option to use the Reader base role as their starting point, rather than starting with no access.To check whether this applies to any of your existing roles, edit the role and look for the warning statement “This role currently has base permissions set to Reader. Members can view all LaunchDarkly content.” Uncheck the box to update the role so that it starts with no access and only allows actions based on the statements in its policy.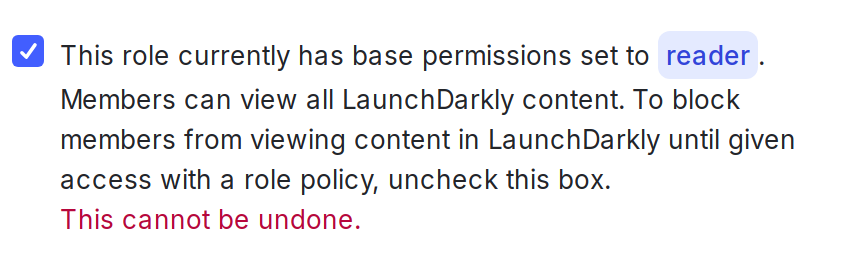
Expand Allow all actions by default
Expand Allow all actions by default
Allowing all actions by default automatically allows members access to new features as they are released. However, we do not consider this a best security practice, because all members, regardless of role, are automatically granted access to new features. Administrators will need to explicitly deny access to new features in role policies as needed.Here is an example of a role that allows all actions, then explicitly denies actions on certain resources in the last statement:
Use Launch
Darkly teams to manage permissionsTeams are only available to customers on select plans. To learn more, read about our pricing. To upgrade your plan, contact Sales.
Use roles with your Id
P With your roles designed and built, you can now manage them using SSO and your IdP.When you pass account member information into LaunchDarkly from your IdP, you can include the key of the member’s role in acustomRole attribute, along with their other profile information such as name and email address, if you want to update those fields. To learn more about the customRole attribute, read Roles.
The fields and methods you must use to pass role information to LaunchDarkly differ depending on your IdP. We provide configuration guidance for the following IdPs:
- Active Directory Federation Services (ADFS)
- Entra ID
- Google Workspace
- Okta
- OneLogin
Expand ADFS details
Expand ADFS details
You can map LaunchDarkly custom role attributes to ADFS using a Claim issuance Policy. To learn how, read Configure custom roles.After your policy is set up, you can assign members to custom role groups using the Member of tab within the ADFS user properties window.
Expand Entra details
Expand Entra details
You can map LaunchDarkly
role and customRole attributes to Entra using Entra claims. role and customRole can be mapped using any unused Entra source attribute. To learn how, read Map custom roles to Entra user attributes.After your role and customRole attributes are mapped, include the key of the role for each account member in the mapped fields.Expand Google Workspace details
Expand Google Workspace details
Before you create the LaunchDarkly app in GSuite, you must create LaunchDarkly-specific fields for roles, custom roles, and teams. To learn how, read Assign roles, custom roles, and teams with Google Workspace.After your
role and customRole attributes are mapped, include the key of the role for each account member in the mapped fields.Expand Okta details
Expand Okta details
You can assign custom roles that you created in LaunchDarkly to members through the Okta user interface (UI). To learn how, read Assign custom roles in Okta.
Expand OneLogin details
Expand OneLogin details
You can assign custom roles that you created in LaunchDarkly to members through the OneLogin UI. To learn how, read Add users and set roles in OneLogin.