Managing AI model configuration outside of code with the Node.js AI SDK
This guide shows how to manage AI model configuration and prompts for an OpenAI-powered application in a runtime environment. It uses the LaunchDarkly Node.js (server-side) AI SDK and AI Configs to dynamically customize your application.
This guide shows how to manage AI model configuration and prompts for an OpenAI-powered application in a runtime environment. It uses the LaunchDarkly Node.js (server-side) AI SDK and AI Configs to dynamically customize your application.Using AI Configs to customize your application means you can:
manage your model configuration and prompts outside of your application code
enable non-engineers to iterate on prompt and model configurations
apply updates to prompts and configurations without redeploying your applicationThis guide steps you through the process of working in your application and in LaunchDarkly to customize your application. If you’re already familiar with setting up AI Configs in the LaunchDarkly UI and want to skip straight to the sample code, you can find it on GitHub.
If you’re not familiar with AI Configs and would like additional explanation, you can start with the Quickstart for AI Configs and come back to this guide when you’re ready for a more realistic example.You can find reference guides for each of the AI SDKs at AI SDKs.
a role that allows AI Config actions. The LaunchDarkly Project Admin, Maintainer, and Developer project roles, as well as the Admin and Owner base roles, all include this ability.
a Node.js (server-side) application. This guide provides sample code in TypeScript. You can omit the types if you are using JavaScript.
an OpenAI API key. The LaunchDarkly AI SDKs provide specific functions for completions for several common AI model families, and an option to record this information yourself. This guide uses OpenAI.
In this example, you manage a product recommendation system for an e-commerce platform. Using the LaunchDarkly Node.js (server-side) AI SDK, you’ll configure AI prompts to provide personalized product suggestions based on your customers’ preferences. You’ll also track metrics, such as the number of output tokens used by your generative AI application.
Darkly SDK clientsInside of your project, create a shared utility for initializing the LaunchDarkly SDK and its AI client.Create a config/launchDarkly.ts file:
DarklyNext, create an AI Config in the LaunchDarkly UI. AI Configs are the LaunchDarkly resources that manage model configurations and messages for your generative AI applications.To create an AI Config:
In LaunchDarkly, click Create and choose AI Config.
In the “Create AI Config” dialog, give your AI Config a human-readable Name, for example, “chat-helper-v1” or “shopping assistant.”
Click Create.Then, configure the model and prompt by creating a variation. Every AI Config has one or more variations, each of which includes your AI messages and model configuration.
Here’s how:
In the create panel in the Variations tab, replace “Untitled variation” with a variation Name. You’ll use this to refer to the variation when you set up targeting rules, below.
Click Select a model and select a supported OpenAI model, for example, gpt-4o.
Optionally, adjust the model parameters: click Parameters to view and update model parameters. In the dialog, adjust the model parameters as needed. The Base value of each parameter is from the model settings. You can choose different values for this variation if you prefer.
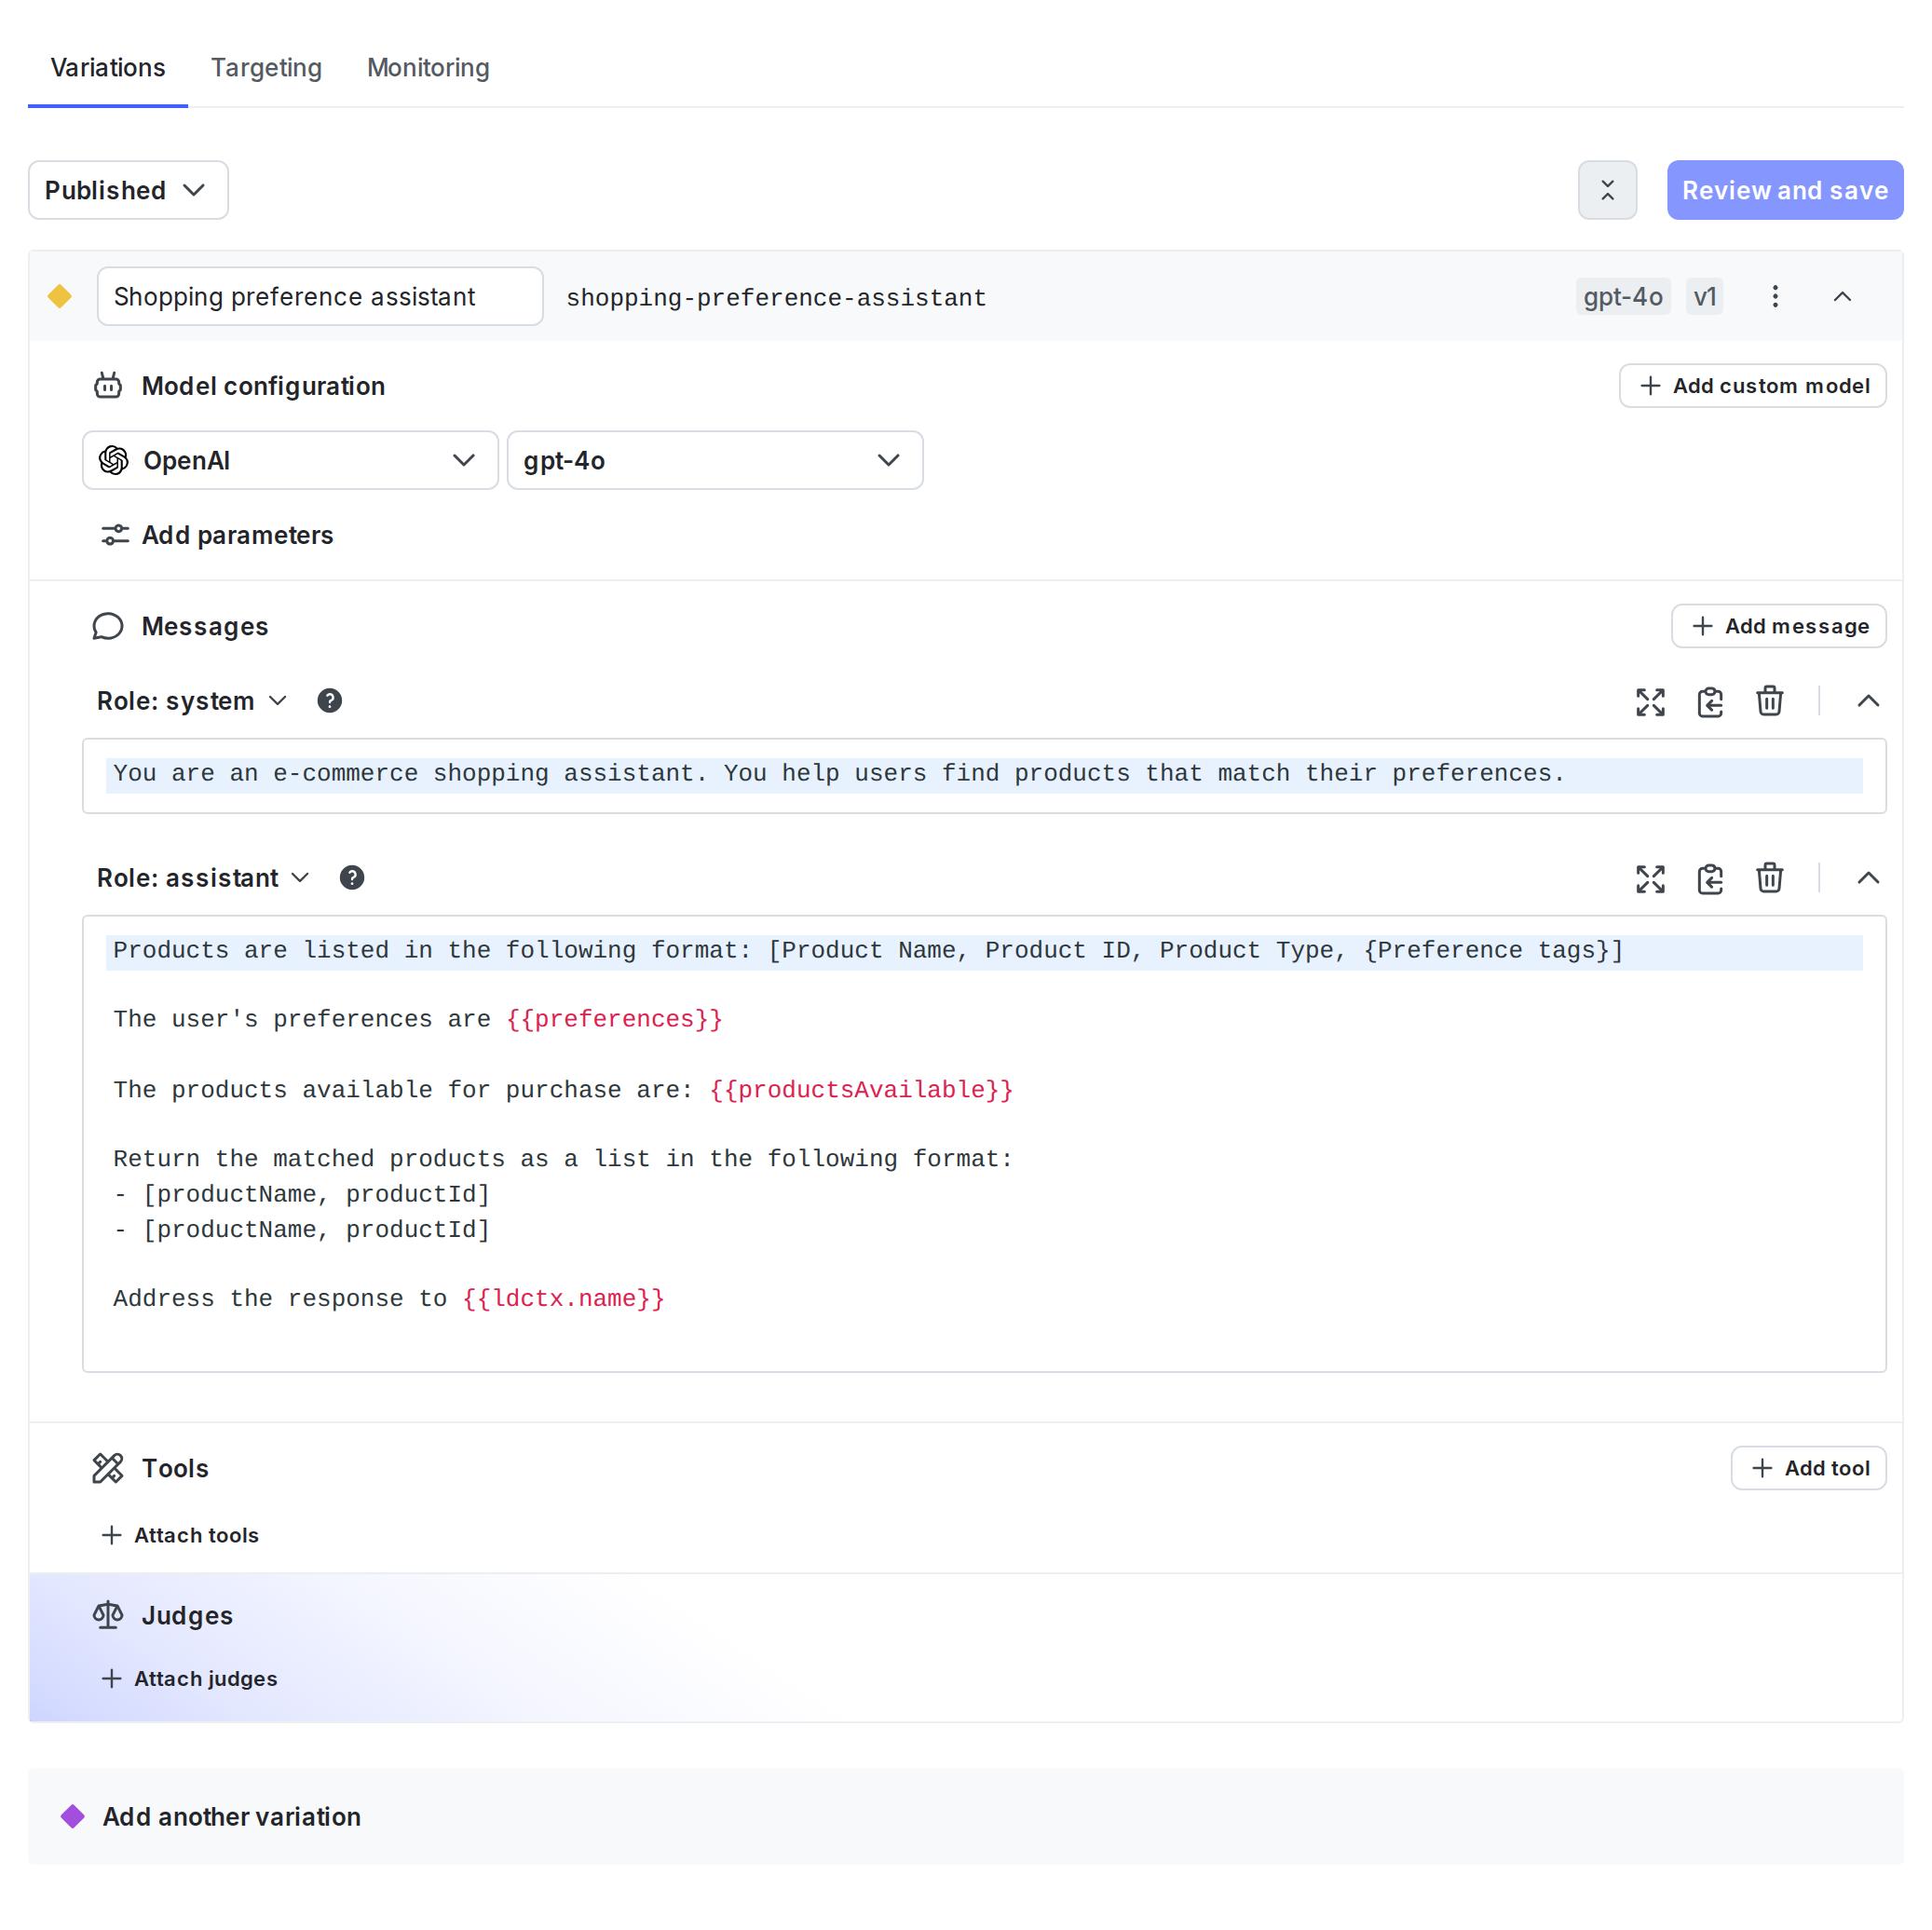
Next, add system, user, or assistant messages to define your prompt. In this example, you’ll augment the prompt with saved user preferences.Start with the system message:
You are an e-commerce shopping assistant. You help users find products that match their preferences.
Now, add an assistant message that pre-loads the model with the user’s preferences and provides some instructions about the input format, response format, and context:
    Products are listed in the following format: [Product Name, Product ID, Product Type, {Preference tags}]

    The user's preferences are {{preferences}}

    The products available for purchase are: {{productsAvailable}}

    Return the matched products as a list in the following format:
    - [productName, productId]
    - [productName, productId]

    Address the response to {{ldctx.name}}
The double curly braces in the prompts allow you to augment the messages with customized data at runtime. To learn more, read Syntax for customization.Within the UI, the variation will look like the following:
Click Review and save at the top right of the page to save the configuration.
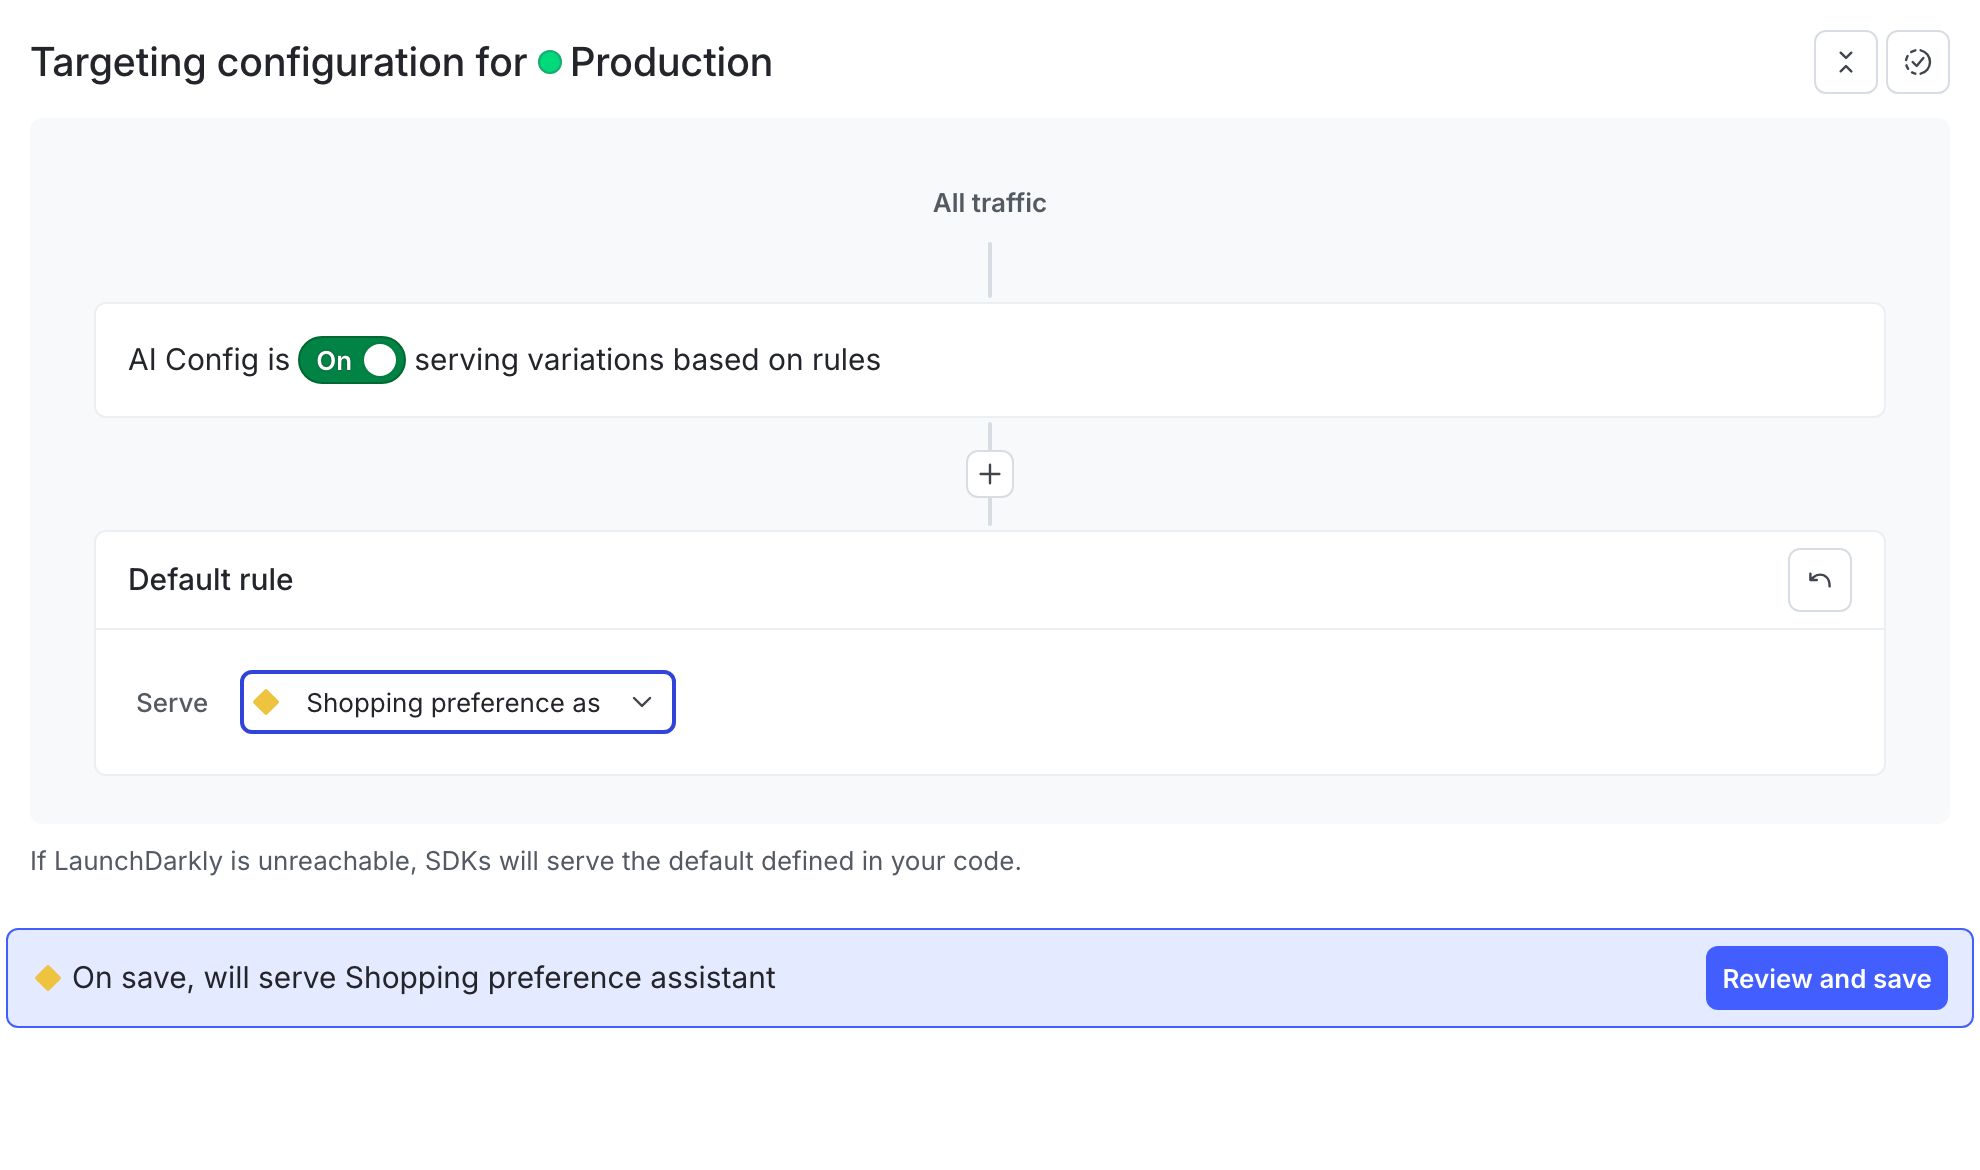
DarklyTargeting is how you specify that specific end users working in your application will receive specific variations that you’ve created in your AI Config.To set up targeting, click the Targeting tab. Targeting for AI Configs is on by default. Set the default targeting rule to serve the “Shopping preference assistant” variation you just created for your test environment.To specify the AI Config variation to use by default when the AI Config is toggled on:
Select the Targeting tab for your AI Config.
In the “Default rule” section, click Edit.
Set the default rule to serve the shopping preference assistant variation.
Click Review and save. In the confirmation dialog, click Save changes.By default, this AI Config will now serve the variation shopping preference assistant variation:
Step 5: Integrate the AI Config into your application
To integrate the LaunchDarkly AI Config into your application, you’ll need to set up your OpenAI client, set up your application data, add your completion code, and finally put it all together.
Then, set up the data for your application. Normally, the product data that your application retrieves would come from a database. For this example, create a data/products.ts file to serve mock data:
    import { Product} from "./products"

    export const productsAvailable: Product[] = [
        {
            name: "AeroGlide Elite Runner 3.0",
            productId: "1",
            description: "Versatile running shoes with responsive cushioning",
            type: "shoes",
            price: 120,
            preferenceTags: ["athletic", "running", "comfort"]
        },
        // complete list of products available in linked file
      ]
The data contains the name, price, type, preference tags to match to a customer’s preferences, a description, and a product ID. This should give the AI model ample data to match to a customer’s query.
    import { LDContext } from "@launchdarkly/node-server-sdk";
    import { getLaunchDarklyClients } from "../config/launchdarkly";
    import { getOpenAI } from "../config/openAI";
    import { formatProductForCompletion, getProducts } from "../data/products";
    import { LDFeedbackKind } from "@launchdarkly/server-sdk-ai";

    export const completeShoppingAssistant = async (userName: string, userMessage: string, userPreferences: string[]) => {
      const openaiClient = getOpenAI();

      const { productsAvailable } = await getProducts();

      const { aiClient } = await getLaunchDarklyClients();
      // Create the user context for this request
      const ctx: LDContext = {
        // The context key should be unique to this end user
        // You can use any generated value
        key: "example-user-key",
        kind: "user",
        name: userName,
      };

      // Retrieve the AI Configuration for this context
      const aiConfig = await aiClient.completionConfig(
        // The AI Config key, which you can copy from the sidebar in the LaunchDarkly UI
        "chat-helper-v1",
        // The context for this request
        ctx,
        // A fallback configuration
        // For this example, skip execution if the AI Config is disabled
        {},
        // The parameters for this AI Config
        // These will replace the {{}} placeholders in the LaunchDarkly UI
        {
            preferences: userPreferences,
            // Fetch our mock product data and format it for the completion matching the format we provided to the model
            productsAvailable: productsAvailable.map(product => formatProductForCompletion(product)),
        }
      );

      // If the AI Config is disabled, make sure to handle that appropriately
      if (!aiConfig.enabled) {
        // Application path to take when the aiConfig is disabled
        // For example, you could show a message that the shopping assistant
        // is not available and customers should try again later
        console.log("AI Config is disabled");
      }

      // Track the completion and return the result
      const completion = await aiConfig.tracker.trackOpenAIMetrics(async () => await openaiClient.chat.completions.create({
          model: aiConfig.model!.name as string,
          messages: [
            // Add the system and assistant messages from the AI Config, as well as the user message
            ...aiConfig.messages!,
            { role: "user", content: userMessage }
          ],
        }))

        return `<pre>${completion.choices[0].message.content}</pre>`;
    };
Notice that you need to wrap the completion call in one of the provided methods from the LaunchDarkly SDK (trackOpenAIMetrics). This enables you to monitor the performance of your application, below.
Now that you’ve set up the AI Config and completion, you need to plug this into your app somewhere where you can get a response.Here’s an example:
await completeShoppingAssistant("Sandy", "I'm looking for a fitness tracker", ["premium"])
With these parameters, run your application and you should get a response that looks like this:
Hi Sandy! Based on your preference for premium products, here are the fitness trackers that match your request: - [RaceTracker Pro GPS Elite, 16]
You can play around with the preferences or the query passed in to see different results.At this point, when you run your application, you receive a response from the model that has relevant results to customized to the input, but the formatting isn’t customer-facing. If you were storing your prompts in code, this would require a code change to format differently. However, because you have it in an AI Config, you can update the formatting without having to touch the code or redeploy the application.
Next, let’s adjust the formatting. You can do this without changing application code, or even requiring developer involvement. If any member of your team wants to edit the prompt, adjust the formatting or tone, or make any changes, they can do that directly from the LaunchDarkly UI.In the LaunchDarkly UI, navigate to the Variations tab of the AI Config you created earlier. You’ll edit the existing variation to reflect the formatting you’d prefer for the output. You’ll also update the system messaging to be a bit more friendly and less academic.First, edit the existing variation and adjust the system message to the following:
You are an e-commerce shopping assistant. You help users find products that match their preferences. Your tone should be friendly and warm, as if you're a friend shopping with the person purchasing the items.
Next, adjust the formatting on the assistant response format message to be more customer-facing, provide the result in more nicely-formatted Markdown, and provide a link to the product in the catalog:
    Products are listed in the following format: [Product Name, Product ID, Product Type, {Preference tags}]

    The user's preferences are {{preferences}}

    The products available for purchase are: {{productsAvailable}}

    Return the matched products as a list in the following format with each product on a new line:
    ##[productName](https://my-store-url/product/{productId})\n
    productDescription\n\n
    ##[productName](https://my-store-url/product/{productId})\n
    productDescription\n\n

    Address your response to {{ldctx.name}}
With these parameters, run your application again:
await completeShoppingAssistant("Sandy", "I'm looking for some running shoes", ["athletic", "casual", "running"])
and you should get a response that looks like this:
    Hey Sandy! Let's find the perfect running shoes for you. Based on your preferences, here are some options I think you'll love:
    ##[AeroGlide Elite Runner 3.0](https://my-store-url/product/1)
    These shoes are designed for athletic performance and running. They offer incredible comfort, making them a great choice for your runs. Perfect for keeping a steady pace while feeling great on your feet!
    ##[PowerBoost Pro Runner X22](https://my-store-url/product/5)
    These premium running shoes elevate your run with their top-notch design and superior performance. Ideal for serious runners who want that extra boost on the track!
    ##[CloudStep Comfort Runner](https://my-store-url/product/9)
    Focused on comfort, these running shoes are neutral yet supportive, ensuring you have a smooth, enjoyable run every time. They're perfect for everyday runs and long distances alike.
    ##[UltraGlide Distance Elite](https://my-store-url/product/12)
    For those long-distance runs, these premium shoes offer unbeatable performance. They're a great choice if you're looking to cover miles with ease and efficiency.
    I hope one of these pairs catches your eye! Let me know if you need more information or help deciding. Happy running!
The output now contains a friendlier message, links to the products, and provides the descriptions in Markdown format. As long as you’re providing the data in the completion input context, you can update this output to contain any of the input parameters without the need for code changes.
When you set up the OpenAI completion call, you wrapped it in a function called trackOpenAIMetrics. This function automatically captures metrics pertaining to the LLM calls for OpenAI:
      const completion = await aiConfig.tracker.trackOpenAIMetrics(async () => await openaiClient.chat.completions.create({
          model: aiConfig.model!.name as string,
          messages: [
            // Add the system and assistant messages from the AI Config, as well as the user message
            ...aiConfig.messages!,
            { role: "user", content: userMessage }
          ],
        }))
After you’ve run your completion a few times, check the Monitoring tab for your AI Config in the LaunchDarkly UI. The Monitoring tab displays metrics that are automatically tracked, including:
Generation count
Input tokens used
Output tokens usedIn combination with LaunchDarkly’s targeting rules, you can duplicate the prompts with different models and messages to see the differences in their generation patterns.
You can also use the LaunchDarkly AI client to keep a running total of positive and negative sentiment about the prompt generation.If you have a process that validates your prompts at runtime, you can use the following:
If you wait for customer interaction to capture whether the result was a positive or negative generation, you can instead call the SDK function asynchronously, by providing the same context to the configuration and tracking it:
In this guide, you reviewed how to manage AI model configuration and prompts for an OpenAI-powered application, and how to dynamically customize your application.Using AI Configs with the LaunchDarkly AI SDKs means you can:
modify AI prompts and model parameters directly in LaunchDarkly
empower non-engineers to refine AI behavior without code changes
gain insights into model performance and token consumptionTo learn more, read AI Configs and AI SDKs.