> ## Documentation Index
> Fetch the complete documentation index at: https://launchdarkly-preview.mintlify.site/llms.txt
> Use this file to discover all available pages before exploring further.
# Create a feature flag in your IDE in 5 minutes with LaunchDarkly's MCP server
> You can now create, evaluate, and modify flags from within your IDE using natural language with LaunchDarkly's MCP server.
> For the complete documentation index, see [llms.txt](/llms.txt). For the full documentation snapshot, see [llms-full.txt](/llms-full.txt).
Published May 28th, 2025
by Tilde Thurium
## Overview
You can now create, evaluate, and modify flags from within your IDE or AI client using natural language with LaunchDarkly's new MCP server. Follow along with this tutorial for step by step instructions.
This MCP server is currently in beta. For the most up to date instructions, read [LaunchDarkly MCP server](/home/getting-started/mcp) in the product documentation.
## Prerequisites
In order to complete this tutorial, you must have the following prerequisites:
* A LaunchDarkly account — [sign up for a free one here](https://app.launchdarkly.com/signup).
* [The Cursor IDE](https://www.cursor.com/) installed on your local machine. Although this tutorial is Cursor-focused, our MCP server also works with any AI client that supports MCP, such as [Windsurf](https://windsurf.com/editor) or even [Raycast](https://www.raycast.com/).
* A JavaScript runtime on your local machine that supports ECMAScript 2020 or newer. Functionally, this means [Node.js](https://github.com/nodejs) v18 or v20, Bun v1 or newer, or Deno 1.39 and above.
## What is MCP?
\*Model-context protocol [(MCP)](https://modelcontextprotocol.io/docs/getting-started/intro)
* is an open protocol that lets you interact with APIs using natural language.
LaunchDarkly's MCP server is powered by [Speakeasy](https://www.speakeasy.com/), a developer tool for generating SDKs, documentation, and agent tools.
## Creating a Launch
Darkly API access token
To use the LaunchDarkly MCP server, you'll need to create a LaunchDarkly API access token with appropriately scoped permissions.
Go to the [the LaunchDarkly Authorization page](https://app.launchdarkly.com/settings/authorization). (If you're an EU or Federal user, that link won't work – instead, navigate to **Organization settings** > **Authorization** in the left nav menu.) Click **Create token**. Give the token a memorable name, such as "Tilde's MCP server." The Role should be Writer. Leave the service token box unchecked. The MCP server will be running on your local machine, so a personal API token is a better fit. Also, leave the API version set to the most recent version (currently `20240415`).
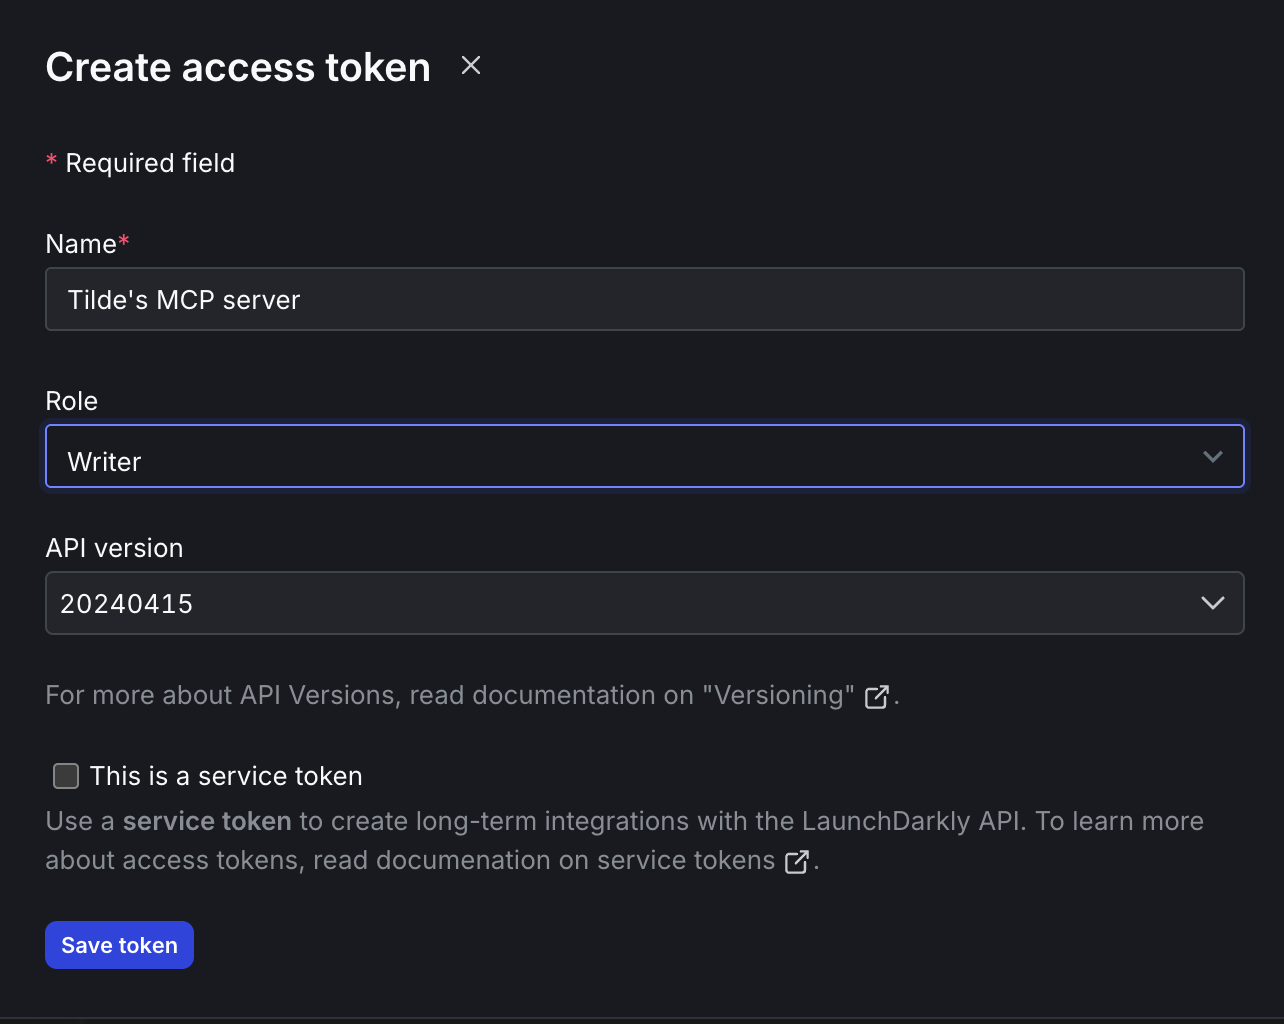
After you create your API token, copy it to your clipboard. You'll need it for the next step. After you leave the page the token will be hidden, so don't lose it.
If you'd rather customize your permissions in a more granular fashion, you can use the Role builder. [Read about custom roles](/home/account/roles/role-concepts) or [see these example policies](/home/account/roles/example-roles) in the docs.
## Installing the MCP server
In Cursor, go to **Settings** > **Cursor Settings** > **Tools & Integrations** > **MCP Tools** > **New MCP server.**
Copy the example configuration, using your API token instead of the dummy key in this example.
```json theme={null}
{
"mcpServers": {
"LaunchDarkly": {
"command": "npx",
"args": [
"-y", "--package", "@launchdarkly/mcp-server", "--", "mcp", "start",
"--api-key", "api-xxxxxxxx-xxxx-xxxx-xxxx-xxxxxxxxxxxx"
]
}
}
}
```
If you're using LaunchDarkly's Federal or EU instances, you'll need to point your server at a different host by adding a `server-url` argument like so. Replace `` with [your host URL](https://www.npmjs.com/package/@launchdarkly/mcp-server#available-environments).
```json theme={null}
{
"mcpServers": {
"LaunchDarkly": {
"command": "npx",
"args": [
"-y", "--package", "@launchdarkly/mcp-server", "--", "mcp", "start",
"--api-key", "api-xxxxxxx",
"--server-url", ""
]
}
}
}
```
## Creating a feature flag with MCP
Toggle Cursor's AI pane. Try asking the agent to create a flag using the following prompt:
*create a feature flag to gate my awesome new feature*
Model responses are non-deterministic, so your response may not exactly match the following, but it should be something like this:
*To create a feature flag for your awesome new feature, I'll need to know which LaunchDarkly project you want to add the flag to. Could you please provide the project key (the unique identifier for your LaunchDarkly project)? If you have a preferred flag key or description, let me know as well, or I can generate them for you!*
Oops, we forgot to specify which LaunchDarkly project we wanted to use. Luckily the agent retains context between queries, and knows how to ask us for the info it needs. The MCP protocol is forgiving and you don't have to get prompts perfect on the first try.
My example LaunchDarkly project is named [*raccoon-api-facts*](https://launchdarkly.com/blog/upgrade-api-safely-progressive-rollouts-expressjs/). 🦝 Don't judge me. Input your own project name in the AI chat pane and hit Enter. Although these flag and project names are technically called *keys* when referenced in code, the LaunchDarkly MCP server can understand what we are asking for without that level of specificity. Hooray for natural language interfaces.
Click **Run tool** in your AI pane in Cursor to finish creating the flag. You'll need to do this every time the AI agent attempts to interact with the LaunchDarkly API. MCP servers require explicit approval before calling external APIs as a security measure.
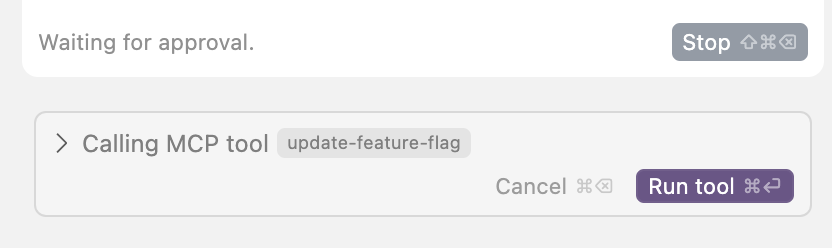
Next, roll over to the [LaunchDarkly UI](https://app.launchdarkly.com/). You should see the *awesome-new-feature* flag in your list. If it's not there, double-check that you're in the correct project.

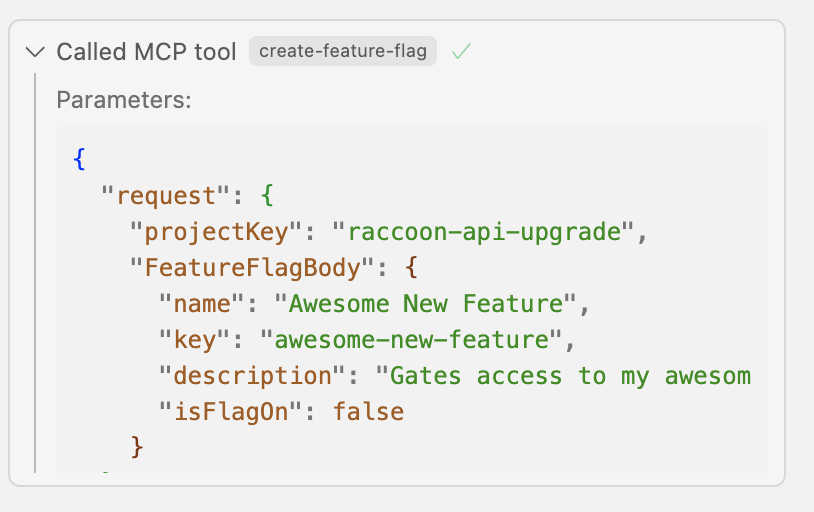
Back in Cursor, if you click on **called MCP tool** you can see the details of the request the MCP server sent to the LaunchDarkly API:
## Enabling a feature flag
Ask the AI agent to check the value of the flag:
*what is the value of the awesome-new-feature flag?*
Your response should be something like this:
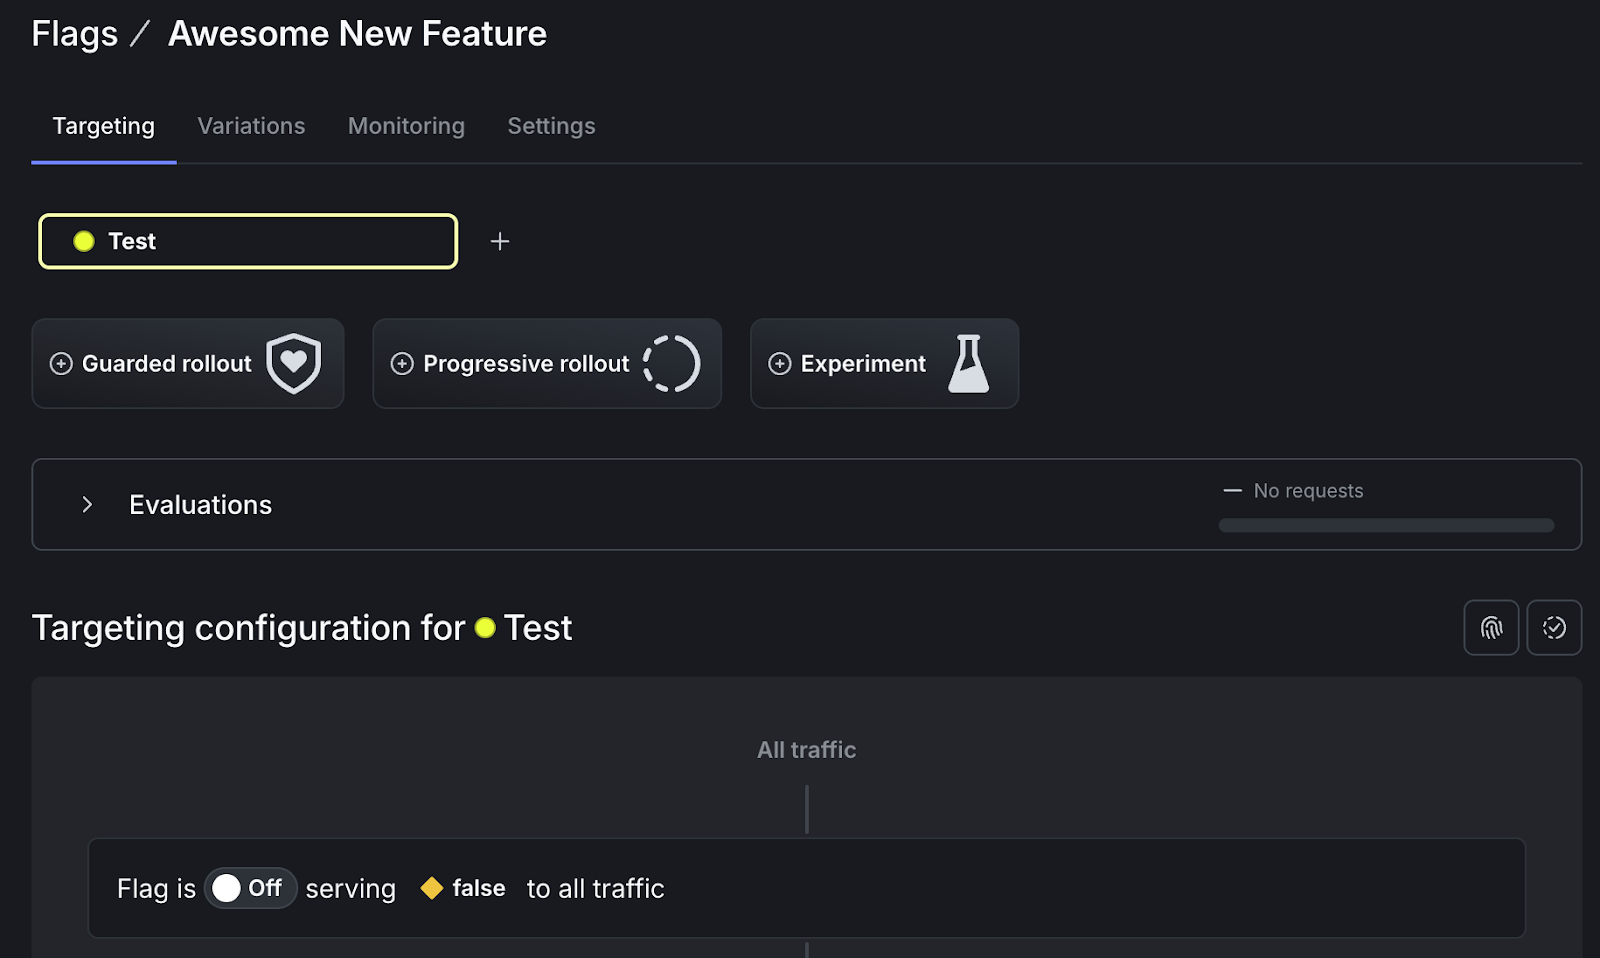
*The value of the awesome-new-feature flag is currently set to off (false) by default in both the production and test environments. If you want to enable it or check its value for a specific user or context, let me know!*
This matches what we see in the LaunchDarkly UI:
Let's try to turn the flag on and see what happens!
*Turn the awesome new feature flag ON, serving True to all users.*
Don't forget to click **Run tool** after submitting your prompt to the agent.
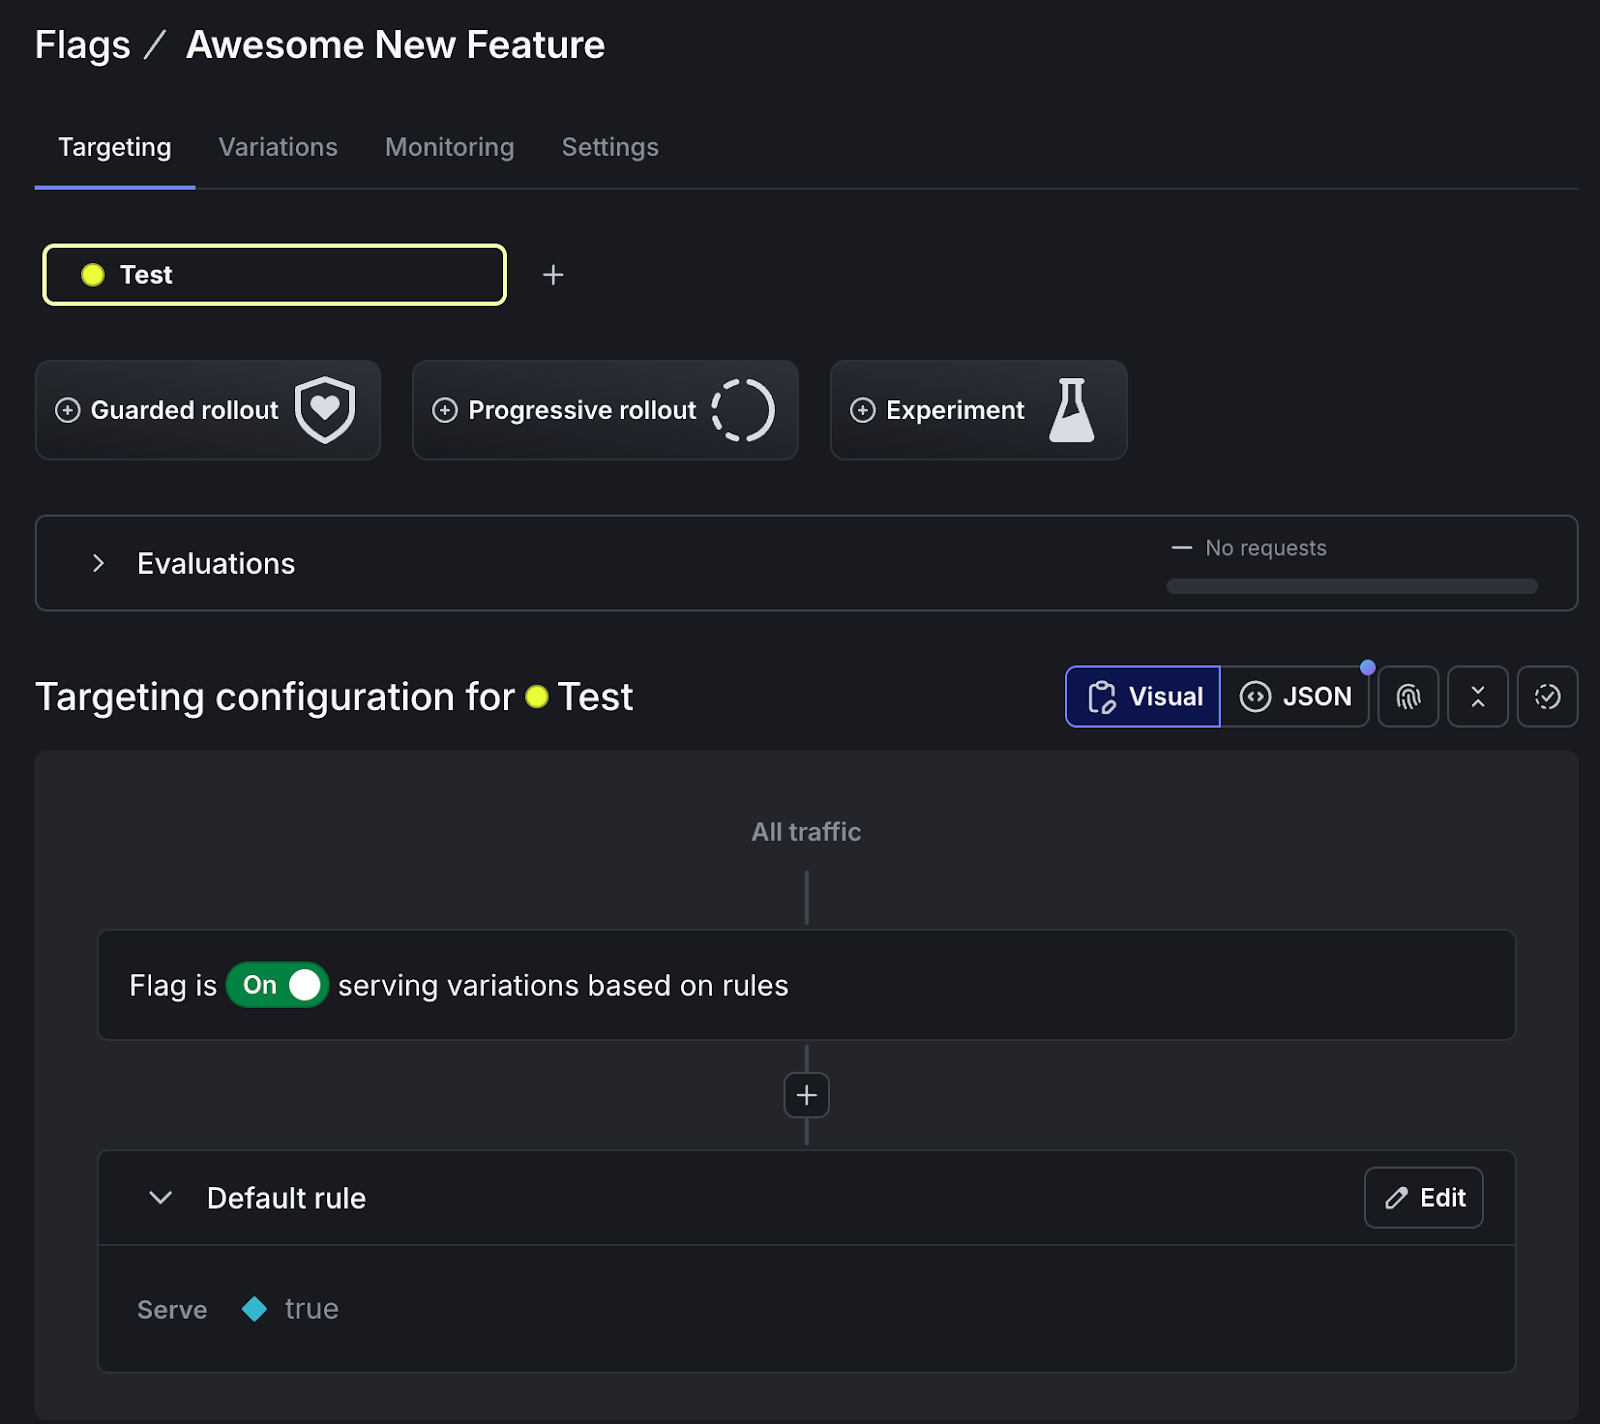
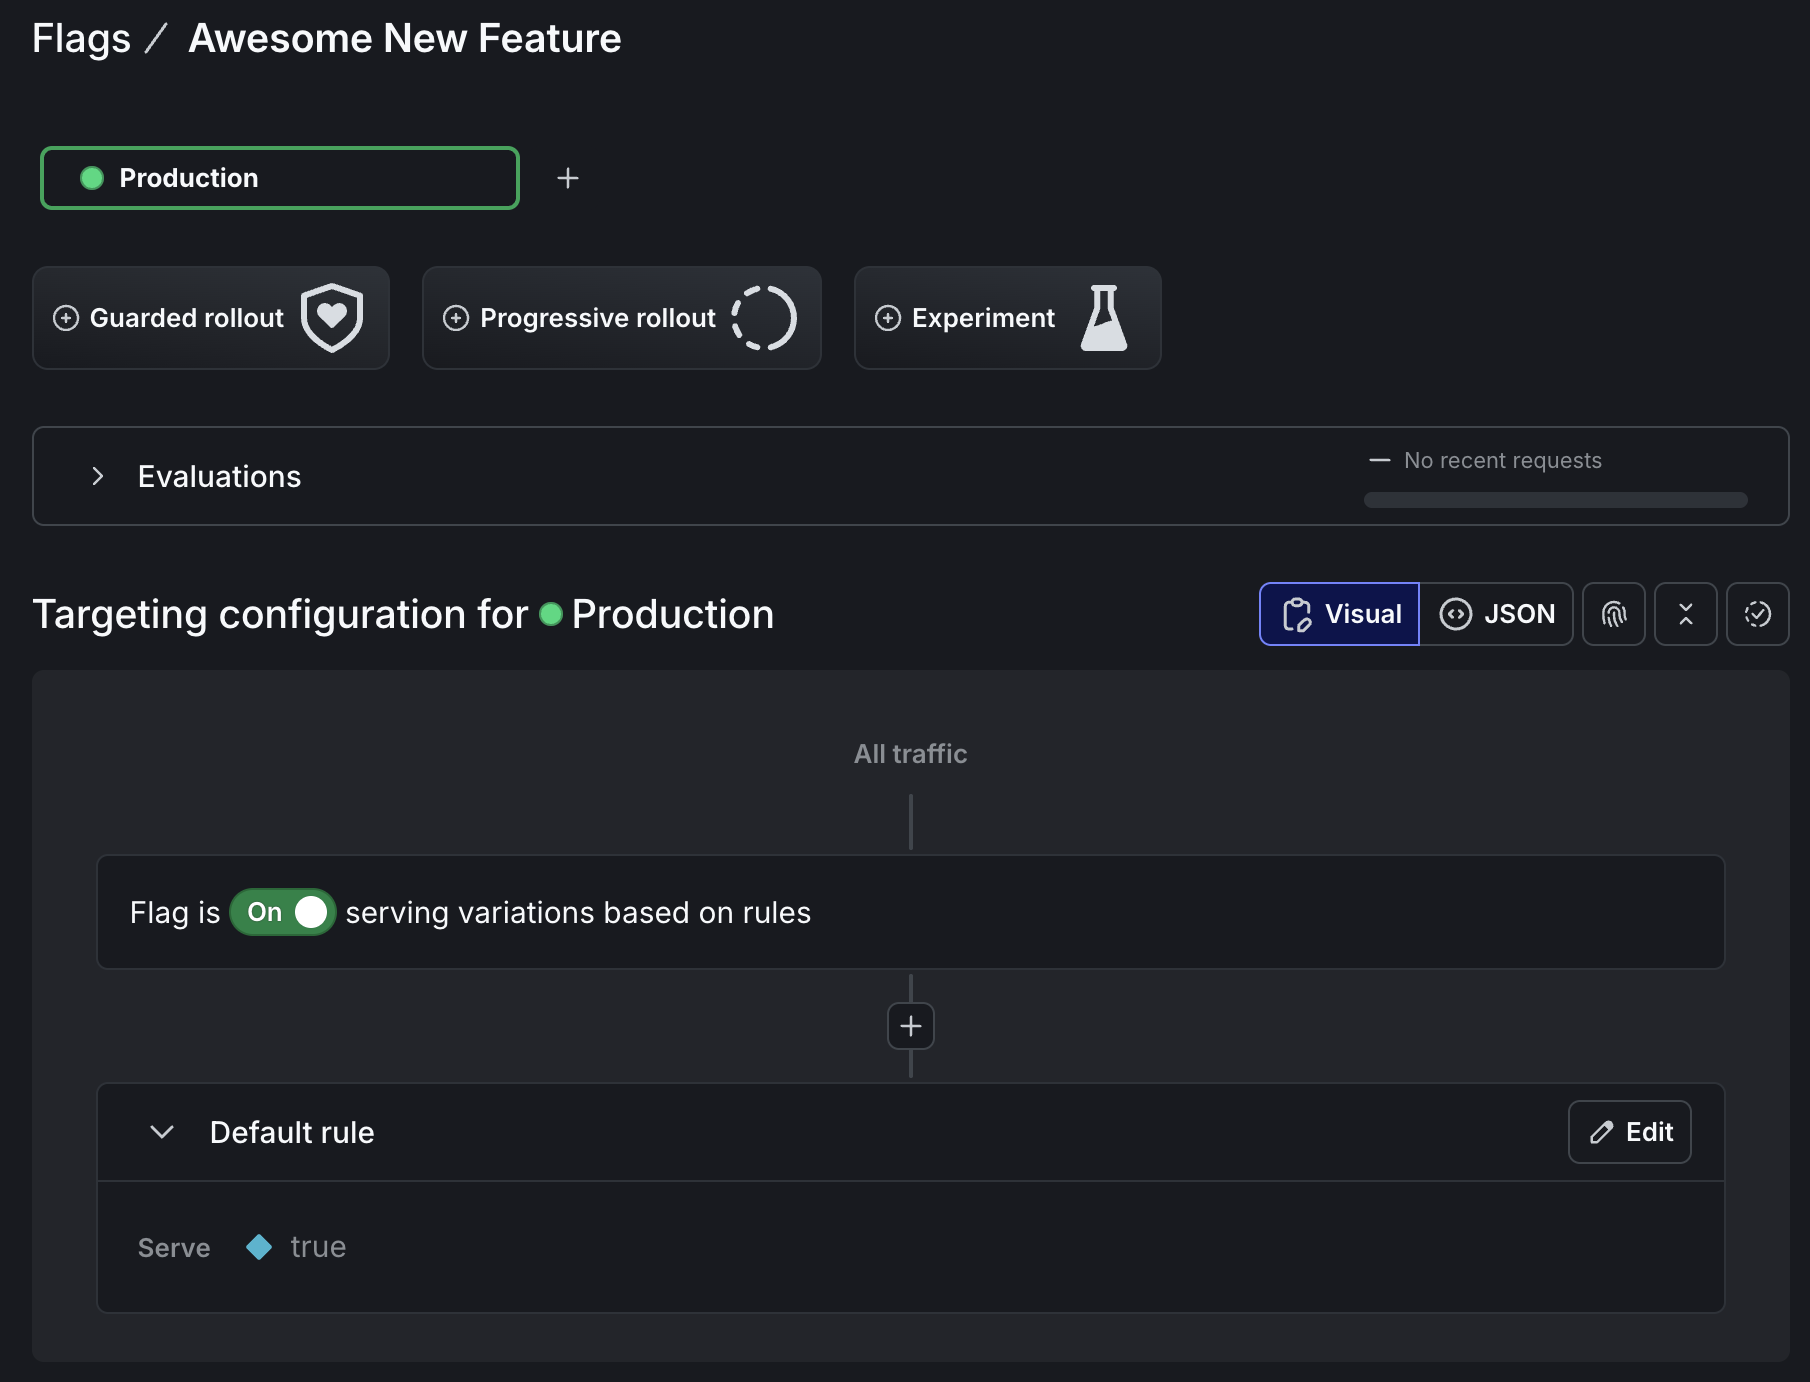
*The awesome-new-feature flag is now turned ON in both the production and test environments! Your awesome new feature is now enabled for all users in these environments.*\
*If you want to target specific users, add rules, or need to verify the flag's status, just let me know!*
You may need to reload the LaunchDarkly UI in your browser to see the updated flag state:
## Adding a flag targeting rule
What if we ask the AI agent to do something a little more complicated? Let's [create a targeting rule](/home/flags/target-rules) so that the flag is serving true for users whose email addresses end in launchdarkly.com. This could be useful if we wanted to roll out our awesome new feature to internal users first, to test for bugs.
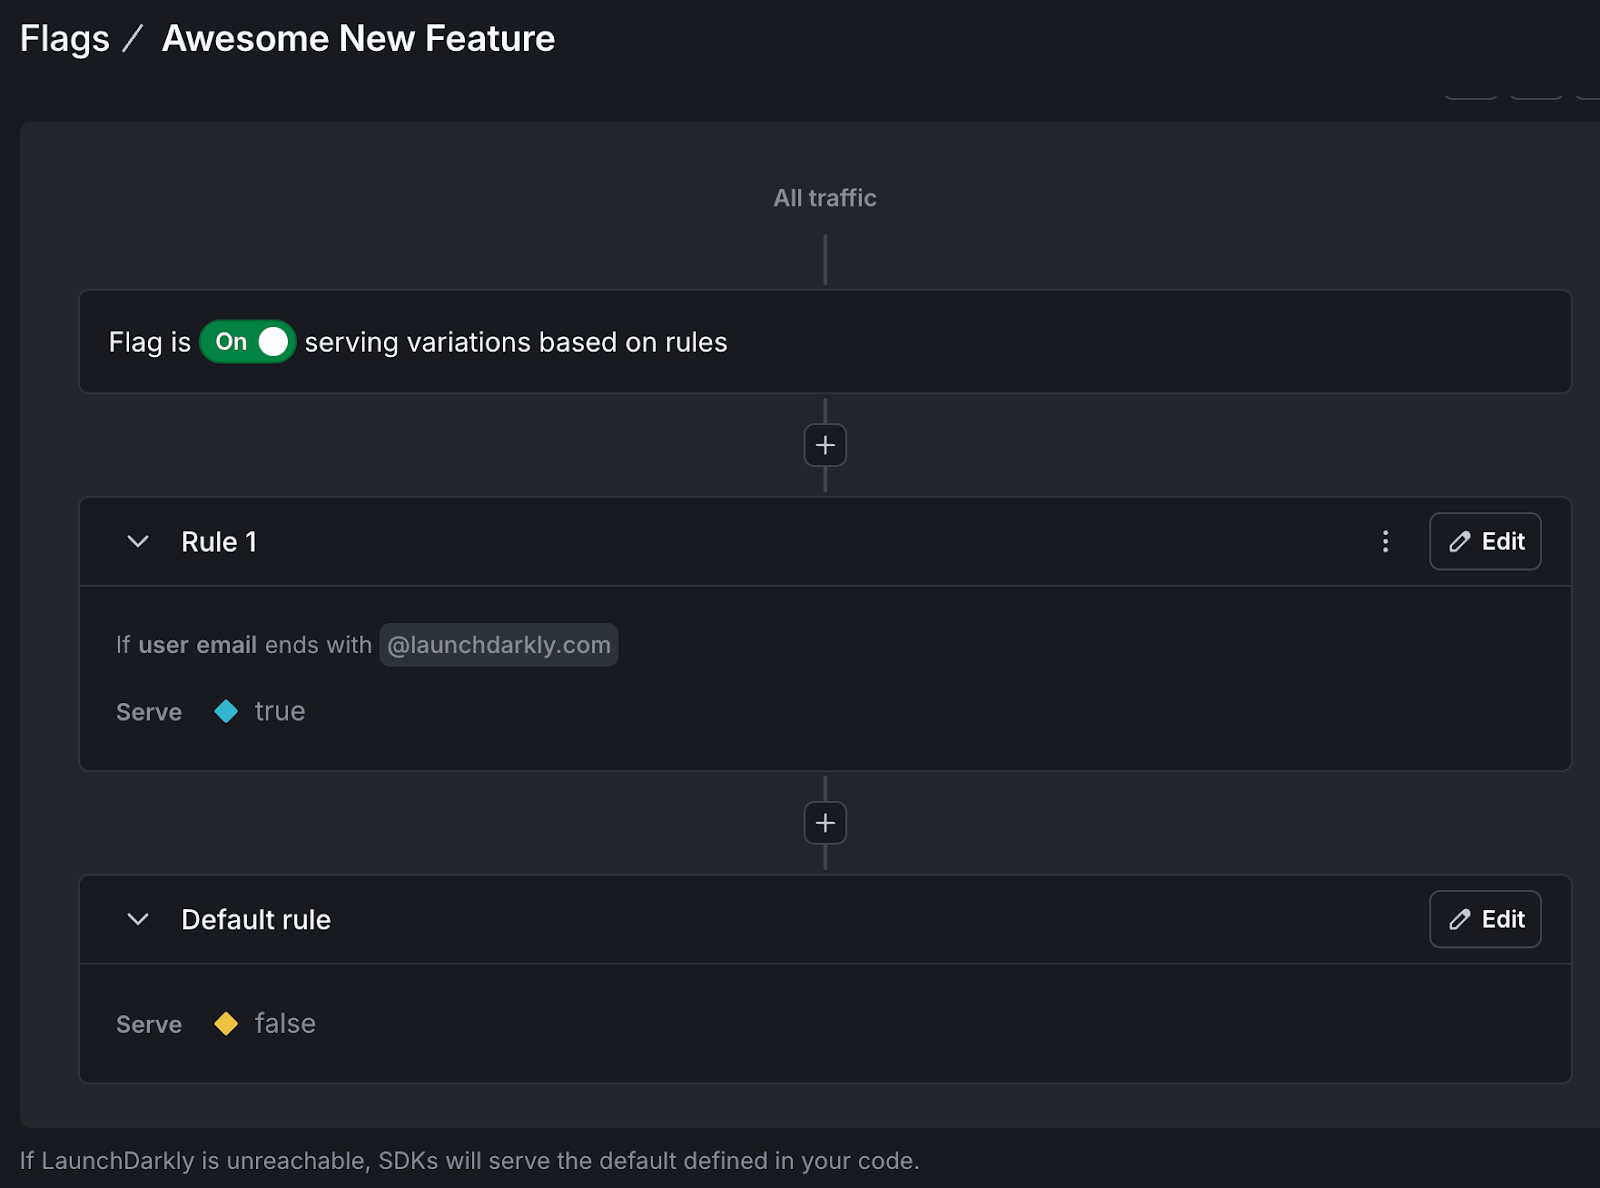
*For the awesome new feature flag, update the targeting rules so the flag is only enabled and serving true for users who have email addresses ending with `launchdarkly.com`. Everyone else should get the false variation.*
*The awesome-new-feature flag is now enabled only for users whose email addresses end with `launchdarkly.com` in both production and test environments. For all other users, the flag will be off.*\
*If you need to further adjust the targeting or want to verify the setup, let me know!*
Checking the AI agent's work in the LaunchDarkly UI, it looks like the targeting updates were successful:
## Evaluating a feature flag
Now that our targeting rule is set up, let's try evaluating our awesome feature flag using a few different contexts.
*Evaluate the awesome new feature flag using the following context:*
`{"name": "tilde", "email": "tthurium@launchdarkly.com"}`
*To evaluate the awesome-new-feature flag for the context:*
`{"name": "tilde", "email": "tthurium@launchdarkly.com"}`
* *The flag is ON, but only enabled for users whose email ends with `@launchdarkly.com`.*
* *The provided email `tthurium@launchdarkly.com` matches this rule.*
*Result: The awesome-new-feature flag will be enabled (true) for this user.*\
*If you want to see the raw evaluation or check for a different context, let me know!*
Great. What about evaluating a context that should be false?
*Evaluate the awesome new feature flag using the following context:*
`{"name": "tilde", "email": "tthurium@foo.com"}`
*For the context `{"name": "tilde", "email": "tthurium@foo.com"}`:*
* *The awesome-new-feature flag is ON, but only enabled for users whose email ends with "`@launchdarkly.com`".*
* *The email `tthurium@foo.com` does not match this rule.*
*Result: The awesome-new-feature flag will be disabled (false) for this user. If you want to check for another context or need the raw evaluation details, let me know!*
You can even pass in the context in natural language rather than JSON.
*Evaluate the value of Awesome New Feature flag with a context where the user has an email address `foo@bar.com`*
Given the current targeting rules for the "Awesome New Feature" flag:
* *The only users who receive the true variation are those whose email ends with `launchdarkly.com`.*
* *All other users receive the false variation.*
*For a user with the email address `foo@bar.com`, the flag will evaluate to false in both the Production and Test environments.*
Note that the LaunchDarkly API doesn't have an endpoint for evaluating feature flags. For that, you'd need to use one of [LaunchDarkly's SDKs](https://launchdarkly.com/docs/sdk). When you evaluate a feature flag via MCP, the AI model is running the evaluation logic. Cool!
## Additional feature flag MCP prompts
Most flag-related actions you can do with the LaunchDarkly REST API can now be done from the comfort of your editor. Here are some examples of additional prompts that you may find useful. Replace the placeholders with the names/keys of your actual flags and projects.
\| Task
| Prompt |
| - |
\| --- |
\| Disabling a feature flag
\| Turn the \$FEATURE\_FLAG\_KEY flag off. |
\| Updating a feature flag description
\| Update the \$FEATURE\_FLAG\_KEY flag description: "When enabled, show the updated UI for my awesome new feature." |
\| Listing all feature flags in a project
\| Show me all the feature flags in the \$PROJECT\_KEY project. |
\| Getting a feature flag's details
\| Tell me about my \$FEATURE\_FLAG\_KEY feature flag. |
\| Adding individual targets
\| Add a new targeting rule for the \$FEATURE\_FLAG\_KEY feature flag so that the user `tthurium@launchdarkly.com` receives the true variation. |
\| Copying a feature flag
\| Create a new feature flag that copies the configuration of the \$FEATURE\_FLAG\_KEY flag, but add V2 to the flag key. |
\| Archiving a feature flag
\| Archive the feature flag \$FEATURE\_FLAG\_KEY. |
\| Deleting a feature flag. (Be careful with this one — the action can't be undone!)
\| Delete the feature flag \$FEATURE\_FLAG\_KEY. |
## Conclusion
In this tutorial you learned how to create and manage feature flags from within your IDE, using the magic of MCP. This can save you time, as well as the mental energy of context switching, which will ultimately help you ship more quickly.
Stay tuned for updates. We're actively working on adding more functionality to our MCP server.
If you enjoyed this tutorial, here's some related reading:
* [A list of awesome MCP servers](https://mcpservers.org/)
* [Getting started with the LaunchDarkly REST API](https://launchdarkly.com/docs/guides/api/rest-api)
* [Customizing user experiences using FastAPI and LaunchDarkly segment targeting](https://launchdarkly.com/blog/tutorial-fastapi-targeting-segment/)
Thanks for following along! If you have any questions, or you want to tell me about the cool stuff you're building, you can reach me via email ([tthurium@launchdarkly.com](mailto:tthurium@launchdarkly.com)), [Bluesky](https://bsky.app/profile/annthurium.bsky.social), [Discord](https://discord.com/invite/launchdarklycommunity), or [LinkedIn](https://www.linkedin.com/in/annthurium/).