> ## Documentation Index
> Fetch the complete documentation index at: https://launchdarkly-preview.mintlify.site/llms.txt
> Use this file to discover all available pages before exploring further.
# AWS PrivateLink
> This topic explains how to configure the AWS PrivateLink integration for LaunchDarkly event egress traffic.
> For the complete documentation index, see [llms.txt](/llms.txt). For the full documentation snapshot, see [llms-full.txt](/llms-full.txt).
The AWS PrivateLink integration is only available to customers on select plans. To learn more, [read about our pricing](https://launchdarkly.com/pricing/). To upgrade your plan, [contact Sales](https://launchdarkly.com/contact-sales/).
## Overview
This topic explains how to configure and use the PrivateLink integration for LaunchDarkly.
The PrivateLink integration lets you configure [AWS PrivateLink](https://aws.amazon.com/privatelink/) to route your event egress traffic through the AWS network backbone. Sending event egress traffic through PrivateLink can significantly reduce NAT Gateway and internet data transfer costs. Additionally, it lets you enforce stricter egress firewalls because none of the traffic to LaunchDarkly will traverse the public internet.
Only event egress traffic is supported for PrivateLink. This traffic is generated by LaunchDarkly SDKs to track various behaviors, such as which contexts have received which variant of a feature flag. PrivateLink is most useful for customers using LaunchDarkly for [experimentation](/guides/experimentation) or [guarded rollouts](/home/releases/guarded-rollouts) because these products can generate significant amounts of event egress traffic. If you want to limit *ingress* traffic for flags, consider using the [Relay Proxy](/sdk/relay-proxy).
## Prerequisites
Before you can configure PrivateLink, you must add your AWS account to our allowlist. Contact your LaunchDarkly account manager or our [Support team](https://support.launchdarkly.com/hc/en-us/requests/new) to get started.
The LaunchDarkly PrivateLink integration is available in all US AWS regions and availability zones.
For other regions, you can use [VPC Peering](https://docs.aws.amazon.com/vpc/latest/userguide/vpc-peering#vpc-peer-region-example).
## Configuring endpoints in different AWS regions
By default, the LaunchDarkly PrivateLink service runs in the `us-east-1` region. AWS supports [cross-region PrivateLink connectivity](https://docs.aws.amazon.com/vpc/latest/privatelink/privatelink-share-your-services.html#endpoint-service-cross-region), which lets you create endpoints in other regions that connect to this service.
You can create PrivateLink endpoints in any of the following AWS regions:
* af-south-1 (Africa – Cape Town)
* ap-east-1 (Asia Pacific – Hong Kong)
* ap-northeast-1 (Asia Pacific – Tokyo)
* ap-northeast-2 (Asia Pacific – Seoul)
* ap-northeast-3 (Asia Pacific – Osaka)
* ap-south-1 (Asia Pacific – Mumbai)
* ap-south-2 (Asia Pacific – Hyderabad)
* ap-southeast-1 (Asia Pacific – Singapore)
* ap-southeast-2 (Asia Pacific – Sydney)
* ap-southeast-3 (Asia Pacific – Jakarta)
* ap-southeast-4 (Asia Pacific – Melbourne)
* ca-central-1 (Canada – Central)
* ca-west-1 (Canada – West)
* eu-central-1 (Europe – Frankfurt)
* eu-central-2 (Europe – Zurich)
* eu-north-1 (Europe – Stockholm)
* eu-south-1 (Europe – Milan)
* eu-south-2 (Europe – Spain)
* eu-west-1 (Europe – Ireland)
* eu-west-2 (Europe – London)
* eu-west-3 (Europe – Paris)
* il-central-1 (Israel – Tel Aviv)
* me-central-1 (Middle East – UAE)
* me-south-1 (Middle East – Bahrain)
* sa-east-1 (South America – São Paulo)
* us-east-1 (US East – N. Virginia)
* us-east-2 (US East – Ohio)
* us-west-1 (US West – N. California)
* us-west-2 (US West – Oregon)
When creating an endpoint outside of `us-east-1`, do the following:
1. In the AWS Console, check the **Enable Cross Region endpoint** box under **Service Region.**
2. Set the service region to `us-east-1.`
3. Click **Verify service** after selecting these options.
When using the AWS CLI, include the `--service-region us-east-1` argument when creating endpoints outside of `us-east-1`. Do not include this argument when creating endpoints in `us-east-1`.For example:
```title="CLI Argument" theme={null}
aws ec2 create-vpc-endpoint \
--vpc-id vpc-0123456789abcdef0 \
--vpc-endpoint-type Interface \
--service-name com.amazonaws.vpce.us-east-1.vpce-svc-02ce0367b7e976a75 \
--service-region us-east-1 \
--subnet-ids subnet-11111111 subnet-22222222 \
--security-group-ids sg-12345678
```
## Configure the Launch
Darkly integration in the AWS Console
This section describes how you use the AWS Console to configure the integration. You can also use [Terraform](https://registry.terraform.io/providers/hashicorp/aws/latest/docs/resources/vpc_endpoint) or [CloudFormation](https://docs.aws.amazon.com/AWSCloudFormation/latest/UserGuide/aws-resource-ec2-vpcendpoint.html) to configure the integration.
To configure the integration in the AWS Console:
1. Go to the [AWS VPC Console](https://console.aws.amazon.com/vpc/) in the `us-east-1` region. If you are configuring an endpoint in another region, follow the steps in [Configuring endpoints in different AWS regions](#configuring-endpoints-in-different-aws-regions).
2. Click **Endpoints** in the left navigation pane.
3. Click the **Create Endpoint** button in the top right. The **Create Endpoint** page appears.
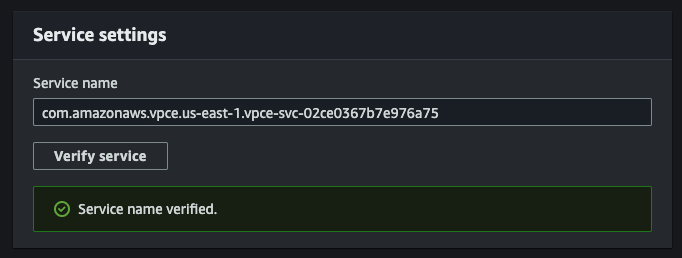
4. Enter your endpoint name, select **PrivateLink Ready partner services** as the category, enter `com.amazonaws.vpce.us-east-1.vpce-svc-02ce0367b7e976a75` as the service name, and click **Verify Service.**
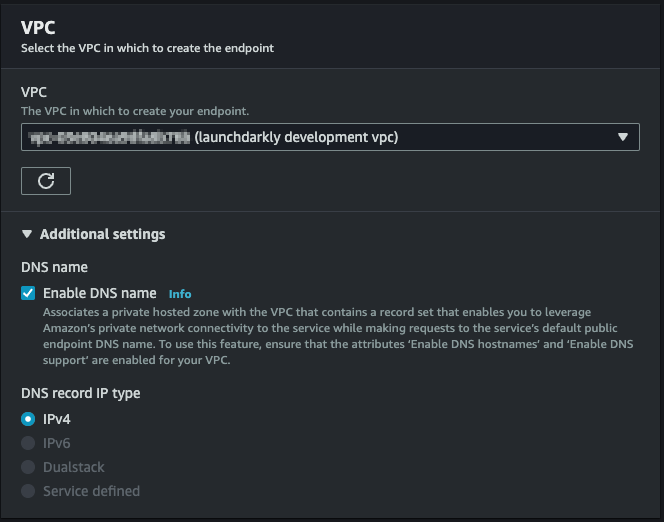
5. Select the VPC to connect to the endpoint from.
6. Select **Enable DNS Name** in **Additional Settings.** This enables `events.launchdarkly.com` to resolve to this endpoint from within this VPC.
7. Select subnets to use for the Availability Zones that you would like the endpoint to exist in.
8. Select or create a Security Group that allows inbound access on port `443` from the VPC.
9. Click **Create Endpoint.** The endpoint enters a `Pending` state. When the endpoint has been provisioned and becomes `Available`, traffic will begin to route through it.