> ## Documentation Index
> Fetch the complete documentation index at: https://launchdarkly-preview.mintlify.site/llms.txt
> Use this file to discover all available pages before exploring further.
# mParticle
> This topic explains how to create and test an mParticle destination for Data Export.
> For the complete documentation index, see [llms.txt](/llms.txt). For the full documentation snapshot, see [llms-full.txt](/llms-full.txt).
## Overview
This topic explains how to create and test an mParticle destination for Data Export.mParticle is a customer data platform that allows you to aggregate your analytics and create customer cohorts.
## Prerequisites
To set up an mParticle destination in LaunchDarkly, you need:
* Your mParticle server-to-server key
* Your mParticle server-to-server secretThe key and secret are available in your mParticle account. Copy and save both strings. You'll need them to connect mParticle to LaunchDarkly. Here is an image of the mParticle API keys dialog:
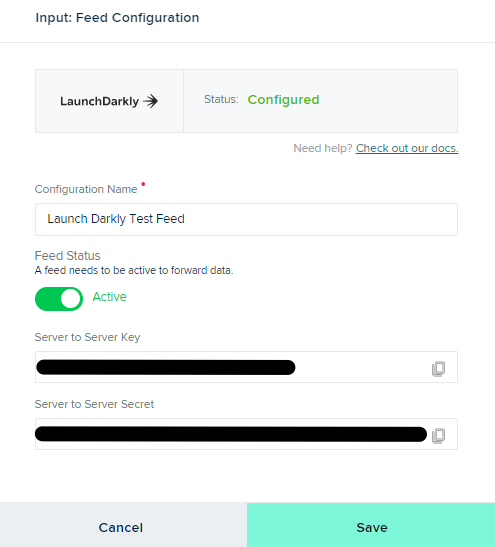
## Create the m
Particle destination in LaunchDarklyYou can use the LaunchDarkly UI to create and modify destinations for Data Export.
To create an mParticle destination in LaunchDarkly:
1. In LaunchDarkly, click the **gear** icon in the left sidenav to view Organization settings.
2. Click **Integrations** and find "mParticle."
3. Click **Add integration.** The "Create a destination" panel appears.
4. (Optional) Enter a **Name** for the destination.
5. Select a **Project and environment** for this destination to receive events from.
You cannot change an environment after you create the destination. If you wish to export event data from a different environment, you must set up another destination.
6. Select an **mParticle Environment**.
7. Enter your mParticle server-to-server key in the **API key** field.
8. Enter your mParticle server-to-server secret in the **API secret** field.
9. Click **Add a mapping**.
10. Select a **LaunchDarkly Context**.
11. Select an **mParticle User Identifier**.
The user identifier you choose must match an identifier you chose to identify users in the mParticle ecosystem.
Every event LaunchDarkly exports has a context key specified by the SDK. The user identifier should correspond to the mParticle user identity your SDK context key represents. For example, if your context key represents a customer ID, you should choose `customer_id` as the user identifier.
To learn more about exported events, read [Streaming Data Export schema reference](/integrations/data-export/schema-reference).
11. Click **Add mapping**.
12. Check the checkbox indicating you consent to the Integration Terms and Conditions.
13. Click **Save destination**.The mParticle destination appears in the "Your data export destinations" section of the **Integrations** screen.
## Test an m
Particle destinationAfter you save the destination, send a test event to confirm that the destination is configured properly.
To send a test event:
1. Navigate to the **Integrations** page and find "mParticle."
2. Click into the "mParticle" section to display a list of destinations.
3. Click the **pencil** icon next to the destination you want to test. The "Edit destination" panel appears.
4. In the "Send a test event" section, click **Send event**.
5. Verify the event appears on the mParticle events live stream.
## Example events
These example events display the structure of the events LaunchDarkly sends to mParticle.
LaunchDarkly sends events in the following formats:
```json title="Feature event" theme={null}
{
"user_identities": {
"customer_id": "EXAMPLE-CUSTOMER"
},
"environment": "EXAMPLE-ENVIRONMENT-NAME",
"events": [
{
"event_type": "CUSTOM-EVENT",
"data": {
"source_message_id": "###-##",
"event_name": "EXAMPLE-FEATURE-NAME",
"timestamp_unixtime_ms": 1590697814783,
"custom_event_type": "other",
"custom_attributes": {
"project": "EXAMPLE-PROJECT-NAME",
"environment": "5d4b12345d2a2806bd2cc6eb",
"version": "1",
"key": "flag",
"value": "true",
"flag_version": "42",
"default": "false",
"reason_kind": "FALLTHROUGH",
"prerequisite_of": "PARENT-FLAG",
"event_type": "custom_event"
}
}
}
]
}
```
```json title="Click event" theme={null}
{
"user_identities": {
"customer_id": "EXAMPLE-CUSTOMER"
},
"environment": "EXAMPLE-ENVIRONMENT-NAME",
"events": [
{
"event_type": "CUSTOM-EVENT",
"data": {
"source_message_id": "###-##",
"event_name": "click",
"timestamp_unixtime_ms": 1579630914337,
"custom_event_type": "navigation",
"custom_attributes": {
"project": "project",
"environment": "5d4b12345d2a2806bd2cc6eb",
"version": "1",
"key": "EXAMPLE-CLICK-EVENT-KEY",
"selector": "btn",
"url": "http://example.com?queryParam=this",
"event_type": "custom_event"
}
}
}
]
}
```
```json title="Custom event" theme={null}
{
"user_identities": {
"customer_id": "EXAMPLE-CUSTOMER"
},
"environment": "EXAMPLE-ENVIRONMENT-NAME",
"events": [
{
"event_type": "custom_event",
"data": {
"source_message_id": "###-##",
"event_name": "custom",
"timestamp_unixtime_ms": 1590698576956,
"custom_event_type": "other",
"custom_attributes": {
"project": "project",
"environment": "5d4b12345d2a2806bd2cc6eb",
"version": "1",
"key": "EXAMPLE-CUSTOM-EVENT-KEY",
"event_type": "custom_event"
}
}
}
]
}
```
```json title="Page event" theme={null}
{
"user_identities": {
"customer_id": "EXAMPLE-CUSTOMER"
},
"environment": "EXAMPLE-ENVIRONMENT-NAME",
"events": [
{
"event_type": "screen_view",
"data": {
"source_message_id": "###-##",
"screen_name": "http://example.com",
"timestamp_unixtime_ms": 1590698654895,
"custom_attributes": {
"project": "project",
"environment": "5d4b12345d2a2806bd2cc6eb",
"version": "1",
"key": "EXAMPLE-PAGEVIEW-EVENT-KEY",
"url": "http://example.com?queryParam=this"
}
}
}
]
}
```
## Enable Data Export for flags and environments
After you create a Data Export destination, you must start sending flag or environment event data to it. You can enable Data Export for individual flags, or for all the flags in an environment.
To learn more, read [Export event data for flags and environments](/integrations/data-export#export-event-data-for-flags-and-environments)
## Delete an m
Particle destinationYou can delete a Data Export destination from the **Integrations** screen.
To delete a destination:
1. Navigate to the **Integrations** page and find "mParticle."
2. Click into the "mParticle" section to display a list of destinations.
3. Click the **pencil** icon next to the destination you wish to delete. The "Edit destination" panel appears.
4. Click **Delete destination**.