> ## Documentation Index
> Fetch the complete documentation index at: https://launchdarkly-preview.mintlify.site/llms.txt
> Use this file to discover all available pages before exploring further.
# Amazon Kinesis
> This topic explains how to create and test an Amazon Kinesis destination for Data Export.
> For the complete documentation index, see [llms.txt](/llms.txt). For the full documentation snapshot, see [llms-full.txt](/llms-full.txt).
## Overview
This topic explains how to create and test an Amazon Kinesis destination for Data Export.
You can export all of the flag evaluation and event data generated by LaunchDarkly SDKs to a Kinesis data stream.
## Prerequisites
To set up a Kinesis destination, you must configure your AWS account with the following information:
* A Kinesis stream you want to export the data to. You can use an existing stream if you already have one.
* An IAM policy that can put records into your Kinesis stream
* An IAM role that LaunchDarkly can assume that provides access to the policy
If you don't already have a Kinesis stream, create one by reading [Amazon's documentation](https://docs.aws.amazon.com/streams/latest/dev/amazon-kinesis-streams.html).
As a best practice, we recommend that you use **1 shard for every 50 million events you send us a month**. This recommendation is an estimate based on typical usage patterns, not a requirement.
To prevent performance degradation, adjust your shard count based on your actual usage at peak times. If you expect usage spikes, provision more shards. If you do not use enough shards for the load, AWS may throttle your data stream. If this happens, you may experience data loss.
## Create the IAM Policy
This section explains how to create an IAM policy to support the Kinesis Data Export.
If you create a new Kinesis stream, write down or save the following information:
* Region
* Stream name
* Stream ARN
You will need this information when you configure your export.
To create an IAM policy:
1. Sign in to the [Identity and Access Management (IAM) console](https://console.aws.amazon.com/iam/).
2. Follow [Amazon's documentation](http://docs.aws.amazon.com/IAM/latest/UserGuide/access_policies_create.html) to create an IAM policy that allows LaunchDarkly to write to your Kinesis Stream.
3. Select the **Create Policy from JSON** option.
4. Use the following template policy to configure the Policy Document field:
```json title="Example policy" theme={null}
{
"Version": "2012-10-17",
"Statement": [
{
"Effect": "Allow",
"Action": [
"kinesis:PutRecord",
"kinesis:PutRecords"
],
"Resource": [
"arn:aws:kinesis:{region}:{account-id}:stream/{stream-name}"
]
}
]
}
```
5. If you have a *stream ARN* already configured, you can paste the entire ARN in. At least, change the following fields to include the values you specified during IAM policy configuration:
* `{region}`
* `{account-id}`
* `{stream-name}`.
6. Click **Save**.
7. After you create the policy, write down or save the policy's name.
## Create an IAM Role
This section explains how to create a cross-account IAM role for LaunchDarkly to assume so it can access the policy.
To create a cross-account IAM role:
1. Log into AWS and [access the IAM section](https://console.aws.amazon.com/iamhome#/roles\$new?step=type\&roleType=crossAccount).
2. Copy the account ID:
```bash title="Account ID" theme={null}
554582317989
```
```bash title="Account ID, federal" theme={null}
341100992732
```
3. Enter the account ID into the **Account ID** field. This allows LaunchDarkly to assume the role:
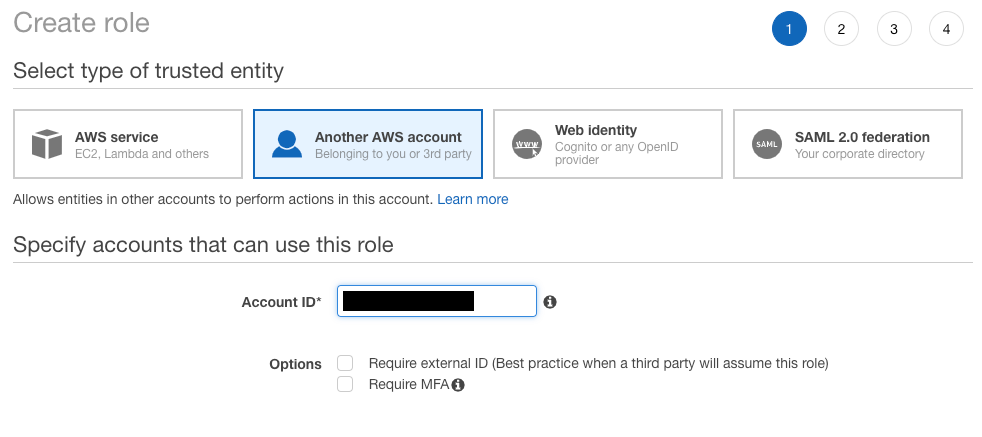
4. Add the policy you created earlier to this role. Write down or save the role ARN.
It's safe and straightforward to set up the role as described above, but your organization may have security requirements limiting what kind of roles you can trust.
If your organization's security policies require you to trust a specific role, we've provided a role for you to trust instead. Only Data Export services can assume this role, not accounts belonging to people.
The role is: `arn:aws:iam::554582317989:role/LaunchDarkly-data-export`
Trust our role by following a procedure in [Amazon's documentation](https://docs.aws.amazon.com/IAM/latest/UserGuide/id_roles_manage_modify.html#roles-managingrole-editing-console).
## Create the Kinesis Destination in Launch
Darkly
Using the region, stream name, and role ARN from earlier in the procedure, you can now create the Kinesis destination within LaunchDarkly.
To create the Kinesis destination:
1. In LaunchDarkly, click the **gear** icon in the left sidenav to view Organization settings.
2. Click **Integrations** and find "Amazon Kinesis."
3. Click **Add integration.** The "Create a destination" panel appears.
4. (Optional) Enter a **Name** for the destination.
5. Choose an environment from the **Environment** menu.
6. Enter the AWS data you saved earlier:
* AWS Kinesis stream region
* Role address
* AWS Kinesis stream name
7. Click **Save destination**.
## Test a Kinesis Destination
After you save the destination, send a test event to confirm that the destination is configured properly.
To send a test event:
1. Navigate to the **Integrations** page and find "Amazon Kinesis."
2. Click into the "Amazon Kinesis" section to display a list of destinations.
3. Click the **pencil** icon next to the destination you want to test. The "Edit destination" panel appears.
4. In the "Send a test event" section, click **Send event**.
5. If you have configured the destination correctly, an event is logged in the Kinesis destination.
6. Identify a successful test event by searching for the context key or flag key `LaunchDarklyDataExportTestEvent`. When this key appears in the destination, you know the test event arrived.
Kinesis records have [partition keys](https://docs.aws.amazon.com/streams/latest/dev/key-concepts.html#partition-key). When LaunchDarkly creates a record, it creates a random partition key.
## Consume the Kinesis Data Stream
Kinesis Data Streams are very flexible. You can consume them in a lambda function, write an application to consume the streams, and use a number of pre-built AWS integrations.
A common use case is to use the Data Stream to populate a data store, such as S3 or Redshift, by setting the Kinesis Data Stream as a source to a Kinesis Data Firehose. To learn how to do this, read [Amazon's documentation](https://docs.aws.amazon.com/firehose/latest/dev/writing-with-kinesis-streams.html).
## Enable Data Export for flags and environments
After you create a Data Export destination, you must start sending flag or environment event data to it. You can enable Data Export for individual flags, or for all the flags in an environment.
To learn more, read [Export event data for flags and environments](/integrations/data-export#export-event-data-for-flags-and-environments).
## Delete a Kinesis destination
You can delete a Data Export destination from the **Integrations** screen.
To delete a destination:
1. Navigate to the **Integrations** page and find "Amazon Kinesis."
2. Click into the "Amazon Kinesis" section to display a list of destinations.
3. Click the **pencil** icon next to the destination you wish to delete. The "Edit destination" panel appears.
4. Click **Delete destination**.