> ## Documentation Index
> Fetch the complete documentation index at: https://launchdarkly-preview.mintlify.site/llms.txt
> Use this file to discover all available pages before exploring further.
# Quickstart for AI Configs
> This topic explains how to get started with the LaunchDarkly AI Configs product.
> For the complete documentation index, see [llms.txt](/llms.txt). For the full documentation snapshot, see [llms-full.txt](/llms-full.txt).
## Overview
This topic explains how to get started with the LaunchDarkly AI Configs product.
You can use AI Configs to customize, test, and roll out new large language models (LLMs) within your generative AI applications. Use AI Configs to:
* Manage your model configuration and messages outside of your application code.
* Upgrade your app to the newest model version, then gradually release to your customers.
* Add a new model provider and progressively move your production traffic.
* Compare variations to find the best-performing prompt and model.
AI Configs can be created in two modes:
* Completion mode: Configure prompts with messages and roles for single-step model responses. Completion mode supports multi-message prompts, including chat-style prompts. In LaunchDarkly, completion mode is a product mode and does not map to a specific provider API.
* Agent mode: Configure structured multi-step workflows using instructions. Agent mode is designed for coordinating structured, multi-step workflows within your application. For agent-based variations, invoke a judge programmatically using the AI SDK. To learn more, read [Agents in AI Configs](/home/ai-configs/agents).
Tool integration depends on your SDK and model provider integration, not on the AI Config mode. Agent mode is optimized for structured multi-step workflows, but tool usage is not limited to agent mode.
This quickstart focuses on AI Configs in completion mode.
AI Configs can also be created in agent mode, which uses instructions to define multi-step workflows. Agent mode is documented separately in [Agents in AI Configs](/home/ai-configs/agents).
You can attach judges to completion-mode AI Config variations in the LaunchDarkly UI. For other variations, invoke a judge programmatically using the AI SDK. To learn more, read [Online evaluations in AI Configs](/home/ai-configs/online-evaluations).
With AI Configs, messages and model configuration are customized for each end user at runtime. You can update messages and model configuration without redeploying your application.
Working with AI Configs requires a role that allows [AI Config actions](/home/account/roles/role-actions#ai-config-actions). The LaunchDarkly Project Admin, Maintainer, and Developer project roles, as well as the Admin and Owner base roles, include this permission.
Follow the steps below to incorporate AI Configs into your app, or use the [in-app onboarding experience](https://app.launchdarkly.com/projects/default/onboarding) to set up your first AI Config directly in the LaunchDarkly UI.
To learn from an example that's built on a specific generative AI application, read one of our [guides](/guides/ai-configs):
* [Managing AI model configuration outside of code with the Node.js AI SDK](/guides/ai-configs/config-outside-code-nodejs)
* [Using targeting to manage AI model usage by tier with the Python AI SDK](/guides/ai-configs/targeting-python)
You can use AI Configs with any model provider, including Gemini, OpenAI, and Anthropic. To learn how to use OpenAI or Anthropic models with AI Configs, read the examples in [Customize the AI Config](#customize-the-ai-config). To learn how to use Gemini models, including how to cache prompts, read [Use Gemini prompt caching with AI Configs](#use-gemini-prompt-caching-with-ai-configs).
You can also use the [LaunchDarkly demo sandbox](https://demo.app.launchdarkly.com/).
AI Configs is an add-on feature. Access depends on your organization's LaunchDarkly plan. If AI Configs does not appear in your project, your organization may not have access to it.
To enable AI Configs for your organization, contact your LaunchDarkly account team. They can confirm eligibility and assist with activation.
For information about pricing, visit the LaunchDarkly [pricing page](https://launchdarkly.com/pricing/) or contact your LaunchDarkly account team.
## Step 1, in your app: Install an AI SDK
First, install one of the [LaunchDarkly AI SDKs](/sdk/ai) in your app:
```csharp title=".NET AI SDK" theme={null}
Install-Package LaunchDarkly.ServerSdk
Install-Package LaunchDarkly.ServerSdk.Ai
```
```go title="Go AI SDK" theme={null}
import (
ld "github.com/launchdarkly/go-server-sdk/v7"
"github.com/launchdarkly/go-server-sdk/ldai"
)
```
```js title="Node.js AI SDK (TypeScript)" theme={null}
npm install @launchdarkly/node-server-sdk
npm install @launchdarkly/server-sdk-ai
```
```python title="Python AI SDK" theme={null}
pip install launchdarkly-server-sdk
pip install launchdarkly-server-sdk-ai
```
```ruby title="Ruby AI SDK" theme={null}
gem install launchdarkly-server-sdk
gem install launchdarkly-server-sdk-ai
```
Next, import the LaunchDarkly AI client in your app and initialize a single, shared instance of it:
```csharp title=".NET AI SDK" theme={null}
using LaunchDarkly.Sdk.Server.Ai;
using LaunchDarkly.Sdk.Server.Ai.Adapters;
using LaunchDarkly.Sdk.Server.Ai.Config;
var baseClient = new LdClient(Configuration.Builder("sdk-key-123").StartWaitTime(TimeSpan.FromSeconds(5)).Build());
var aiClient = new LdAiClient(new LdClientAdapter(baseClient));
```
```go title="Go AI SDK" theme={null}
client, err := ld.MakeClient("YOUR_SDK_KEY", 5*time.Second)
if err != nil {
// handle error creating the LaunchDarkly client
}
aiClient, err := ldai.NewClient(client)
if err != nil {
// handle error creating the AI client
}
```
```ts title="Node.js AI SDK (TypeScript)" theme={null}
import { init } from '@launchdarkly/node-server-sdk';
import { initAi, LDAIClient } from '@launchdarkly/server-sdk-ai';
const ldClient = init('YOUR_SDK_KEY');
async function start() {
try {
await ldClient.waitForInitialization();
// initialization complete
} catch (error) {
// SDK failed to initialize
}
const aiClient: LDAIClient = initAi(ldClient);
// use aiClient here
}
start();
```
```python title="Python AI SDK" theme={null}
import ldclient
from ldclient.context import Context
from ldclient.config import Config
from ldai.client import LDAIClient
ldclient.set_config(Config("YOUR_SDK_KEY"))
aiclient = LDAIClient(ldclient.get())
```
```ruby title="Ruby AI SDK" theme={null}
require 'launchdarkly-server-sdk'
require 'launchdarkly-server-sdk-ai'
ld_client = LaunchDarkly::LDClient.new("YOUR_SDK_KEY")
ai_client = LaunchDarkly::Server::AI::Client.new(ld_client)
```
The AI SDKs each require that you specify your SDK key to authorize your application to connect to a particular environment within LaunchDarkly. SDK keys are specific to each project and environment. They are available from **Project settings**, on the **Environments** list in the LaunchDarkly UI. To learn more, read [Keys](/sdk/concepts/client-side-server-side#keys).
Then, set up the context. Contexts are the people or resources who will encounter generated AI content in your application. The context attributes determine which variation of the AI Config LaunchDarkly serves to the end user, based on the targeting rules in your AI Config. If you are using template variables in the messages in your AI Config's variations, the context attributes also fill in values for the template variables.
Here's how:
```csharp title=".NET AI SDK" theme={null}
using LaunchDarkly.Sdk;
var context = Context.Builder("example-user-key")
.Kind("user")
.Name("Sandy")
.Build();
```
```go title="Go AI SDK" theme={null}
import "github.com/launchdarkly/go-sdk-common/v3/ldcontext"
context := ldcontext.NewBuilder("example-user-key").
Kind("user").
Name("Sandy").
Build()
```
```ts title="Node.js AI SDK (TypeScript)" theme={null}
import { LDContext } from '@launchdarkly/node-server-sdk';
const context: LDContext = {
kind: 'user',
key: 'example-user-key',
name: 'Sandy',
};
```
```python title="Python AI SDK" theme={null}
from ldclient.context import Context
context = Context.builder('example-user-key').kind('user').name('Sandy').build()
```
```ruby title="Ruby AI SDK" theme={null}
context = LaunchDarkly::LDContext.create(
key: 'example-user-key',
kind: 'user',
name: 'Sandy'
)
```
## Step 2, in Launch
Darkly: Create an AI Config
Next, create an AI Config in LaunchDarkly:
1. In the left navigation, select **AI Configs**, then click **Create AI Config**.
2. In the "Create AI Config" dialog, select **Completion**. This quickstart covers completion mode only. For agent mode, read [Agents in AI Configs](/home/ai-configs/agents).
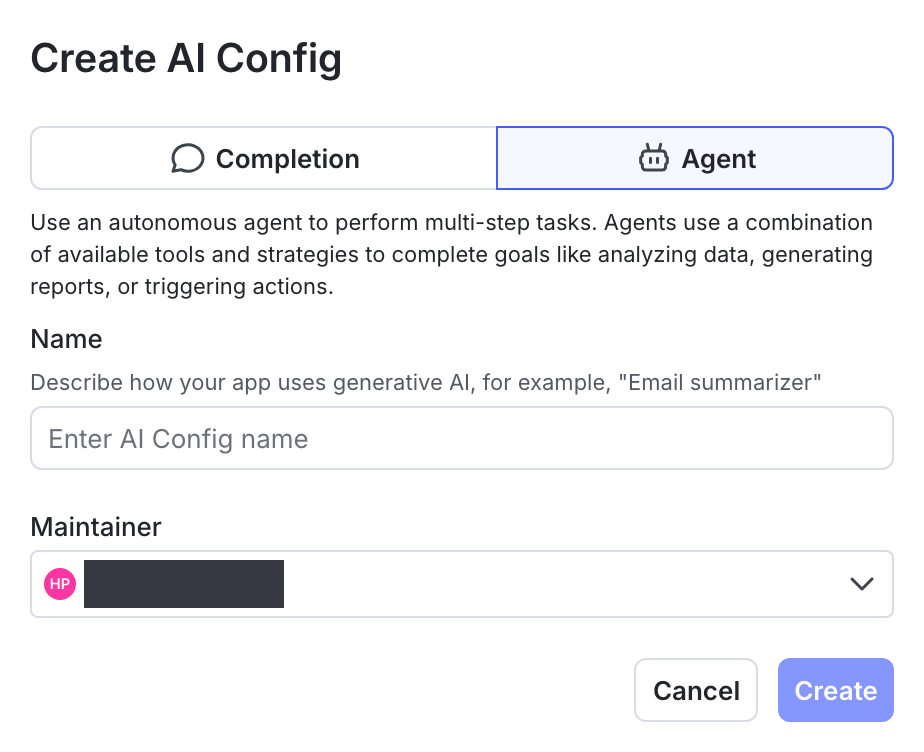
3. Enter a name for your AI Config, and optionally assign a maintainer.
4. Click **Create**.
After you create the AI Config, the **Variations** tab appears.
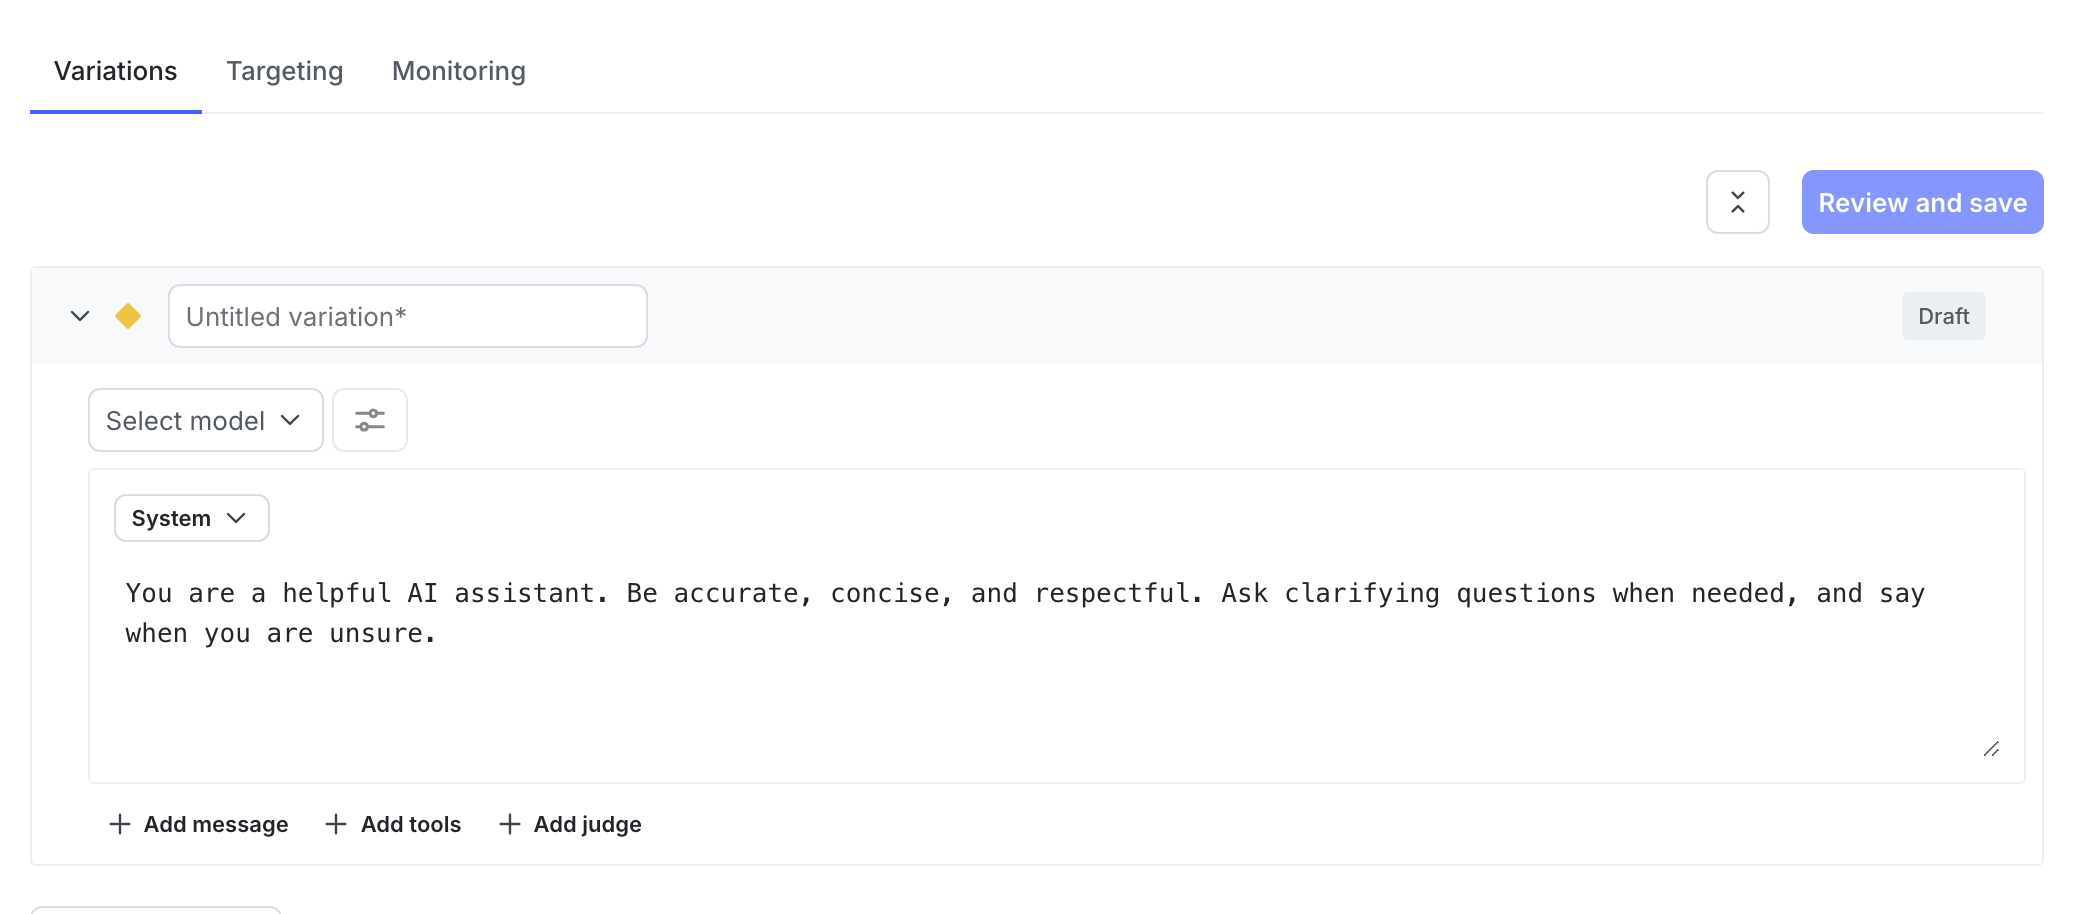
Then, create a variation. Every completion-based AI Config has one or more variations. Each variation includes a model configuration and, optionally, one or more messages.
Here's how:
1. In the **Variations** tab, replace "Untitled variation" with a variation **Name**. You'll use this to refer to the variations when you set up targeting rules, below.
2. Click **Select a model** and choose the model to use.
* LaunchDarkly provides a list of common models, and updates it regularly.
* You can also choose **+ Add a model** and create your own. To learn more, read [Create AI model configurations](/home/ai-configs/create-model-config).
3. (Optional) Select a **message role** and enter the message for the variation. If you'd like to customize the message at runtime, use `{{ example_variable }}` or `{{ ldctx.example_context_attribute }}` within the message. The LaunchDarkly AI SDK will substitute the correct values when you customize the AI Config from within your app.
* To learn more about how variables and context attributes are inserted into messages at runtime, read [Customizing AI Configs](/sdk/features/ai-config).
4. Click **Review and save**.
You can also select **Import from playground** in your variation to bring your model, model parameters, and messages from an external playground.
Here's an example of a completed variation:
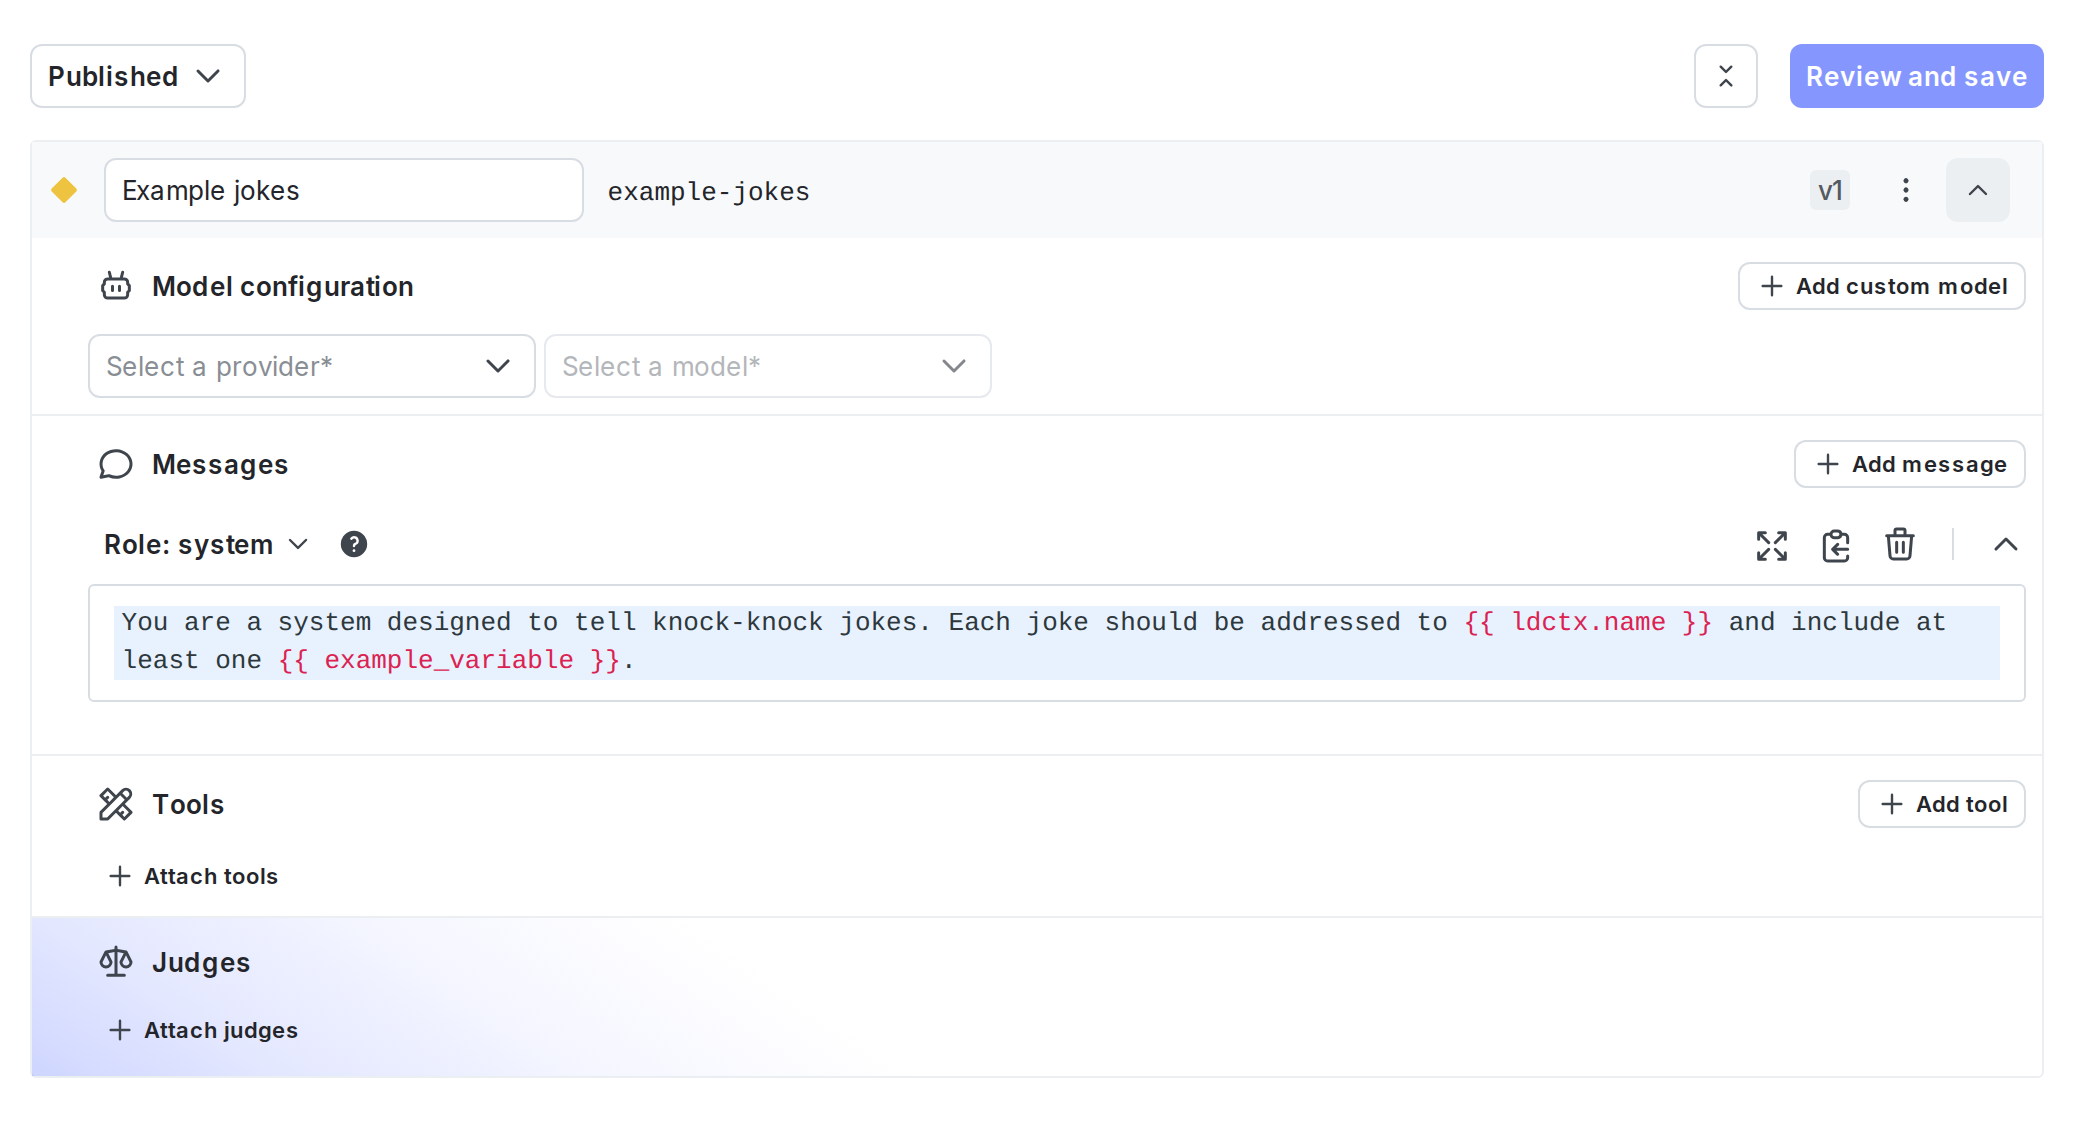
Here's the variation message for this example. You can copy this if you're working through this quickstart in your own project:
```title="'Example jokes' variation, system message" theme={null}
You are a system designed to tell knock-knock jokes. Each joke should be addressed to {{ ldctx.name }} and include at least one {{ example_variable }}.
```
## Step 3, in Launch
Darkly: Set up targeting rules
Next, set up targeting rules for your AI Config. These rules determine which of your customers receive a particular variation of your AI Config.
To specify the AI Config variation to use by default when the AI Config is toggled on:
1. Select the **Targeting** tab for your AI Config.
2. In the "Default rule" section, click **Edit**.
3. Configure the default rule to serve a specific variation.
4. Click **Review and save**.
Here is an example of a default rule:
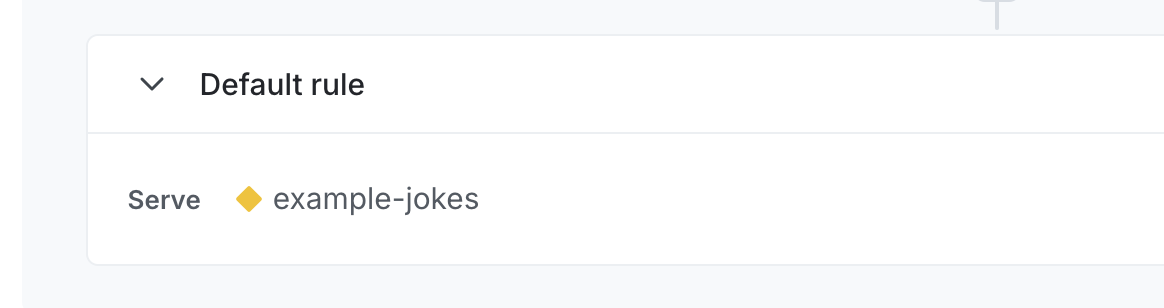
The AI Config is enabled by default. After you've added code to your application to pull the customized messages and model configuration from LaunchDarkly, your AI Config will be active.
When an end user opens your application, they'll get the AI Config variation you've defined, either in the default rule or in a custom targeting rule. Your app's AI content generation will use the model and messages from the AI Config variation, and the messages will be customized for each end user.
When you're ready to add more AI Config variations, come back to this step and set up additional targeting rules. If you are familiar with LaunchDarkly's flag targeting, the process is very similar: with AI Configs, you can target individuals or segments, or target contexts with custom rules. To learn how, read [Target with AI Configs](/home/ai-configs/target).
You can release a new variation gradually using a [guarded rollout](/home/releases/guarded-rollouts). Guarded rollouts reduce risk and let you monitor key metrics as the change rolls out.
## Step 4, in your app: Customize the AI Config and track metrics
Now that your AI Config is set up, you can use it in your app:
1. [Customize the AI Config](#customize-the-ai-config): First, use your SDK's completion-mode config function to customize the AI Config. This function returns the customized messages and model configuration along with a tracker instance for recording metrics.
2. [Call your generative AI model, track metrics](#call-your-generative-ai-model-track-metrics): Then, call your generative AI model, passing in the result of the config function. In the LaunchDarkly AI SDKs, you use a `track[Model]Metrics` function to record metrics from your AI model generation. This function takes a completion from your AI model generation.
### Customize the AI Config
In your application code, call your SDK's completion-mode config function each time you generate content. This lets LaunchDarkly evaluate targeting and return the latest messages and model settings.
The completion-mode config function returns the customized messages and model configuration along with a tracker instance you can use to record metrics. Customization means that any variables you include in the AI Config variation's messages have their values set to the context attributes and variables you pass to your SDK's function. Then, you can pass the customized messages directly to your AI. Set up a fallback value to use in case of an error, and handle the fallback case appropriately in your application.
Here's how:
```csharp title=".NET AI SDK" theme={null}
var fallbackConfig = LdAiConfig.New()
.SetEnabled(false)
.Build();
var tracker = aiClient.Config(
"example-ai-config-key",
context,
fallbackConfig,
new Dictionary {
{ "example_variable", "puppy" }
}
);
// Based on the example AI Config variation shown in step 2,
// tracker.Config.Messages[0].Content will be:
// "You are a model designed to tell knock-knock jokes. Each joke should be addressed to Sandy and include at least one puppy."
```
```go title="Go AI SDK" theme={null}
fallbackValue := ldai.NewConfig().Build() // by default, the Config is disabled
cfg, tracker := aiClient.Config(
"example-ai-config-key",
context,
fallbackValue,
map[string]interface{}{"example_variable": "puppy"},
)
msg := cfg.Messages()
// Based on the example AI Config variation shown in step 2,
// msg[0].Content will be:
// "You are a model designed to tell knock-knock jokes. Each joke should be addressed to Sandy and include at least one puppy."
```
```ts title="Node.js AI SDK" theme={null}
const fallbackConfig = { enabled: false };
const aiConfig: LDAIConfig = await aiClient.completionConfig(
'example-ai-config-key',
context,
fallbackConfig,
{ 'example_variable': 'puppy' },
);
// Based on the example AI Config variation shown in step 2,
// aiConfig.messages[0].content will be:
// "You are a model designed to tell knock-knock jokes. Each joke should be addressed to Sandy and include at least one puppy."
```
```python title="Python AI SDK" theme={null}
fallback_value = AICompletionConfigDefault(enabled=False)
config, tracker = aiclient.completion_config('example-ai-config-key', context, fallback_value, { 'example_variable': 'puppy' })
# Based on the example AI Config variation shown in step 2,
# config.messages[0].content will be:
# "You are a model designed to tell knock-knock jokes. Each joke should be addressed to Sandy and include at least one puppy."
```
```ruby title="Ruby AI SDK" theme={null}
fallback_value = LaunchDarkly::Server::AI::AIConfig.new(enabled: false)
ai_config = ai_client.config('example-ai-config-key', context, fallback_value, { 'example_variable' => 'puppy' })
# Based on the example AI Config variation shown in step 2,
# ai_config.messages[0][:content] will be:
# "You are a model designed to tell knock-knock jokes. Each joke should be addressed to Sandy and include at least one puppy."
```
### Call your generative AI model, track metrics
Next, make a call to your generative AI model and pass in the result of your SDK's completion-mode config function.
Use one of the `track[Model]Metrics` or `TrackRequest` functions to record metrics from your AI model generation. These functions take the response from your model provider. Call your SDK's completion-mode config function each time you generate content so LaunchDarkly can evaluate targeting and return the latest messages and model settings.
LaunchDarkly provides specific functions for completions for several common AI model families, and an option to record this information yourself.
Here's how to use a provider-specific `track[Model]Metrics` function to call a supported provider or framework, such as OpenAI, Amazon Bedrock, or LangChain, and record metrics from your AI model generation:
```ts title="Node.js AI SDK (TypeScript), OpenAI model" theme={null}
// Call completionConfig() each time you want to call the OpenAI operation
const aiConfig = await aiClient.completionConfig(
'example-ai-config-key',
context,
fallbackConfig,
{ example_variable: 'elephant' },
);
const { tracker } = aiConfig;
if (aiConfig.enabled) {
try {
const completion = await tracker.trackOpenAIMetrics(async () =>
client.chat.completions.create({
messages: aiConfig.messages || [],
model: aiConfig.model?.name || 'gpt-4',
temperature: (aiConfig.model?.parameters?.temperature as number) ?? 0.5,
max_tokens: (aiConfig.model?.parameters?.maxTokens as number) ?? 4096,
}),
);
// use completion here
} catch (err) {
// handle exception from OpenAI or LaunchDarkly tracker
}
} else {
// Application path to take when the aiConfig is disabled
}
```
```ts title="Node.js AI SDK (TypeScript), Bedrock model" theme={null}
// Call completionConfig() each time you want to call the Bedrock Converse command
const aiConfig = await aiClient.completionConfig(
'example-ai-config-key',
context,
fallbackConfig,
{ example_variable: 'elephant' },
);
const { tracker } = aiConfig;
if (aiConfig.enabled) {
try {
const completion = await tracker.trackBedrockConverseMetrics(async () => {
return awsClient.send(
new ConverseCommand({
modelId: aiConfig.model?.name ?? 'no-model',
messages: mapPromptToConversation(aiConfig.messages ?? []),
inferenceConfig: {
temperature: (aiConfig.model?.parameters?.temperature as number) ?? 0.5,
maxTokens: (aiConfig.model?.parameters?.maxTokens as number) ?? 4096,
},
}),
);
});
// use completion here
} catch (err) {
// handle error from AWS Bedrock or LaunchDarkly tracker
console.error('Error:', err);
}
} else {
// Application path to take when the aiConfig is disabled
}
```
```python title="Python AI SDK, OpenAI model" theme={null}
# Call completion_config() each time you want to call the OpenAI operation
config, tracker = aiclient.completion_config(
'example-ai-config-key',
context,
fallback_value,
{ 'example_variable': 'elephant' }
)
if config.enabled:
try:
messages = [] if config.messages is None else config.messages
completion = tracker.track_openai_metrics(
lambda: openai_client.chat.completions.create(
model=config.model.name,
messages=[message.to_dict() for message in messages],
)
)
# use completion here
except Exception as err:
# handle exception from OpenAI or LaunchDarkly tracker
print(f"Error: {err}")
else:
# Application path to take when the config is disabled
```
```python title="Python AI SDK, Bedrock model" theme={null}
# Call completion_config() each time you want to call the Bedrock Converse command
config, tracker = aiclient.completion_config(
'example-ai-config-key',
context,
fallback_value,
{ 'example_variable': 'elephant' }
)
if config.enabled:
try:
completion = tracker.track_bedrock_converse_metrics(
client.converse(
modelId=config.model.name,
messages=map_messages_to_conversation(config.messages)
)
)
# use completion here
except Exception as err:
# handle exception from Bedrock or LaunchDarkly tracker
print(f"Error: {err}")
else:
# Application path to take when the config is disabled
```
```python title="Python AI SDK, LangChain model" theme={null}
from langchain.chat_models import init_chat_model
# Call completion_config() each time you want to call the LangChain model
config, tracker = aiclient.completion_config(
'example-ai-config-key',
context,
fallback_value,
{ 'example_variable': 'elephant' }
)
if config.enabled:
try:
# Create LangChain model instance using init_chat_model.
# Pass the provider and model from the evaluated config.
llm = init_chat_model(
model=map_provider_to_langchain(config.provider.name),
model_provider=config.provider.name,
)
# Convert LaunchDarkly messages to LangChain messages.
messages = [message.to_dict() for message in (config.messages or [])]
# Track the LangChain completion with LaunchDarkly metrics.
completion = track_langchain_metrics(tracker, lambda: llm.invoke(messages))
# Handle the response in your application as needed.
print(getattr(completion, "content", str(completion)))
except Exception as err:
# handle exception from LangChain or LaunchDarkly tracker
print(f"Error: {err}")
else:
# Application path when the config is disabled
pass
```
```python title="Python AI SDK, LangChain helper functions" theme={null}
from ldai.tracker import TokenUsage
def map_provider_to_langchain(provider_name: str) -> str:
"""Map LaunchDarkly provider names to LangChain provider names."""
provider_mapping = {
"gemini": "google_genai"
}
lower_provider = provider_name.lower()
return provider_mapping.get(lower_provider, lower_provider)
def track_langchain_metrics(tracker, func):
"""
Track LangChain-specific operations.
This function tracks the duration of the operation, token usage,
and the success or error status.
If the provided function raises an exception, this function will
record the duration and an error, then re-raise the exception.
A failed operation will not have any token usage data.
:param tracker: The LaunchDarkly tracker instance.
:param func: Zero-argument callable to track.
:return: Result of the tracked function.
"""
try:
result = tracker.track_duration_of(func)
tracker.track_success()
if hasattr(result, "usage_metadata") and result.usage_metadata:
# Extract token usage from LangChain response
usage_data = result.usage_metadata
token_usage = TokenUsage(
input=usage_data.get("input_tokens", 0),
output=usage_data.get("output_tokens", 0),
total=usage_data.get("total_tokens", 0),
)
tracker.track_tokens(token_usage)
except Exception as err:
tracker.track_error()
raise
return result
```
```python title="Python AI SDK, Gemini model" theme={null}
if config.enabled:
try:
# Convert LaunchDarkly messages to Gemini format
system_instruction, messages = map_to_google_ai_messages(config.messages or [])
# Add the user input
USER_INPUT = "What can you help me with?"
messages.append(types.Content(role="user", parts=[types.Part(text=USER_INPUT)]))
# Call Gemini and track metrics
completion = tracker.track_request(lambda: client.models.generate_content(
model=config.model.name,
contents=messages,
system_instruction=system_instruction,
))
ai_response = completion.text
print("AI Response:\n", ai_response)
except Exception as err:
# handle exception from Gemini or LaunchDarkly tracker
print(f"Error: {err}")
else:
# Application path when the config is disabled
pass
```
```ruby title="Ruby AI SDK, OpenAI model" theme={null}
if ai_config.enabled
# Pass in the result of the OpenAI operation.
# When calling the OpenAI operation, use details from ai_config.
# For instance, you can pass ai_config.model.name
# and ai_config.messages to your specific OpenAI operation.
#
# CAUTION: If the call inside of track_openai_metrics throws an exception,
# the SDK will re-raise that exception
begin
completion = ai_config.tracker.track_openai_metrics(
openai_client.chat.completions.create(
model: ai_config.model.name,
messages: ai_config.messages.map(&:to_h)
)
)
# use completion here
rescue => e
# handle exception from OpenAI or LaunchDarkly tracker
puts "Error: #{e}"
end
else
# Application path to take when the ai_config is disabled
end
# Call config() again each time you want to call the OpenAI operation
ai_config = ai_client.config(
'example-ai-config-key',
context,
fallback_value,
{ 'example_variable' => 'elephant' }
)
completion = ai_config.tracker.track_openai_metrics(...)
```
```ruby title="Ruby AI SDK, Bedrock model" theme={null}
if ai_config.enabled
# Pass in the result of the Bedrock Converse command.
# When calling the Bedrock Converse command, use details from ai_config.
# For instance, you can pass ai_config.model.name
# and ai_config.messages to your specific Bedrock Converse command.
begin
completion = ai_config.tracker.track_bedrock_converse_metrics(
bedrock_client.converse(
map_converse_arguments(
ai_config.model.name,
ai_config.messages
)
)
)
# use completion here
rescue => e
# handle exception from Bedrock or LaunchDarkly tracker
puts "Error: #{e}"
end
else
# Application path to take when the ai_config is disabled
end
# Call config() again each time you want to call the Bedrock Converse command
ai_config = ai_client.config(
'example-ai-config-key',
context,
fallback_value,
{ 'example_variable' => 'elephant' }
)
completion = ai_config.tracker.track_bedrock_converse_metrics(...)
```
```ruby title="Ruby AI SDK, Bedrock helper function" theme={null}
# The map_converse_arguments helper function transforms the messages
# to fit the Bedrock SDK
def map_converse_arguments(model_id, messages)
args = {
model_id: model_id,
}
mapped_messages = []
user_messages = messages.select { |msg| msg.role == 'user' }
mapped_messages << { role: 'user', content: user_messages.map { |msg| { text: msg.content } } } unless user_messages.empty?
assistant_messages = messages.select { |msg| msg.role == 'assistant' }
mapped_messages << { role: 'assistant', content: assistant_messages.map { |msg| { text: msg.content } } } unless assistant_messages.empty?
args[:messages] = mapped_messages unless mapped_messages.empty?
system_messages = messages.select { |msg| msg.role == 'system' }
args[:system] = system_messages.map { |msg| { text: msg.content } } unless system_messages.empty?
args
end
```
Here's how to use the general `TrackRequest` function to call any AI model provider and record metrics from your AI model generation:
```csharp title=".NET AI SDK, any model" theme={null}
if (tracker.Config.Enabled == true) {
var response = tracker.TrackRequest(() =>
{
// Make request to a provider, which automatically tracks metrics in LaunchDarkly.
// When sending the request to a provider, use details from tracker.Config.
// For instance, you can pass tracker.Config.Model and tracker.Config.Messages.
// Optionally, return response metadata, for example to do your own additional logging.
//
// CAUTION: If the call inside of Task.Run() throws an exception,
// the SDK will re-throw that exception.
return new Response
{
Usage = new Usage { Total = 1, Input = 1, Output = 1 }, /* Token usage data */
Metrics = new Metrics { LatencyMs = 100 } /* Metrics data */
};
}
));
} else {
// Application path to take when the tracker.Config is disabled
}
// Call Config() again each time you want to call the generative AI operation.
var tracker = aiClient.Config(
"example-ai-config-key",
context,
fallbackConfig,
new Dictionary {
{ "example_variable", "elephant" }
}
);
var response = tracker.TrackRequest(...)
```
```go title="Go AI SDK, any model" theme={null}
if cfg.Enabled() {
response, err := tracker.TrackRequest(func(config *Config) (ProviderResponse, error) {
// Make request to a provider, which automatically tracks metrics in LaunchDarkly.
// When sending the request to a provider, use details from config.
// For instance, you can pass a model parameter (config.ModelParam) or messages (config.Messages).
// Optionally, return response metadata, for example to do your own additional logging.
return ProviderResponse{
Usage: TokenUsage{
Total: 1, // Token usage data
},
Metrics: Metrics{
Latency: 10 * time.Millisecond, // Metrics data
},
}, nil
})
} else {
// Application path to take when the cfg.config is disabled
}
// Call Config() again each time you want to call the generative AI operation
cfg, tracker := aiClient.Config("example-ai-config-key", context, fallbackValue, map[string]interface{}{"example_variable": "elephant"})
response, err := tracker.TrackRequest(...)
```
Whether you use `track[Model]Metrics` or `TrackRequest`, the SDK automatically flushes these pending analytics events to LaunchDarkly at regular intervals. If you have a short-lived application, such as a script or unit test, you may need to explicitly request that the underlying LaunchDarkly client deliver any pending analytics events to LaunchDarkly, using [`flush()`](/sdk/features/flush) or [`close()`](/sdk/features/shutdown).
Here's how:
```csharp title=".NET AI SDK" theme={null}
baseClient.Flush();
```
```go title="Go AI SDK" theme={null}
client.Flush()
```
```js title="Node.js AI SDK" theme={null}
ldClient.flush();
```
```python title="Python AI SDK" theme={null}
ldclient.get().flush()
```
```ruby title="Ruby AI SDK" theme={null}
ld_client.flush
```
LaunchDarkly provides specific functions for completions for several common AI model families, including OpenAI, Bedrock, and LangChain, and an option to record this information yourself.
If you are using another provider, or want to record additional metrics, each AI SDK also includes individual `track*` methods to record duration, token usage, generation success, generation error, time to first token, output satisfaction, and more. To learn more, read [AI metrics](/sdk/features/ai-metrics).
For a complete example application, you can review some of our sample applications:
* [Node.js AI SDK, using OpenAI](https://github.com/launchdarkly/js-core/tree/main/packages/sdk/server-ai/examples/openai)
* [Node.js AI SDK, using Bedrock](https://github.com/launchdarkly/js-core/tree/main/packages/sdk/server-ai/examples/bedrock)
* [Python AI SDK, using OpenAI](https://github.com/launchdarkly/hello-python-ai/blob/main/examples/openai_example.py)
* [Python AI SDK, using Bedrock](https://github.com/launchdarkly/hello-python-ai/blob/main/examples/bedrock_example.py)
* [Python AI SDK, using LangChain](https://github.com/launchdarkly/hello-python-ai/blob/main/examples/langchain_example.py)
* [Python AI SDK, using Gemini](https://github.com/launchdarkly/hello-python-ai/blob/main/examples/gemini_example.py)
* [Ruby AI SDK, using Bedrock](https://github.com/launchdarkly/ruby-server-sdk-ai/tree/main/examples/chatbot/aws-bedrock)
* [Ruby AI SDK, using OpenAI](https://github.com/launchdarkly/ruby-server-sdk-ai/tree/main/examples/chatbot/openai)
### Use Gemini prompt caching with AI Configs
To use Gemini's explicit prompt caching with AI Configs, we recommend structuring your variation with two system messages:
1. Use the first system message (`messages[0]`) for static content that should be cached.
2. Use the second system message (`messages[1]`) for dynamic content that changes per request, such as user input or context variables.
In your application, call `aiClient.completionConfig()` to evaluate the AI Config. Extract `messages[0]` and pass it to Gemini's `system_instruction` field or use it when creating a cached prompt using the Gemini SDK. Use `messages[1]` as your dynamic prompt content.
To detect when the cached prompt should be refreshed, access `tracker.config.version`. This value changes when LaunchDarkly serves a different variation or when the variation's content is updated. Alternatively, compare the `role` and content of `messages[0]` to a previously cached version.
## Step 5, in Launch
Darkly: Monitor the AI Config
Select the **Monitoring** tab for your AI Config. When end users use your application, LaunchDarkly monitors AI Config performance. Metrics update approximately every minute.
To score response quality in production, you can attach judges to completion-mode AI Config variations in the LaunchDarkly UI. For other variations, invoke a judge programmatically using the AI SDK.
Each evaluated response sends an additional request to your model provider, which increases token usage and provider costs. Start with a lower sampling percentage and increase it only if you need more evaluation coverage.
## Attach judges for online evaluations
You can evaluate the quality of AI Config responses by attaching judges.
Judges are AI Configs that evaluate responses generated by other AI Configs. When a response is generated, an attached judge runs automatically and uses its evaluator prompt to generate a numeric score, for example to indicate how accurate or relevant the response is. LaunchDarkly records these judge scores as evaluation metrics.
These evaluation metrics appear on the **Monitoring** tab alongside other AI Config metrics. You can use them to monitor quality over time, compare variations, and assess the impact of changes during guarded rollouts and experiments.
Use judges when you want to:
* Monitor response quality in production without manual review
* Detect quality regressions after prompt or model changes
* Compare variations using automated quality scores
* Apply consistent quality standards across teams and environments
You can attach judges to completion-mode AI Config variations in the LaunchDarkly UI. For other variations, invoke a judge programmatically using the AI SDK.
### See how online evaluations run in your application
After you attach judges to a completion-mode AI Config variation in the LaunchDarkly UI, your application continues to use the same invocation flow. You do not need to call judges directly.
For sampled requests, attached judges run automatically and record evaluation results.
```python title="Completion-mode AI Config with automatic judge evaluation" theme={null}
chat = await ai_client.create_chat(
"example-ai-config",
context,
fallback,
{"example_variable": "value"},
)
response = await chat.invoke("How can LaunchDarkly help me?")
print("Model response:", response.message.content)
if response.evaluations is not None:
eval_results = await asyncio.gather(*response.evaluations)
print("Evaluation results:", [r.to_dict() for r in eval_results])
```
Evaluation results appear on the **Monitoring** tab as metrics such as accuracy, relevance, and toxicity.
To learn more about evaluation patterns and programmatic usage, read Online evaluations in [AI Configs](/home/ai-configs/online-evaluations).
### Set up and attach judges
Online evaluations use your existing AI model provider credentials. Before you enable judges, make sure your organization has connected a supported provider, such as OpenAI or Anthropic.
To attach a judge to a variation:
1. In LaunchDarkly, click **AI Configs**.
2. Click the name of the Completion AI Config you want to edit.
3. Select the **Variations** tab.
4. Open a variation or [create a new variation](/home/ai-configs/create-variation).
5. In the "Judges" section, click **+ Attach judges**.
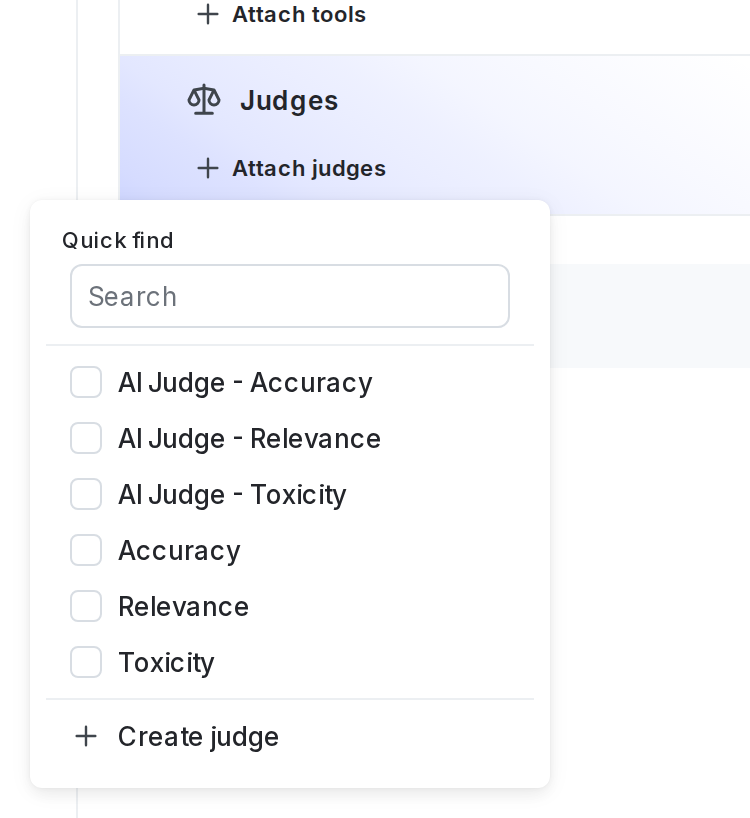
6. Select one or more of the judges. If necessary, enter text in the search bar to search for a judge. By default, LaunchDarkly provides three judges:
* Accuracy
* Relevance
* Toxicity
7. (Optional) Set the sampling percentage to control how many model responses are evaluated.
8. Click **Review and save**.
Each evaluated response triggers an additional call to your model provider. Higher sampling percentages can increase token usage and cost. For guidance on choosing a sampling rate, read [Online evaluations in AI Configs](/home/ai-configs/online-evaluations).
Attached judges remain connected to the variation until you remove them.
For more information about judges, read [Online evaluations in AI Configs](/home/ai-configs/online-evaluations).
## Learn more about AI Configs
The following sections provide answers to common questions about working with AI Configs.
### Integration with AI providers
In the AI Configs product, LaunchDarkly does not handle the integration to the AI provider. The LaunchDarkly AI SDKs provide your application with model configuration details for providers and frameworks such as OpenAI, Amazon Bedrock, and LangChain, including customized messages and model parameters such as temperature and tokens. It is your application's responsibility to pass this information to the AI provider or framework.
The LaunchDarkly AI SDKs provide methods to help you track how your AI model generation is performing, and in some cases, these methods take the completion from common AI providers as a parameter. However, it is still your application's responsibility to call the AI provider. To learn more, read [Tracking AI metrics](/sdk/features/ai-metrics).
### Privacy and personally identifiable information (PII)
LaunchDarkly does not send any of the information you provide to any models, and does not use any of the information to fine tune any models.
You should follow your own organization's policies regarding if or when it may be acceptable to send end-user data either to LaunchDarkly or to an AI provider. To learn more, read [AI Configs and information privacy](/home/ai-configs/privacy).
### Availability of new models
When you [create a new AI Config variation](/home/ai-configs/create-variation), you can select a model from the provided list. LaunchDarkly updates this list regularly. To request a new model, click the **Give feedback** option and let us know what models you'd like to have included.
You can also add your own model at any time. To learn how, read [Create AI model configurations](/home/ai-configs/create-model-config).