> ## Documentation Index
> Fetch the complete documentation index at: https://launchdarkly-preview.mintlify.site/llms.txt
> Use this file to discover all available pages before exploring further.
# Creating roles and policies
> This topic explains how to create roles and policies in LaunchDarkly.
> For the complete documentation index, see [llms.txt](/llms.txt). For the full documentation snapshot, see [llms-full.txt](/llms-full.txt).
## Overview
This topic explains how to create roles and policies in LaunchDarkly.
## Create roles
To give an account member custom permissions in LaunchDarkly, you must assign them a role.
LaunchDarkly provides both project and organization preset roles. We think these roles will be satisfactory for most organizations. They provide permissions based on typical "personas" for members using LaunchDarkly, including Project Admin, Maintainer, Developer, Contributor, and Viewer.
Project and organization preset roles provided by LaunchDarkly may be available in your account as part of our Early Access Program (EAP). If these roles are available, a banner appears on the **Roles** page prompting you to add the roles to your account. After you add these roles, you can assign them to any member. These roles all have names that start with "LaunchDarkly."
To request access these provided roles, [request to join the EAP](mailto:product@launchdarkly.com).
If the permissions that these preset roles provide are not quite what works best for your organization, you add policy statements to these roles. To learn how, read [Editing roles](/home/account/roles/role-edit). You can also create your own roles.
To create a new role:
1. Click the **gear** icon in the left sidenav to view Organization settings.
2. Click **Roles**.
3. Click **New role**. The "New role" page appears:
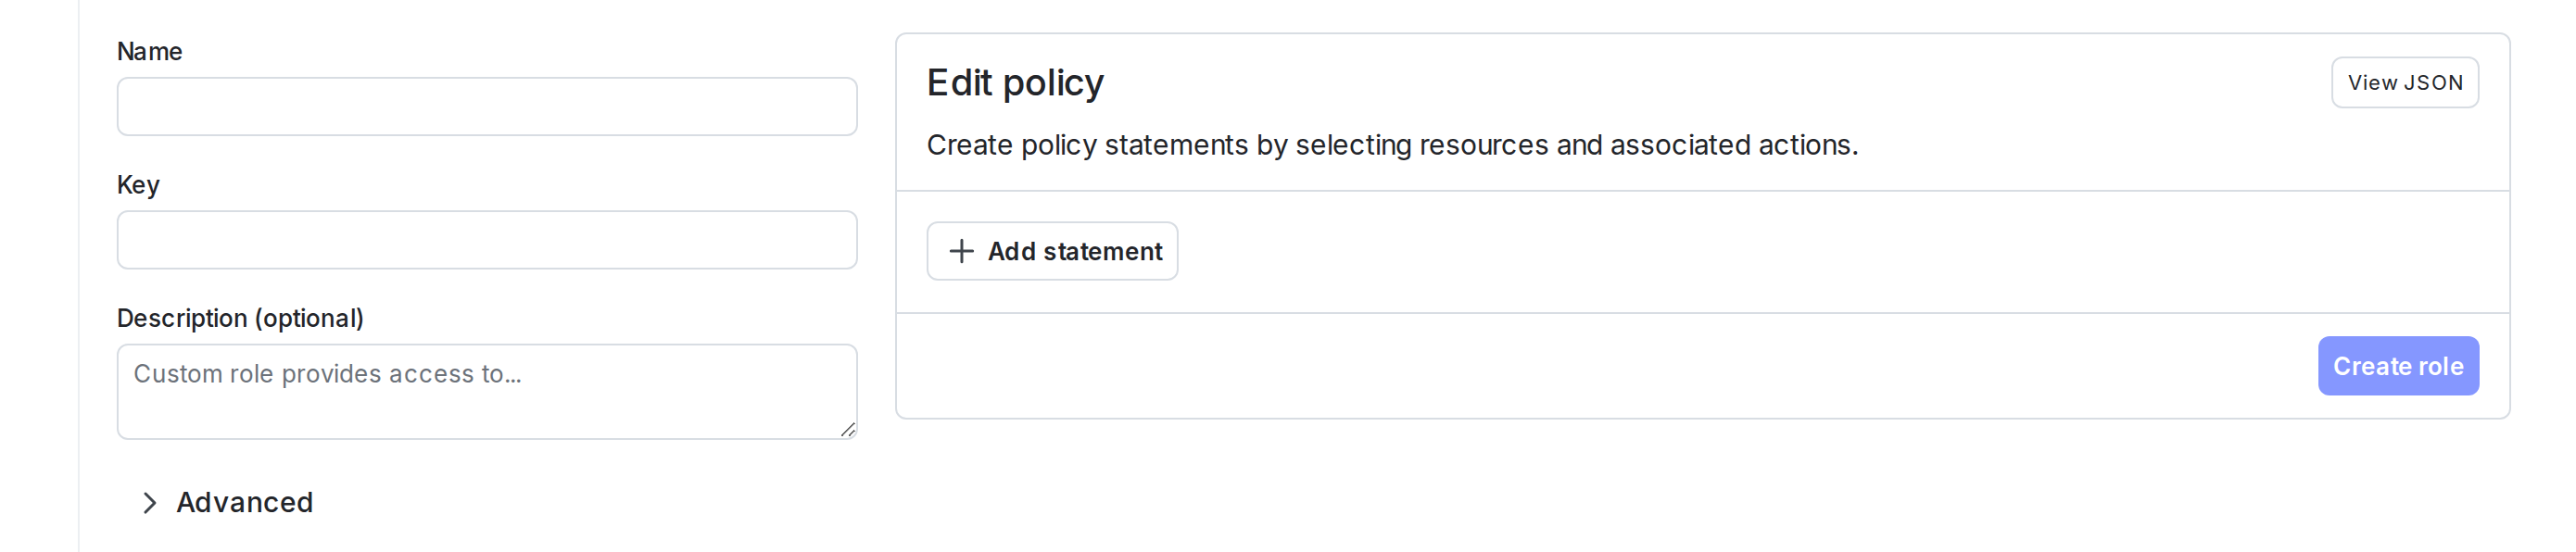
4. Enter a human-readable **Name** for the role.
5. Enter a **Key** for the role.
6. (Optional) Enter a **Description** to explain what the role does.
7. (Optional) Click **Advanced** to open the "Scope using attribute key" section. Then click **+ Add resource type** and select a resource type from the menu.
* If multiple members or teams should have similar permissions, but work with different resources, setting the **role scope** lets you reuse the same custom role. For example, suppose Member A should have access to all actions on flags in Project A, and Member B should have access to all actions on flags in Project B. You can create one role with access to all actions on flags, and set a **role scope** of **project**. Then, you can specify Project A when you assign this role to Member A, and specify Project B when you assign this role to Member B. To learn more, read [Role concepts](/home/account/roles/role-concepts) and [Using role scope](/home/account/roles/role-scope).
8. [Create a policy](#create-policies-for-roles) using the policy builder, following the procedure below.
9. Click **Create role**.
By default, LaunchDarkly allows you to create 1,000 roles per account. You can create more upon request, free of charge. To learn more, read [How to right size when you are over LaunchDarkly system resource count limits](https://support.launchdarkly.com/hc/en-us/articles/12319971362075-How-to-right-size-when-you-are-over-LaunchDarkly-system-resource-count-limits).
You can also use the REST API: [Create custom role](/api-reference/custom-roles/create-custom-role)
## Create policies for roles
Policies are sets of statements that describe the actions a role is allowed or not allowed to take on specified resources. You can use the **Policy builder** to add policy statements to new or existing roles.
By default, roles cannot take any actions on any resources. You must create a policy that provides the level of access you prefer.
You can also write your own policies with the advanced editor. To learn more, read [Using the advanced editor](/home/account/roles/advanced-editor). For examples, read [Example roles and policies](/home/account/roles/example-roles).
To create a policy:
1. Complete steps 1-8 in [Create roles](#create-roles), above.
2. In the "Edit Policy" panel, click **+ Add statement**.
3. Use the **Scope** menu to specify the resources this policy affects.
* Select the resource type.
* In the **Select an operation** menu, select whether the scope of the statement should be all resources of this type, all resources except for a select few, or only a select few.
* If necessary, choose these select few from the **Select \[resources]** menu.
* If you select the "project" resource type, you can only select one project. To create a policy for multiple projects, use the [advanced editor](/home/account/roles/advanced-editor), or use a **role scope** and specify multiple projects when you apply this role to members or teams.
* Some resources require you to specify other resources in order to be correctly identified.
* For example, if you initially select the "flag" resource type, the policy builder prompts you to specify projects and environments before you can continue. If you have set a **role scope** of "project", then projects are listed in the policy builder as being assigned separately. You cannot specify them here.
* If you select the "project" resource type, no other information is needed.
* To learn more, read [Using resources](/home/account/roles/role-resources).
![The "Scope" and "Select \[resources\]" menus when defining a policy scoped to a select set of applications.](https://files.buildwithfern.com/https://launchdarkly.docs.buildwithfern.com/docs/1d01b593b40f16e07f47d92adc6991ecfdfe12b7e5c8636d0ae6ff86886ad0ab/assets/images/auto/custom-roles-policy-builder-scope.auto.png)
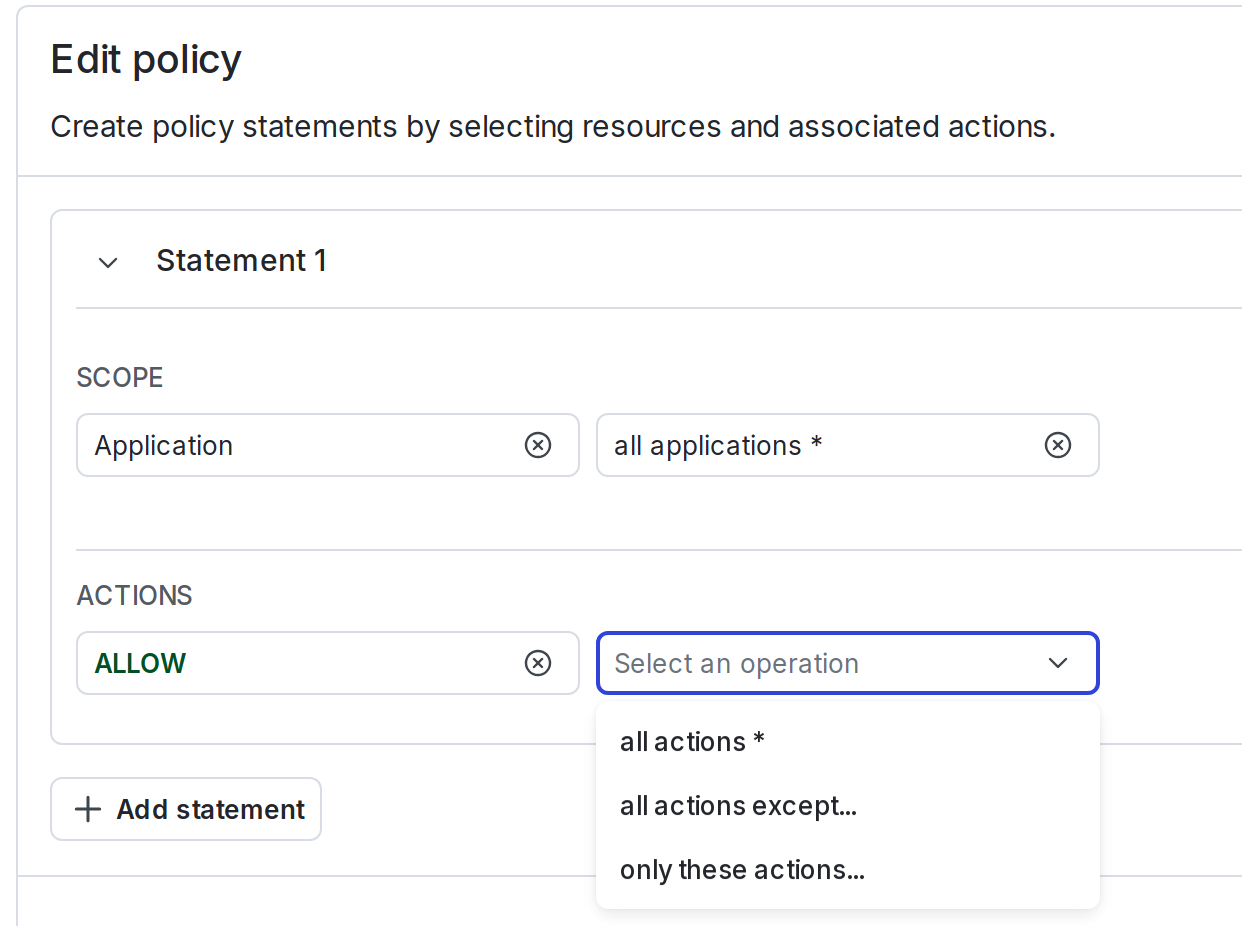
4. Use the **Actions** menu to specify whether to allow or deny actions on these resources.
* Select "ALLOW" or "DENY."
* In the **Select an operation** menu, select whether to allow or deny all actions, all actions except for a select few, or only a select few.
* If necessary, choose these select few from the **Select actions** menu.
5. (Optional) Repeat steps 2-4 to add additional statements to your policy.
6. Click **Create role**.
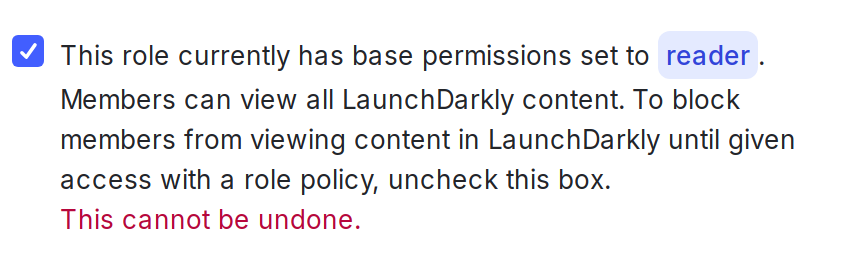
By default, new roles cannot take any actions on any resources. However, roles created prior to October 2024 had the option to use the Reader base role as their starting point, rather than starting with no access.
To check whether this applies to any of your existing roles, edit the role and look for the warning statement "This role currently has base permissions set to Reader. Members can view all LaunchDarkly content." Uncheck the box to update the role so that it starts with no access and only allows actions based on the statements in its policy.
## View role details
You can view details about an existing role and its policies. You can also view each action the role can perform and what that action does.
To view details for roles from the **Roles** page:
1. Click the **gear** icon in the left sidenav to view Organization settings.
2. Click **Roles** and find the role you wish to view. Select the **Project** or **Organization** tab as needed.
3. Click the name of the role. A summary of the role and its policy statements appears.
4. (Optional) To make updates to the role or its policy statements, click the **pencil** icon to open the "Edit role" page.
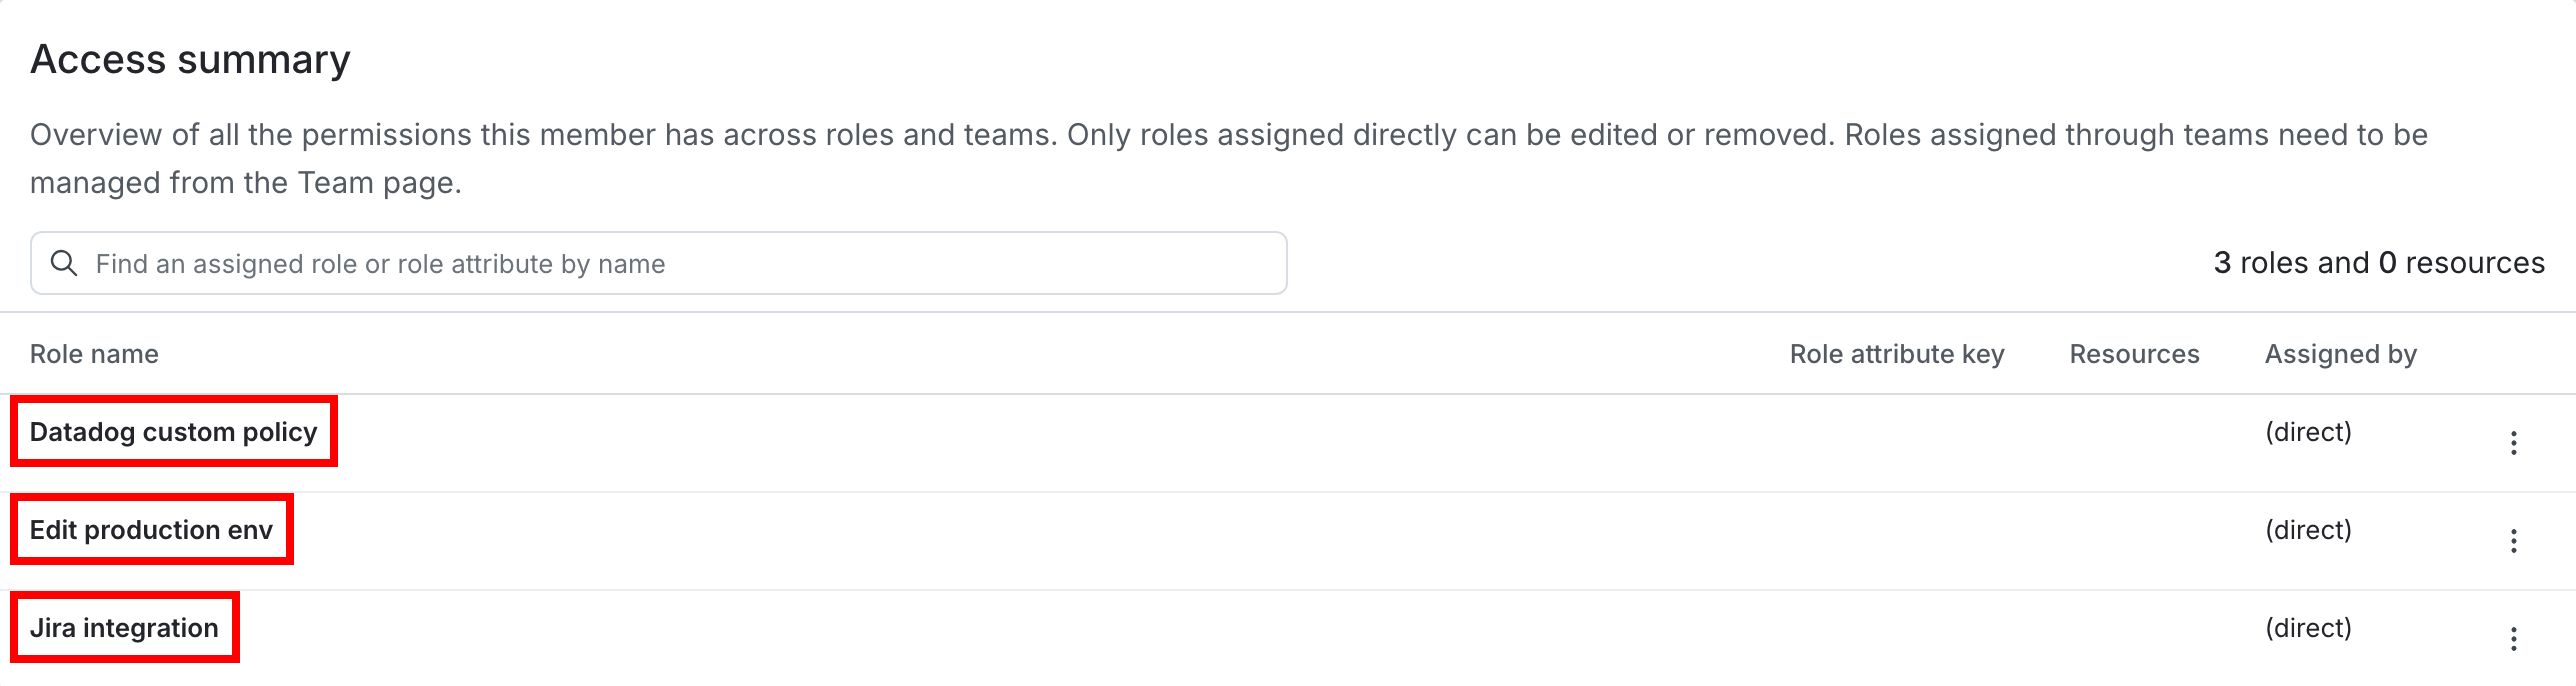
You can also view details for roles from the **Access** tab for a given member:
1. Navigate to the **Members** list.
2. Click the name of a member.
3. On the **Access** tab for the member, click the name of a role. A summary of the role and its policy statements appears.
4. (Optional) To make updates to the role or its policy statements, click the **pencil** icon to open the "Edit role" page.
You can also use the REST API: [Get custom role](/api-reference/custom-roles/get-custom-role)
## Add, view, and remove an account member's roles
To learn how to add a role to an account member, read [Assigning roles to members](/home/account/roles/manage-role-assign).
To learn how to view the roles for an individual account member, read [Viewing member roles](/home/account/roles/manage-role-view).
To learn how to remove a role from an account member, read [Removing member roles](/home/account/roles/manage-role-remove).
You can also use the REST API: [Get account member](/api-reference/account-members/get-account-member)