> ## Documentation Index
> Fetch the complete documentation index at: https://launchdarkly-preview.mintlify.site/llms.txt
> Use this file to discover all available pages before exploring further.
# Managing teams
> This topic explains how to manage team members in LaunchDarkly.
> For the complete documentation index, see [llms.txt](/llms.txt). For the full documentation snapshot, see [llms-full.txt](/llms-full.txt).
Teams are only available to customers on select plans. To learn more, [read about our pricing](https://launchdarkly.com/pricing/). To upgrade your plan, [contact Sales](https://launchdarkly.com/contact-sales/).
## Overview
This topic explains how to manage team members in LaunchDarkly.
## Manage team members
If you have an Admin role, you are a maintainer of the team, or you have the required [team permissions](/home/account/roles/role-actions#team-actions), you can add and remove team members from new and existing teams.
### Add a member to an existing team
If you have an existing team and you want to add a member to it:
1. Click the **gear** icon in the left sidenav to view Organization settings.
2. Click **Teams**.
3. Click on the name of a team to navigate to that team's page. The team's **Team members** tab appears.
4. Click **Add members**. The "Add members" dialog appears.
5. Select the members to add to the team.
6. Click **Add members**.
You can also use the REST API: [Add a member to teams](/api-reference/account-members/add-a-member-to-teams), [Update a team](/api-reference/teams/update-team)
### Add members to a team from the Members dashboard
The bulk editing feature is only accessible if you have a role that allows the updateTeamMembers action. The LaunchDarkly Admin and Architect organization roles, as well as the Admin and Owner base roles, include this ability. To learn more, read [About member roles](/home/account/members#about-member-roles) and [Team actions](/home/account/roles/role-actions#team-actions).
To add members to an existing team:
1. Click the **gear** icon in the left sidenav to view Organization settings.
2. Click **Members**.
3. Select the checkbox to the left of a member's name to choose that member.
4. Select all the members that you want to add to the teams. Next to the **Export CSV** button, another button appears. It is labeled **Edit N members**, where N is the number of members that you selected.
* Alternatively, if you wish to select all the members, click the checkbox next to the **Name** column in the table.

5. Click the **Edit N members** button and select the "Add to teams" option. A modal appears.
6. Select one or multiple teams from the input field and then click **Add members to teams**. LaunchDarkly attempts to add each of the selected members to the selected teams.
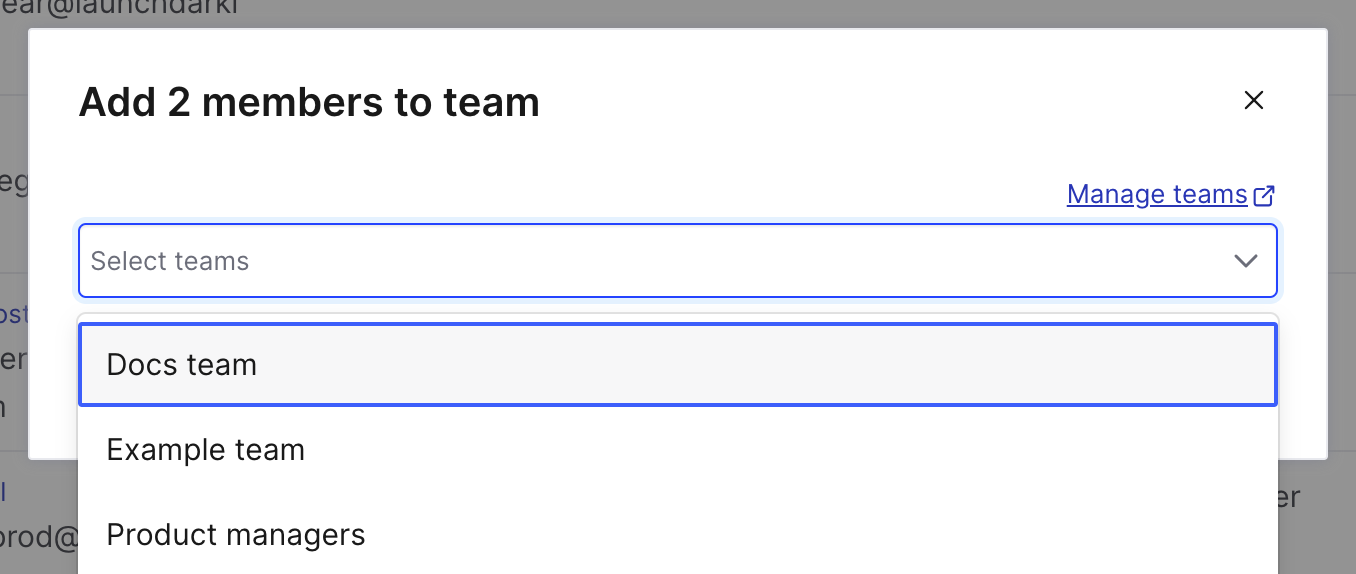
When you select all members, the number of members may not match the number of members that appears at the top of the Members tab. This happens because you cannot perform bulk edit actions on yourself or the Owner of the account.
### Add members in bulk to an existing team from a CSV
You can add multiple members to an existing team by uploading a CSV file of member email addresses. Your CSV file must include email addresses in the first column. You can include data in additional columns, but LaunchDarkly ignores all data outside the first column. Headers are optional.
To upload a CSV file:
1. Click the **gear** icon in the left sidenav to view Organization settings.
2. Click **Teams**.
3. Click on the name of the team you want to add members to. The team's **Team members** tab appears.
4. Click **Upload CSV**. The "Upload CSV" dialog appears:
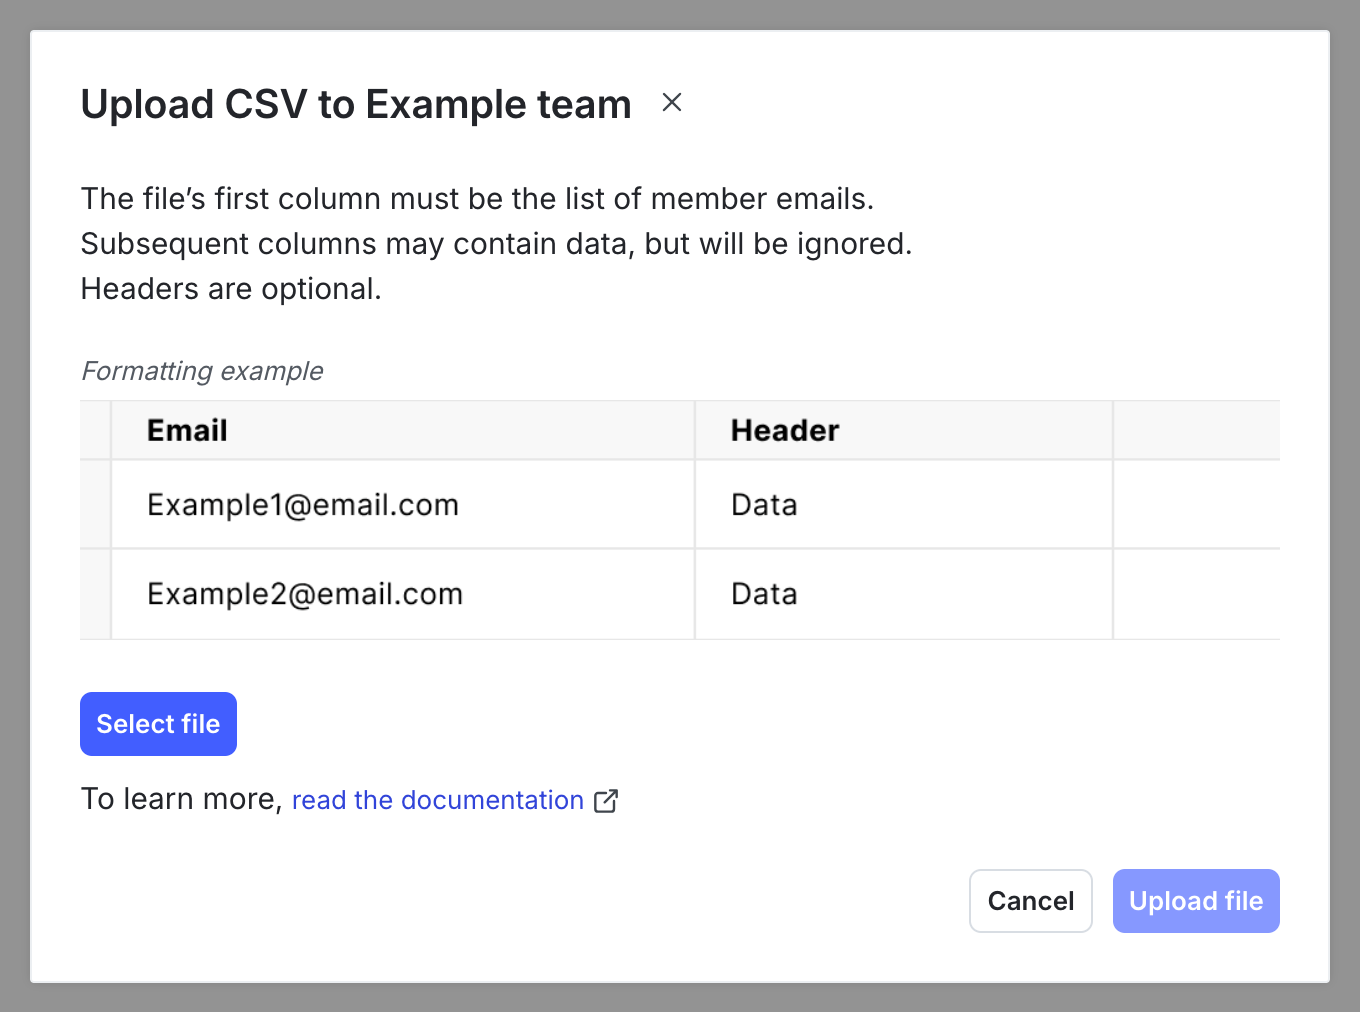
5. Click **Select file**. A prompt to choose a file appears.
6. Choose a CSV file. You are returned to the "Upload CSV" dialog.
7. Click **Upload file.**
A success indicator appears with the number of team members successfully added to your team.
You can also use the REST API: [Add multiple members to team](/api-reference/teams/add-multiple-members-to-team)
If the file upload was not successful, an error message appears with information about the errors in the file.
There are two types of CSV file upload errors:
* **Global errors** are errors at the file level preventing LaunchDarkly from processing the file.
* **Line errors** are errors on one or more individual lines in your CSV file.
### Troubleshoot global errors
Global errors mean that something is wrong at the file level preventing LaunchDarkly from processing the file. You must resolve the errors in your file and try uploading again.
This table includes a list of global errors and how to resolve them:
\| Error message
| Resolution |
| - |
\| --- |
\| Unable to process file
\| LaunchDarkly could not process the file for an unspecified reason. Review your file for errors and try again. |
\| File exceeds 25mb
\| Break up your file into multiple files of less than 25mbs each. |
\| All emails have invalid formatting
\| None of the email addresses in the file are in the correct format. Fix the formatting and try again. |
\| All emails belong to existing team members
\| All listed members are already on this team. Populate the file with member emails that do not belong to the team and try again. |
\| File is empty
\| The CSV file does not contain any email addresses. Populate the file and try again. |
\| No emails belong to members of your LaunchDarkly organization
\| None of the email addresses belong to members of your LaunchDarkly account. Invite these members to LaunchDarkly, then re-add them to the team. To learn how, read [Add members to LaunchDarkly](/home/account/members#add-members-to-launchdarkly). |
### Troubleshoot line errors
Line errors mean that something is wrong with one or more individual lines in your CSV file. You can either add only the valid entries from your CSV file, or upload a new file.
This table includes a list of line errors and how to resolve them:
\| Error message
| Resolution |
| - |
\| --- |
\| Empty row
\| This line is blank. Add an email address and try again. |
\| Duplicate entry
\| This email address appears in the file twice. Remove the email from the file and try again. |
\| Email already exists in the specified team
\| This member is already on your team. No action needed. |
\| Invalid formatting
\| This email address is not formatted correctly. Fix the formatting and try again. |
\| Email does not belong to LaunchDarkly member
\| The email address doesn't belong to a LaunchDarkly account member. Invite them to LaunchDarkly, then re-add them to the team. To learn how, read [Add members to LaunchDarkly](/home/account/members#add-members-to-launchdarkly). |
### Remove a member from a team
You can remove a member from a team in two ways. You can remove them from the team management page or from the **Members** page.
To remove a member from a team using the team management page:
1. Click the **gear** icon in the left sidenav to view Organization settings.
2. Click **Teams**.
3. Click on the name of the team you want to remove members from. The team's **Team members** tab appears.
4. Find the member in the list of team members.
5. Click the **overflow menu** at the right of the row of the member you want to remove.
6. Select **Remove from team**. A confirmation dialog appears.
7. Click **Remove member** in the dialog to confirm.
To remove a member from a team using the **Members** page:
1. Click the **gear** icon in the left sidenav to view Organization settings.
2. Click **Members**.
3. Find the member in the list. Optionally, use the "Team" filter to narrow the list.
4. Click on the member's name.
5. Click the **Teams** tab.
6. Find the team that you want to remove this member from.
7. Click the **overflow menu** at the right of the row of the team you want to remove the member from.
8. Select **Remove member**. A confirmation dialog appears.
9. Click **Remove member** in the dialog to confirm.
## View an individual member's teams
Members of your organization can belong to multiple teams.
To view the teams that a member belongs to:
1. Click the **gear** icon in the left sidenav to view Organization settings.
2. Click **Members**.
3. Filter the list of members for the member you're looking for.
4. The "Teams" column lists the teams the members belong to. There may be additional teams in the overflow menu. Click the **overflow menu** to view the **Teams** tab on that member's page. It has a complete list of that member's teams, and indicates if the member is a team maintainer for any team.