> ## Documentation Index
> Fetch the complete documentation index at: https://launchdarkly-preview.mintlify.site/llms.txt
> Use this file to discover all available pages before exploring further.
# Using the LaunchDarkly CLI for local testing
> This guide describes how to use the LaunchDarkly CLI to perform local testing and development.
> For the complete documentation index, see [llms.txt](/llms.txt). For the full documentation snapshot, see [llms-full.txt](/llms-full.txt).
## Overview
This guide describes how to use the LaunchDarkly CLI to perform local testing and development.
LaunchDarkly provides a command line interface (CLI), which includes a `dev-server` command that you can use to start a local server and retrieve flag values from a LaunchDarkly source environment. This development server supports a single variation value for each flag, which you can override as needed. This means you can test your code locally, and you do not need to coordinate with other developers in your organization who are using the same LaunchDarkly source environment.
## Prerequisites
First, install the LaunchDarkly CLI. To use the `dev-server` command in the LaunchDarkly CLI, you must have a minimum version of 1.4.0.
To install the LaunchDarkly CLI:
```bash title="Install on macOS with Homebrew" theme={null}
brew tap launchdarkly/homebrew-tap
brew install ldcli
```
```bash title="Install on macOS, Windows, or Linux with npm" theme={null}
npm install -g @launchdarkly/ldcli
```
```bash title="Pull from Docker" theme={null}
docker pull launchdarkly/ldcli
```
```bash title="Build from source" theme={null}
# Requires a Go development environment
git clone git@github.com:launchdarkly/ldcli.git
cd ldcli
go build
# The CLI binary is now accessible in the current directory as ./ldcli
```
```text title="Download executable from GitHub" theme={null}
https://github.com/launchdarkly/ldcli/releases
```
To update to the latest version of the LaunchDarkly CLI:
```bash title="Update to latest version using Homebrew" theme={null}
brew upgrade ldcli
```
```bash title="Update to latest version using npm" theme={null}
npm update -g @launchdarkly/ldcli
```
Before you run commands in the LaunchDarkly CLI, you need to authenticate yourself. You only need to do this once.
To authenticate yourself in the LaunchDarkly CLI:
```bash title="Authenticate with your login" theme={null}
# you only need to run this once
ldcli login
```
```bash title="Authenticate with an access token" theme={null}
# you only need to run this once
ldcli config --set access-token
```
If you want to use the `dev-server` command in a preview environment, there's no one to log in. As a result, you need to set up a service token that you add to your secrets store, and then configure your preview environment to use that token.
To learn more about service tokens, read [Creating API access tokens](/home/account/api-create).
To learn more about authentication in the LaunchDarkly CLI, read [Authentication](/home/getting-started/ldcli#authentication).
## Start the Launch
Darkly CLI development serverNext, start the LaunchDarkly CLI dev-server and keep it running in the background:
```bash title="Start the dev-server" theme={null}
ldcli dev-server start
```
Then, configure the dev-server to access flags from your preferred LaunchDarkly project and environment. You will need:
* your project key, which you can copy from the Projects list in the LaunchDarkly UI. To learn how, read [Project keys](/home/account/project#project-keys).
* your environment key, which you can copy from the **Environments** list in the LaunchDarkly UI. To learn how, read [Environment keys](/home/account/environment/keys#environment-keys). Here's how:
```bash title="Configure the dev-server to access your project and environment" theme={null}
ldcli dev-server add-project --project --source
```
```bash title="Example" theme={null}
ldcli dev-server add-project --project default --source test
```
You can add as many projects as you like. If you're primarily working in one project, you can set that project as your default within the CLI. Then you do not need to pass in `--project` to subsequent `dev-server` commands.
Here's how:
```bash title="Set your default project for ldcli commands" theme={null}
# set your primary project
ldcli config --set project
```
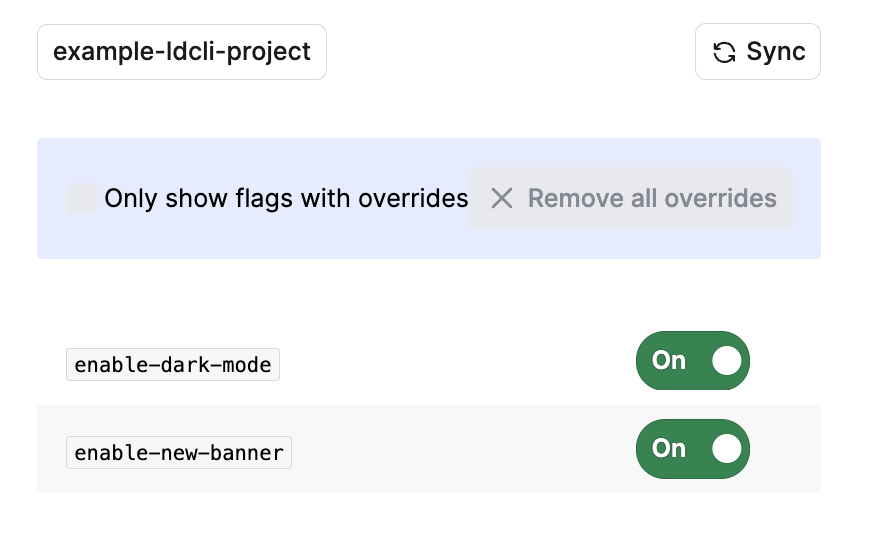
To verify that you've added your project and environment to the dev-server correctly, visit the UI for the dev-server at `http://localhost:8765/ui/`:
## Configure your SDK for testing
Next, configure your SDK to connect to the dev-server:
* Set the SDK credentials to the project key of a project you have added to the dev-server. Do not use the SDK key, mobile key, or client-side ID.
* Set the SDK service endpoints to `http://localhost:8765`, where the dev-server is running.
When you connect a client-side SDK to the ldcli dev-server for local testing, use your project key as the SDK credential and set all service endpoints to `http://localhost:8765`.
Do not use an SDK key, mobile key, or client-side ID with the dev-server. If you use a client-side ID, the SDK connects to LaunchDarkly instead of the dev-server, which can result in CORS errors.
This configuration means the SDK uses flags from the project and environment you've added to the dev-server, and checks the local dev-server for flag values, rather than connecting to LaunchDarkly.
Here are a few examples of this configuration:
```js title="JavaScript SDK" theme={null}
const options = {
streamUrl: 'http://localhost:8765',
baseUrl: 'http://localhost:8765',
eventsUrl: 'http://localhost:8765'
};
const client = LDClient.initialize('example-project-key', context, options);
```
```python title="Python SDK" theme={null}
config = Config(sdk_key='example-project-key',
stream_uri='http://localhost:8765',
base_uri='http://localhost:8765',
events_uri='http://localhost:8765')
ldclient.set_config(config)
```
To find an example specific to your SDK, read [Service endpoint configuration](/sdk/features/service-endpoint-configuration). Replace the example URIs with `http://localhost:8765`.After you configure your SDK, create an appropriate evaluation context for your testing. You can define one that you want to test with manually in your application. Alternatively, you can copy an existing context instance from the [context details page](/home/flags/context-details) in the LaunchDarkly UI.The context that you define does not need to match what your application might encounter in production, because the dev-server always provides a single variation value for each flag. The dev-server does not connect to LaunchDarkly, and it does not evaluate targeting rules, so every context receives the same flag value. You can override the flag value locally to test alternate paths through your code.
Here are a few examples of contexts you could test with:
```js title="JavaScript SDK" theme={null}
const context = {
kind: 'organization',
key: 'example-organization-key',
name: 'ACME Feature Management, LLC',
location: 'Springfield'
};
const client = LDClient.initialize('example-project-key', context, options);
```
```python title="Python SDK" theme={null}
contextDict = {
'kind': 'organization',
'key': 'example-organization-key',
'name': 'ACME Feature Management, LLC',
'location': 'Springfield'
}
context = Context.from_dict(contextDict)
```
To learn more about defining contexts, read [Context configuration](/sdk/features/context-config).
## Set and evaluate flags locally
Now that your SDK is configured to check the local dev-server for flag values, rather than connecting to LaunchDarkly, you can run your application and test it with these local flag values.
The dev-server retrieves flag values from your project and environment only when you explicitly sync with LaunchDarkly. As you perform local development and testing, you can override any flag values that you like. These flag values are served to all contexts.
You can use the dev-server UI at `http://localhost:8765/ui/`:
* To sync flag values from LaunchDarkly, click **Sync**
* To override the value of a particular flag, toggle it **Off** or **On**You can also use the LaunchDarkly CLI:
```bash title="Sync and override flag values" theme={null}
# to sync flag values
ldcli dev-server sync-project --project
# to override the value for a particular flag
ldcli dev-server add-override --flag --data --project
```
The `--project` argument is optional if you have set a default project using `ldcli config`.Use `ldcli dev-server --help` to explore additional commands.
## Conclusion
In this guide, we described the LaunchDarkly CLI's development server. The development server copies flags and flag values from your chosen LaunchDarkly project and environment, which enables you to develop and test locally without accessing LaunchDarkly. To learn about all the functionality exposed by the dev server, read the [reference guide](/guides/flags/ldcli-dev-server-reference).
For additional information, or to provide feedback, visit [LaunchDarkly CLI](https://github.com/launchdarkly/ldcli) on GitHub.