> ## Documentation Index
> Fetch the complete documentation index at: https://launchdarkly-preview.mintlify.site/llms.txt
> Use this file to discover all available pages before exploring further.
# Using segments and targeting to manage early access programs
> This guide provides strategies for managing early access programs with segments and targeting.
> For the complete documentation index, see [llms.txt](/llms.txt). For the full documentation snapshot, see [llms-full.txt](/llms-full.txt).
## Overview
LaunchDarkly feature flags let you map flag targeting to your precise business needs. Flag and segment targeting can help you govern critical parts of user experiences, tailoring them to each audience segment and adapting them to changing conditions, without requiring custom code.
With custom targeting, you can do things like:
* **Target on your terms:** Customize user experiences based on any attribute or combination of attributes with context-aware targeting, so that you deliver the right features to the right audiences. Easily manage hundreds of segments, see their impact, and manage their targeting across all of your flags in one place.
* **Automate feature entitlements:** Grant the right users access to the right features based on customer tier, such as Premium, Basic, or Free, local regulations, account-specific parameters, and more.
* **Securely leverage predefined user groups:** Utilize custom data sources like your own database or S3 storage to populate targeting segments. Or, choose from our external partners on our segments platform to sync audience data. As an example of how you can use segments and targeting to meet your business needs, this guide provides strategies for managing early access programs (EAPs).
### About early access programs
An EAP is a way to release a feature to a small subset of customers for early evaluation and testing. You can use EAPs to gather feedback from strategic stakeholders or users, gauge interest in the feature, create marketing opportunities, and build relationships with external stakeholders.EAPs can be appropriate for highly innovative or highly demanded features, or other features where feedback from strategically chosen customers would be valuable.
## Prerequisites
To complete this guide, you must have the following prerequisites:
* A LaunchDarkly account with the ability to edit segments. To learn more, read [Grant permission to edit EAP-related segments](#grant-permission-to-edit-eap-related-segments).
* Access to any external tools you are syncing segments with.
## Concepts
You should understand these concepts before you read this guide:
### Segments
There are three kinds of LaunchDarkly segments:
* [Segments synced with an external tool](/home/flags/synced-segments)
* [Rule-based segments](/home/flags/rule-based-segments)
* [List-based segments](/home/flags/list-based-segments)To learn more, read [Segments](/home/flags/segments).
### Context kinds
Some of the techniques in this guide limit your targeting to just one context kind. For early access programs, it's likely that you will be targeting on a context kind such as `user` or `customer`. If you need to target on more than one context kind, you cannot use large list-based segments.
To learn more, read [Context kinds](/home/flags/context-kinds).
## Initial planning
Before you begin building your EAP, consider the following questions:
* **Who are the key stakeholders and their roles/responsibilities/requirements?** This might include product managers and engineers.
* **Who initiates EAP releases?** This may be product managers or release managers.
* **Who approves EAP releases?** This may be developers, SREs, product managers, or release managers.
* **Who should be notified of EAP releases?** This includes internal staff and stakeholders including customer-facing teams.
* **What is the communication strategy for this kind of release?**
* Internal: Product managers might create an internal blog post for customer-facing account teams, including details on how to identify a good fit for this program.
* External: Account teams might reach out to customers who are a good fit. Product managers can provide enablement resources for EAP features.
* **Which customers will be in the EAP?** Decide criteria for good EAP candidates, who will communicate with those customers about the EAP.
* **How will you gather feedback on this release?** Account teams might explicitly gather feedback from customers enrolled in the EAP, or you might create a feedback collection form.
## Decide on a segment type
There are four ways you can target your EAP customers within segments:
* [Segments synced with an external tool](#segments-synced-with-an-external-tool): We recommend this approach if you plan to manage your list of EAP customers in either of these tools.
* [Large list-based segments](#large-list-based-segments): We recommend this approach if you have a very large list of EAP customers you maintain outside of LaunchDarkly in a tool we don't provide automatic syncing with.
* [Rule-based segments](#rule-based-segments): We recommend this approach if you want to target all customers that share a certain attribute.
* [Segments with individual targets](#segments-with-individual-targets): We recommend this approach if you have a very small number of customers in your EAP that can be managed manually. No matter what method you use, we recommend adding an `eap` tag to your segments so it's easy to search for segments associated with an early access program.
## Segments synced with an external tool
If you are using server-side SDKs, then you must also be using the Relay Proxy and it must be configured to use synced segments. To learn more, read [Implementing the Relay Proxy](/sdk/relay-proxy/implementing).
This method is our recommended approach to managing large EAPs if you use an external tool such as Amplitude or Segment.
}
iconPosition="left"
>
Configure your SDK: [Relay Proxy configuration](/sdk/features/relay-proxy-configuration)
### Create and populate synced segments
To begin, you must create the segment in your external tool. We have provided examples using Amplitude and Segment here, but you can use any of our segment integrations.
Open each section below to learn how to create a segment synced with LaunchDarkly in either Amplitude or Segment:
To configure a segment that syncs with an Amplitude cohort, you must choose a cohort in Amplitude and tell it to send data to LaunchDarkly. When you do this correctly, the cohort appears as a segment in LaunchDarkly.
To do this, first [add LaunchDarkly as a destination](/home/flags/amplitude#add-launchdarkly-as-a-destination) and then [sync the cohort](/home/flags/amplitude#sync-cohort-to-launchdarkly) to the LaunchDarkly destination.
To learn more, read [Syncing segments with Amplitude cohorts](/home/flags/amplitude).
To configure a segment that syncs with a Twilio Segment Audience, you must choose an Audience in Twilio Segment and configure it to use the **LaunchDarkly Audiences** destination. When you do this, the cohort appears as a segment in LaunchDarkly.
To do this, you will need to first [configure the LaunchDarkly Audiences destination](/home/flags/twilio#configure-the-launchdarkly-audiences-destination) and then [add the LaunchDarkly Audiences destination as a Twilio Segment Audience](/home/flags/twilio#add-the-launchdarkly-audiences-destination-as-a-twilio-segment-audience).
To learn more, read [Syncing segments with Twilio Segment Audiences](/home/flags/twilio).
After you set up your synced segment it will appear automatically in LaunchDarkly in the **Segments** list. We recommend adding an `eap` tag to the segment from the segment's settings. To learn how, read about [adding tags to segments](/home/account/tags#segments).
### Update synced segments
To update the customers included in a synced segment, make the changes in your external tool. The changes will automatically sync with the segment in LaunchDarkly.
## Large list-based segments
If you are using server-side SDKs, then you must also be using the Relay Proxy and it must be configured to use big segments. To learn more, read [Implementing the Relay Proxy](/sdk/relay-proxy/implementing).
Maintaining an external list of EAP customers allows you to have very large opt-in programs without impacting performance or payload size. You should use this option when you will have thousands of opt-ins to your program, and can export those opt-ins to a CSV file. This option requires that all of the targeted contexts are of the same context kind.
}
iconPosition="left"
>
Configure your SDK: [Relay Proxy configuration](/sdk/features/relay-proxy-configuration), [Big segments](/sdk/features/big-segments)
### Create and populate large list-based segments
Before you create and populate your segment, you must have a CSV file including all of the contexts to include in your EAP program. The context keys should be in the first column of the CSV file, and the file should not contain a header row\.To create and populate the segment:
1. Click **Create** and choose **Segment**. The "Create a segment" dialog appears.
2. Select **List-based segments**.
3. Give your segment a human-readable **Name**. We recommend following a naming convention that includes "eap:" at the beginning of your segment name.
4. Enter a **Key** for the segment. This field auto-populates based on the segment name, but you can change it if you need to.
5. Add a **Description** including information about the EAP the segment is for.
6. Select or create a new `eap` tag from the **Tags** menu.
7. Select **More than 15,000**:
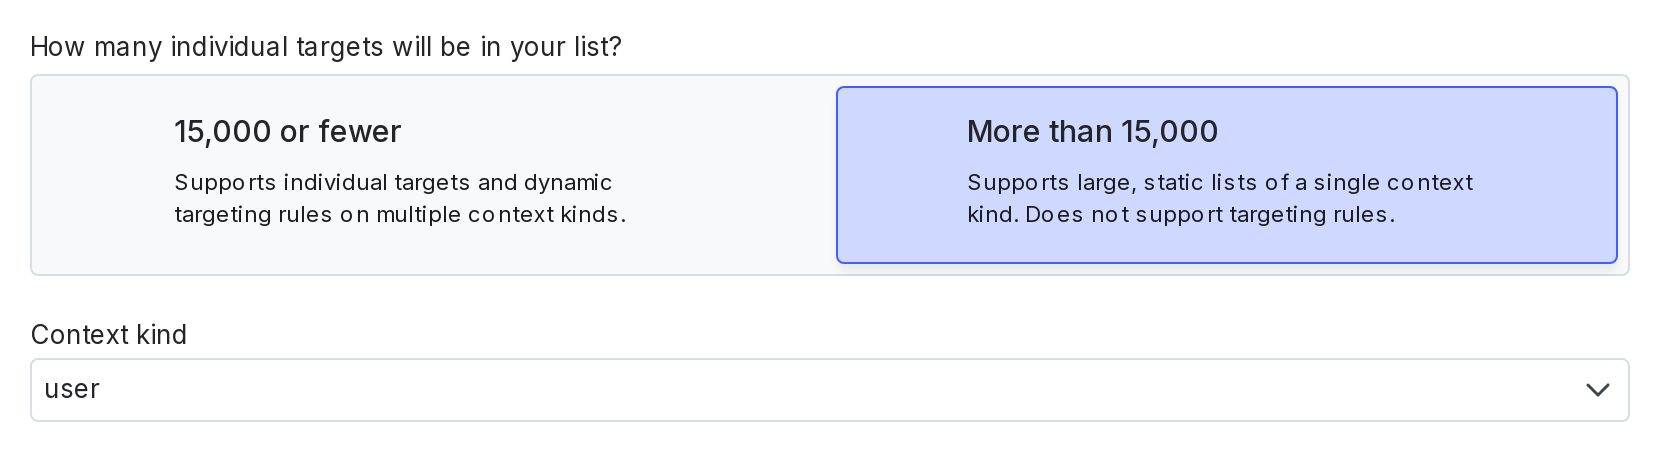
8. Select a context kind.
9. Click **Save segment**. An "Upload CSV" dialog appears.
10. Click **Select File**.
11. Select a CSV file to upload.
12. Click **Upload File**.
You can also use the REST API: [Create segment](/api-reference/segments/create-segment), [Create big segment import](/api-reference/segments/create-big-segment-import)
### Update large list-based segments
You can add to or overwrite the current list of contexts by uploading a new CSV file from the segment's details page. If you are merging contexts, they must be of all the same context kind.
When you upload the new CSV file:
* Select "Overwrite" to replace all existing contexts in the segment
* Select "Merge" to add to the existing contexts in the segment
## Rule-based segments
You can target on any context attribute in a rule-based segment. For example, perhaps you capture customer sign-ups using a form, and store it in an attribute called `eap-opt-in` that your SDK passes in to LaunchDarkly. In this scenario, your segment would target anyone with an `eap-opt-in` attribute value of `yes`.
### Create and populate rule-based segments
To create the segment:
1. Click **Create** and choose **Segment**. The "Create a segment" dialog appears.
2. Select **Rule-based segments**.
3. Give your segment a human-readable **Name**. We recommend following a naming convention that includes "eap:" at the beginning of your segment name.
4. Enter a **Key** for your segment. This field auto-populates based on the segment name, but you can change it if you like.
5. Add a **Description** including information about the EAP the segment is for.
6. Select or create a new `eap` tag from the **Tags** menu.
7. Select **15,000 or fewer**.
8. Click **Save segment**. The segment's details page appears.
To add targeting rules:
1. Click **+ Add rule**.
2. Select **Build a custom rule**.
3. Specify a **Context kind**.
4. Select an **Attribute**. This example uses `eap-opt-in`.
5. Choose an **Operator**. This example uses "is one of."
6. Enter **Values** for the rule. This example uses `yes`.
7. If you want to add more criteria, click the **+** beside the rule criteria.
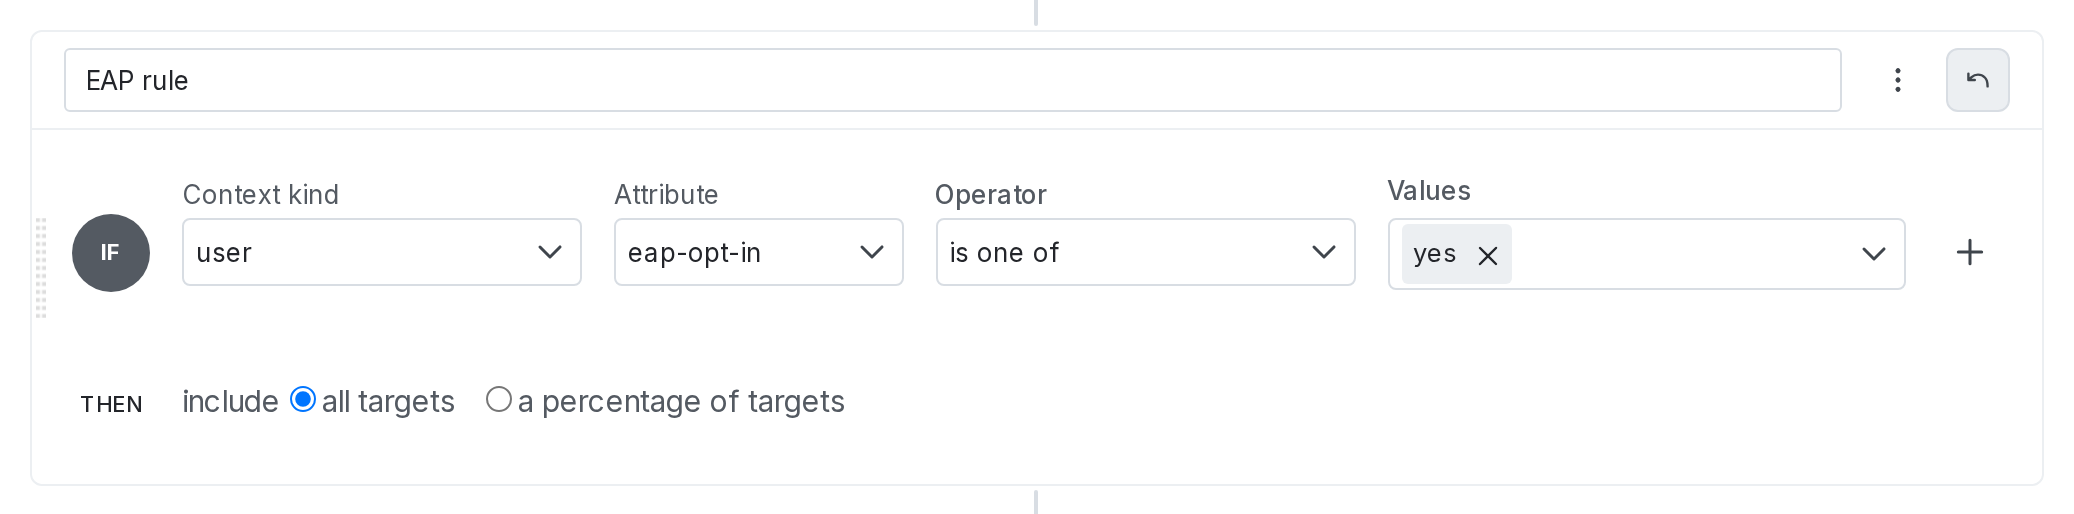
8. Include **all targets**.
9. Click **Save changes**.Now all contexts that match the targeting rule will be included in the EAP.Another approach, if you have multiple EAPs running concurrently, is to store multiple attribute values in your `eap-opt-in` attribute. For example, if you are running two different EAPs, the flag controlling the first EAP could target on `eap-opt-in` attributes with a value of `eap1`, and the flag controlling the second EAP could target on `eap-opt-in` attributes with a value of `eap2`. You can then pass in an array of values for customers that are in both EAPs.
}
iconPosition="left"
>
Configure your SDK: [Context configuration](/sdk/features/context-config)
### Update rule-based segments
To update a rule-based segment, navigate to the segment's details page and edit the existing rule, or add a new rule. Be sure you are passing in the desired context attribute values from your SDK.
You can also use the REST API: [Patch segment](/api-reference/segments/patch-segment)
## Segments with individual targets
You can use individual targets to implement small EAPs. Use individual targets when you have a smaller number of opt-ins and want to avoid the cost of implementing your own external list.
### Create and populate segments with individual targets
To create the segment:
1. Click **Create** and choose **Segment**. The "Create a segment" dialog appears.
2. Select **List-based segments**.
3. Give your segment a human-readable **Name**. We recommend following a naming convention that includes "eap:" at the beginning of your segment name.
4. Enter a **Key** for the segment. This field auto-populates based on the segment name, but you can change it if you need to.
5. Add a **Description** including information about the EAP the segment is for.
6. Select or create a new `eap` tag from the **Tags** menu.
7. Select the **15,000 or fewer** option.
8. Click **Save segment**. The segment's details page appears.
You can further edit the segment's settings by clicking the **gear** icon to manage settings.
To add EAP members to the segment:
1. Navigate to the segment's details page.
2. If you want to add `user` contexts, choose contexts to include in or exclude from the segment.
* You can search for contexts by name or key. Then, click the context name or key.
* If you want to target a context that has not yet been encountered by LaunchDarkly, enter its key.
3. (Optional) If you want to add context kinds other than `user`:
* Click **Edit context** in the "Included targets" section.
* Choose one or more context kinds and click **Save**. The "Individual targets" section updates to display the context kinds you selected.
* Add individual targets by name or key.
4. Click **Save**. The contexts are now individually targeted within the segment.
You can also use the REST API: [Create segment](/api-reference/segments/create-segment)
### Update segments with individual targets
To view or add new customers to the EAP, navigate to the segment's details page and view or edit the "Individual targets" section.
To remove a member from the segment, click the "x" next to the context in the "Individual targets" section and save your changes.
You can also use the REST API: [Patch segment](/api-reference/segments/patch-segment)
## Target segments in your EAP-related flags
After you create your EAP segments, you can target the EAP segment in your EAP-related flags using a targeting rule. Targeting a segment, rather than creating individual targeting rules for each flag, ensures you're targeting the exact same contexts every time and eliminates the need to update multiple targeting rules in multiple flags if something changes.
To target segments:
1. Navigate to the **Targeting** tab for the flag.
2. If the flag is off and the rules are hidden, click **View targeting rules**.
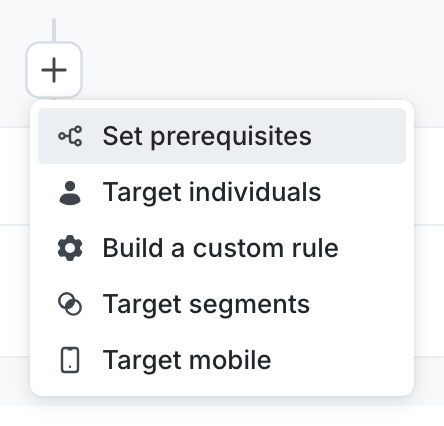
3. Click the **+** button between existing rules, and select **Target segments**.
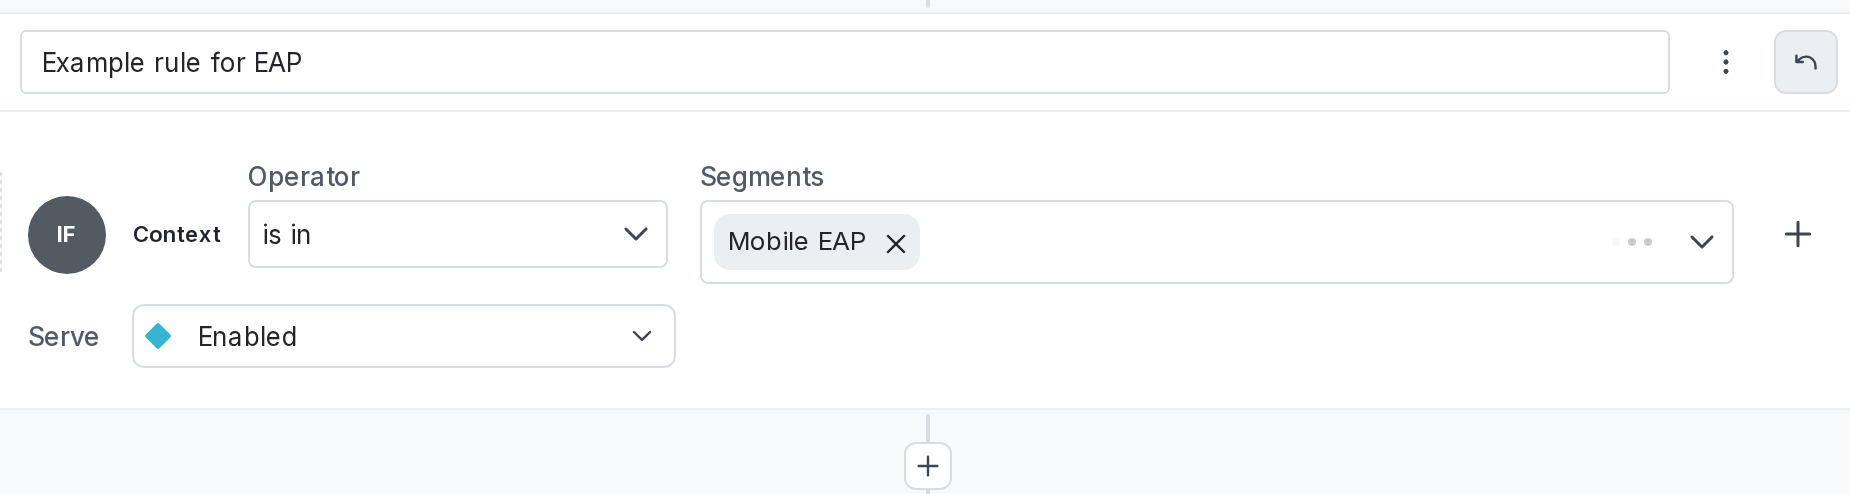
4. (Optional) Enter a name for the rule. We recommend including "EAP" in the name.
5. In the **Operator** menu, select "is in."
6. In the **Segments** menu, enter or select the EAP segments you want to target.
7. From the **Select...** menu, select the variation to serve.
8. Click **Review and save**.Here is an example of a targeting rule for segments:
You can also use the REST API: [Update feature flag](/api-reference/feature-flags/update-feature-flag)
## Find active EAPs
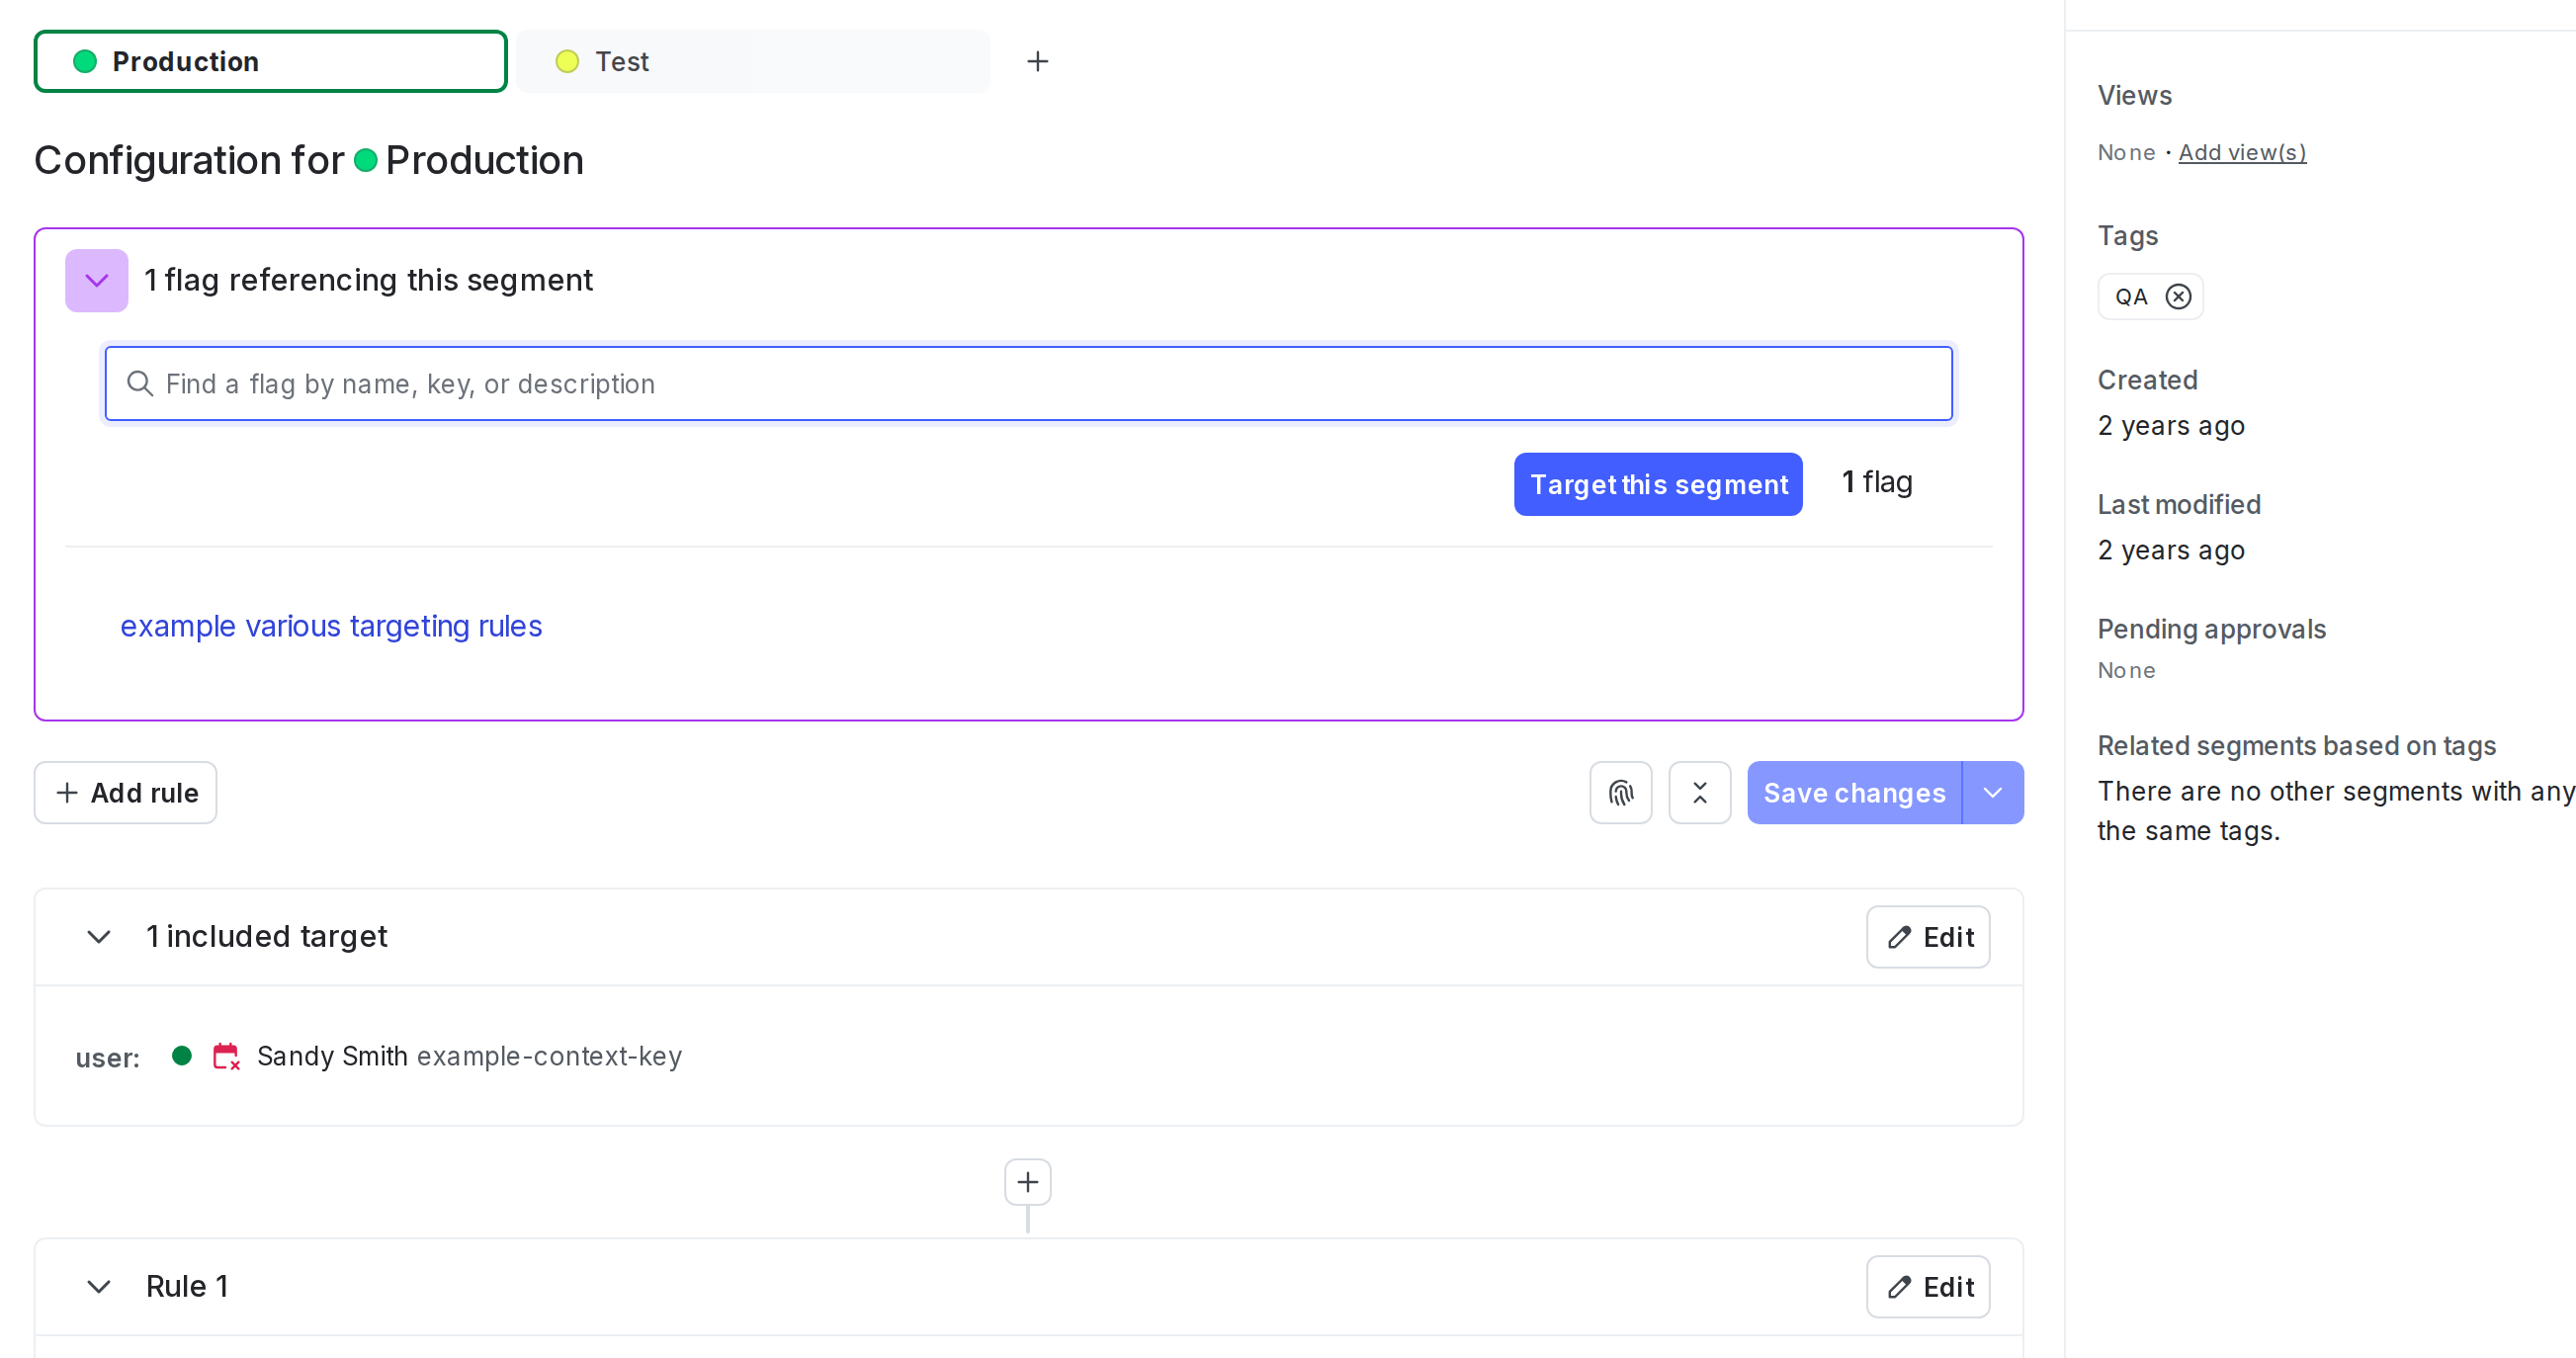
To view which flags are using an EAP segment, navigate to the **Segments** list and click the name of the EAP segment. The segment's details page appears. It displays how many flags target the segment and which variations those flags are serving.
## Grant permission to edit EAP-related segments
Anyone with a LaunchDarkly Project Admin, Maintainer, or Developer project role, or a Writer, Admin, or Owner base role can edit segments. You can use views to scope access to EAP-related segments.
To scope segment edit permissions with views:
1. Create a view for EAP work in each relevant project.
2. Link your EAP segments to that view.
3. Create or update a custom role so segment edit actions are scoped to that view.
4. Assign that role to the members or teams who should manage EAP segments.
This approach keeps role definitions consistent while letting you scope access by project and view\.To learn more, read [Onboarding to views](/guides/account/views-onboarding), [Use views in complex policy statements](/home/account/roles/role-scope#use-views-in-complex-policy-statements), and [Creating roles and policies](/home/account/roles/role-create).
## Conclusion
In this guide, you learned about managing early access programs using segments and targeting. LaunchDarkly offers a variety of segment types to easily manage and target your EAP customers, no matter the program size. For more examples of how segments and targeting can help you meet your business needs, read [Using entitlements to manage customer experience](/guides/flags/entitlements).