> ## Documentation Index
> Fetch the complete documentation index at: https://launchdarkly-preview.mintlify.site/llms.txt
> Use this file to discover all available pages before exploring further.
# Creating mutually exclusive experiments
> This guide provides an example of how to create mutually exclusive experiments using experiment layers.
> For the complete documentation index, see [llms.txt](/llms.txt). For the full documentation snapshot, see [llms-full.txt](/llms-full.txt).
## Overview
This guide provides an example of how to create mutually exclusive experiments using experiment layers. Mutually exclusive experiments are two or more experiments configured to prevent contexts from being included in more than one experiment at a time.
Generally, it is not a problem to include a context in multiple experiments. Our Experimentation offering minimizes interaction effects using audience allocation, and you can be confident in the winning variation even when running multiple concurrent experiments with overlapping audiences.
However, there are some cases in which you may not want to include each context in more than one experiment at a time. For example, you may be concerned about collisions between experiments that are testing similar parts of your app, like two different changes to the same section of your app’s user interface (UI), or experiments running on both the back end and front end of the same functionality. In these cases, you can create mutually exclusive experiments using experiment layers.
## Prerequisites
To complete this tutorial, you must have the following prerequisites:
* An active LaunchDarkly account with Experimentation enabled, and with permissions to create flags, edit experiments, and edit layers
* Familiarity with LaunchDarkly's Experimentation feature
* A basic understanding of your business's needs or key performance indicators (KPIs)
## Concepts
Before you begin, you should understand the following concepts:
### Layers
LaunchDarkly Experimentation achieves mutually exclusive experiments using "layers." You can add two or more experiments to a layer to ensure that those experiments never share the same traffic.
For example, you can create a "Checkout" layer that you add all of your experiments related to the checkout process to. Then, if you run multiple experiments at once, customers are never exposed to more than one experiment variation at a time.
To learn more, read [Experiment layers](/home/experimentation/mutually-exclusive#experiment-layers).
### Reservation amounts
Before you create an experiment, you should decide how much of the layer's traffic you want to include in the experiment. This is called the "reservation amount." The more experiments you expect to include in the layer, the lower the reservation amount be.
For example:
* If you plan to have only two experiments in the layer, you might want to reserve 50% of traffic for each.
* If you plan to have five experiments in the layer, you might want to reserve 20% for each. As new contexts encounter experiments within the layer, LaunchDarkly will assign contexts based on each experiment's reservation amount. In this example, each experiment will have a reservation amount of 25%. Although there are only three planned experiments for this layer, leaving an extra 25% available means you could add a fourth experiment later.
## Get started
Here is an example of multiple experiments split between three different layers. The "Promotions" layer includes three experiments, the "Product pages" layer includes two experiments, and the "Checkout" layer includes three experiments:
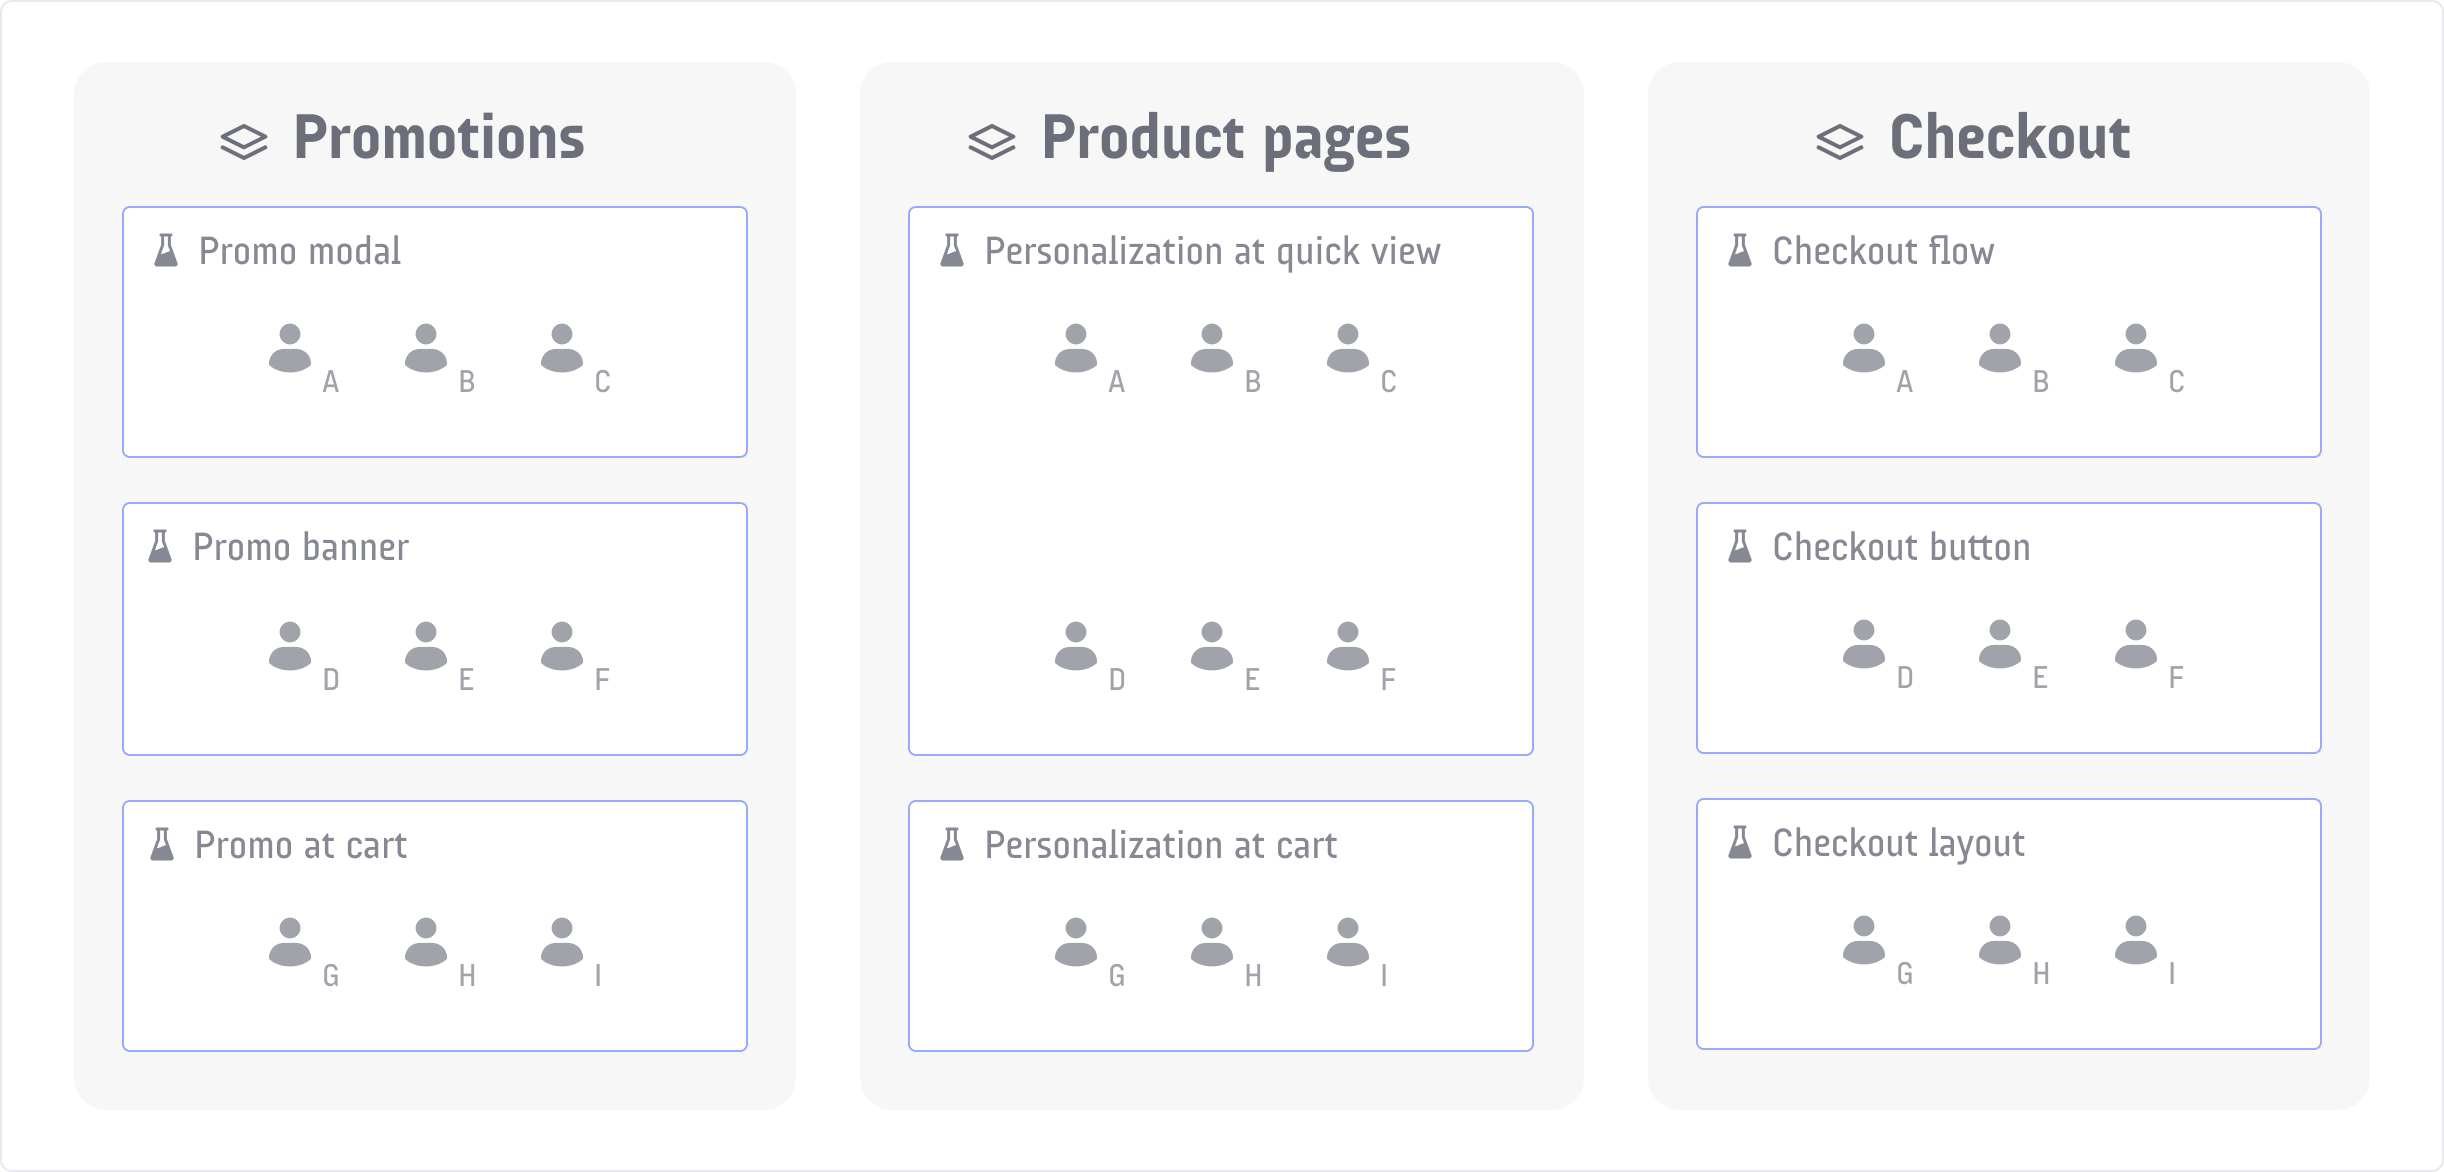
In this example, customer A can't be included in more than one experiment in the "Promotions" layer, more than one experiment in the "Product pages" layer, nor more than one experiment in the "Checkout" layer.
Customer A *can* simultaneously be included in the "Promo modal," "Personalization at quick view," and "Checkout flow" experiments, because those experiments are all in different layers.
This guide will walk you through creating a "Promotions" layer and the three mutually exclusive experiments within it.
## Create experiment flags
To begin, create the flags you will use in your experiments within the layer.
In this example, you will create three boolean experiment flags, one for each experiment in the layer:
* the "Promo modal" flag,
* the "Promo banner" flag, and
* the "Promo at cart" flag. To learn how, read [Experiment flags](/home/flags/experiment).
## Create metrics
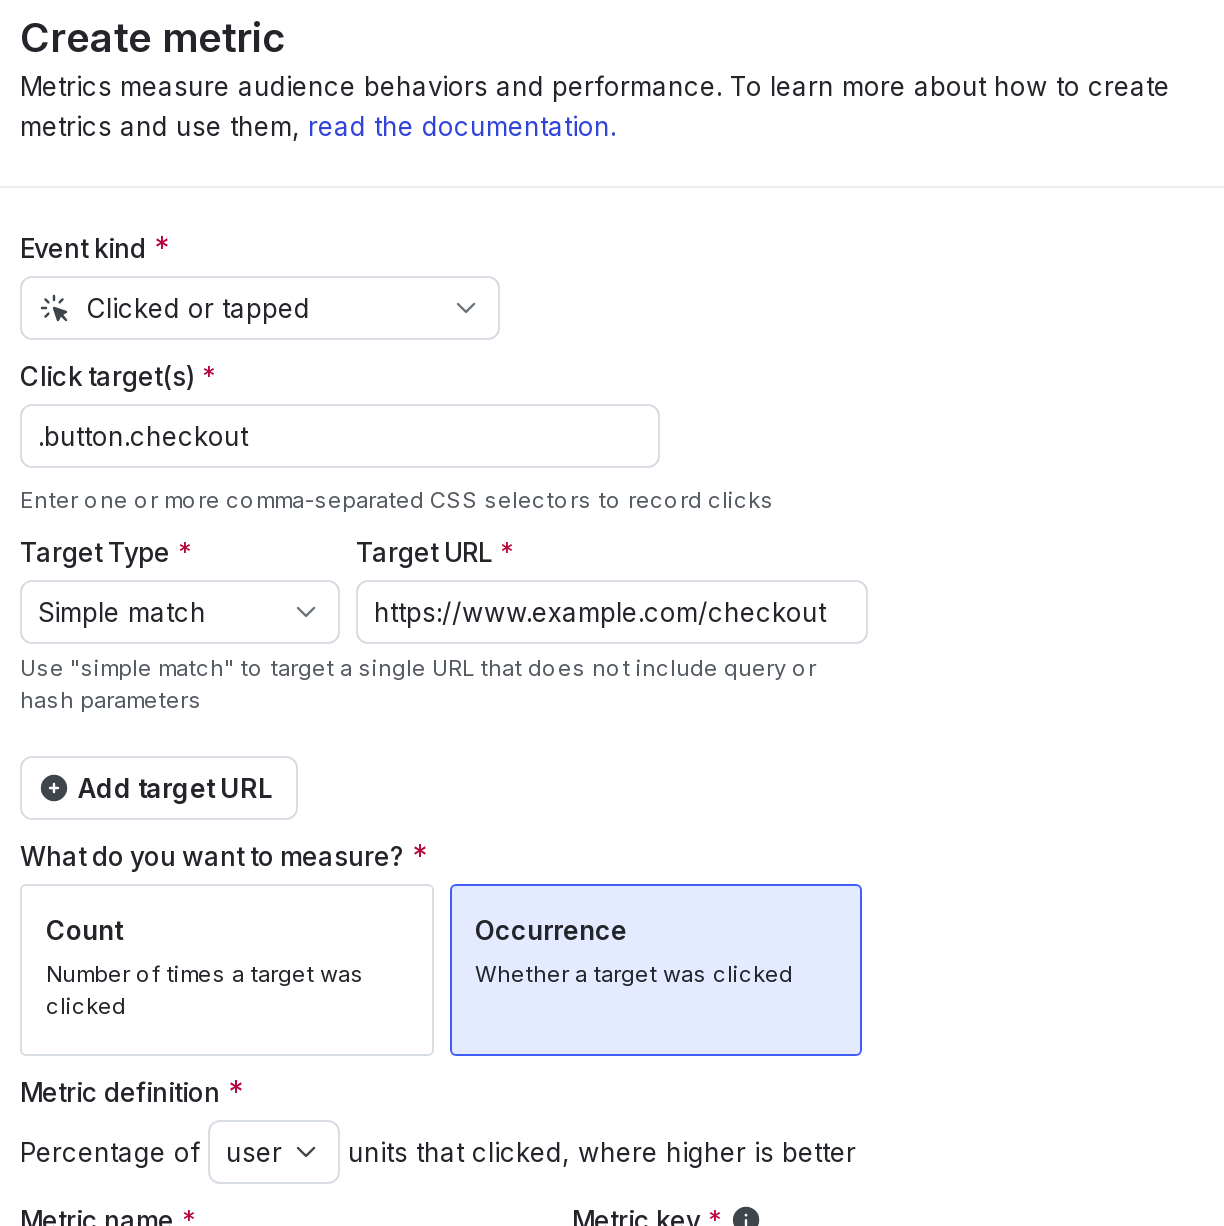
Next, create or select existing metrics to use in your experiments. In this example, you will be using a clicked or tapped conversion metric to measure completed checkouts.
To create the new metric:
1. Navigate to the **Metrics** list.
2. Click **Create metric**. The "Create metric" dialog appears.
3. Leave the "Data warehouse" selection on **LaunchDarkly hosted**.
4. Select a metric kind of **Clicked or tapped**.
5. Enter one or more CSS selectors in the **Click targets** field. In this example, you are using `.button.checkout`.
6. Specify the **Target type** you want to track behavior on. In this example, you are using "Simple match."
7. Enter the **Target URL**. In this example, you are using `https://www.example.com/checkout`.
8. Select **Occurrence**.
9. In the "Metric definition" section, select percentage of **User** units
10. Enter "Completed checkouts" as the **Name** for the metric.
11. Enter "Customers who complete a checkout by clicking the 'purchase' button" for the **Description**.
12. Click **Create metric**.Here is what the metric looks like:
To learn more, read [Clicked or tapped conversion metrics](/home/metrics/click).
## Create the first experiment and layer
Now, you will create the first experiment and the layer together.
Here's how:
1. Click **Create** and choose **Experiment**. The "Create experiment" dialog appears.
2. Enter "Promo modal" for the **Name**.
3. Enter a **Hypothesis**.
4. Click **Create experiment**. The experiment **Design** tab appears.
5. Leave **user** as the context kind to **Randomize by**.
6. Select "LaunchDarkly" as the **Metric source**.
7. Add the "Completed checkouts" **Metric** you created in the [Create metrics](#create-metrics) step.
8. Choose the "Promo modal" **Flag** you created in the [Create experiment flags](#create-experiment-flags) step.
9. Leave the "Default rule" as the **Targeting rule**.
10. In the "Audience allocation" section, click **Add experiment to mutual exclusion layer**.
11. Click the **Create layer** tab.
12. Add "Promotions" as the layer **Name**.
13. Click **Create layer**.
14. Enter a **Reservation** amount of 25%.
15. Click **Save layer**.
16. Choose "True" for the **Variation served to users outside this experiment**.
17. Select the **Sample size** for the experiment. In this example, you will include 5% of your audience.
18. Select a **Statistical approach** of Bayesian or frequentist.
* If you selected a statistical approach of Bayesian, select a preset or **Custom** success threshold.
* If you selected a statistical approach of frequentist, select:
* a **Significance level**.
* a one-sided or two-sided **Direction of hypothesis test**.
You can select a statistical approach of **Bayesian** or **Frequentist**. Each approach includes one or more analysis options.
The Bayesian options include:
* **Threshold**:
* **90%** probability to beat control is the standard success threshold, but you can raise the threshold to **95%** or **99%** if you want to be more confident in your experiment results.
* You can lower the threshold to less than 90% using the **Custom** option. We recommend a lower threshold only when you are experimenting on non-critical parts of your app and are less concerned with determining a clear winning variation.
The frequentist options include:
1. **Enable sequential testing**: Sequential testing lets you act on the results of your experiment at any time, instead of waiting for a specific sample size. To learn more, read [Fixed-horizon versus sequential](/guides/statistical-methodology/choosing#fixed-horizon-versus-sequential).
2. **Significance level**:
* **0.05** p-value is the standard significance level, but you can lower the level to **0.01** or raise the level to **0.10**, depending on whether you need to be more or less confident in your results. A lower significance level means that you can be more confident in your winning variation.
* You can raise the significance level to more than 0.10 using the **Custom** option. We recommend a higher significance level only when you are experimenting on non-critical parts of your app and are less concerned with determining a clear winning variation.
3. **Direction of hypothesis test**:
* **Two-sided**: We recommend two-sided when you're unsure about whether the difference between the control and the treatment variations will be negative or positive, and want to look for indications of statistical significance in both directions.
* **One-sided**: We recommend one-sided when you feel confident that the difference between the control and treatment variations will be either negative or positive, and want to look for indications of statistical significance only in one direction.
4. (Optional) Select a [Multiple comparisons correction (MCC)](/guides/statistical-methodology/mcc) option:
* Select **Apply across treatments** to correct for additional comparisons from multiple treatments
* Select **Apply across metrics** to correct for additional comparisons across multiple metrics
* Select **Apply across both metrics and treatments** to correct for additional comparisons from multiple metrics and multiple treatments
To learn more, read [Bayesian versus frequentist statistics](/guides/experimentation/bayesian-frequentist).
18. Scroll to the top of the page and click **Save**.
## Create the second and third experiments
To create the second and third experiments, you will repeat the process above, except you will use different flags, and you will add the experiments to the new layer you just created.
To create the second experiment:
1. Click **Create** and choose **Experiment**.
2. Enter "Promo banner" for the **Name**.
3. Enter a **Hypothesis**.
4. Click **Create experiment**. The experiment **Design** tab appears.
5. Leave **user** as the context kind to **Randomize by**.
6. Select "LaunchDarkly" as the **Metric source**.
7. Add the "Completed checkouts" **Metric**.
8. Choose the "Promo banner" **Flag**.
9. Leave the "Default rule" as the **Targeting rule**.
10. In the "Audience allocation" section, click **Add experiment to mutual exclusion layer**.
11. Select the "Promotions" layer from the menu.
12. Enter a **Reservation** amount of 25%.
13. Click **Save layer**.
14. Select **Sample size** of 5%.
15. Choose "False" for the **Variation served to users outside this experiment**.
16. Select **Split equally** for the variations split.
17. Select the same **Statistical approach** you chose for the first and second experiment.
18. Scroll to the top of the page and click **Save**.To create the third experiment:
19. Click **Create** and choose **Experiment**.
20. Enter "Promo at cart" for the **Name**.
21. Enter a **Hypothesis**.
22. Click **Create experiment**. The experiment **Design** tab appears.
23. Leave **user** as the context kind to **Randomize by**.
24. Select "LaunchDarkly" as the **Metric source**.
25. Add the "Completed checkouts" **Metric**.
26. Choose the "Promo at cart" **Flag**.
27. Leave the "Default rule" as the **Targeting rule**.
28. In the "Audience allocation" section, click **Add experiment to mutual exclusion layer**.
29. Select the "Promotions" layer from the menu.
30. Enter a **Reservation** amount of 25%.
31. Click **Save layer**.
32. Select **Sample size** of 5%.
33. Choose "False" for the **Variation served to users outside this experiment**.
34. Select **Split equally** for the variations split.
35. Select the same **Statistical approach** you chose for the first and second experiment.
36. Scroll to the top of the page and click **Save**.
## Toggle on the flags
When you are ready to run your experiments, toggle **On** the related flags.
## Start experiment iterations
The last step is to start an iteration for each of your mutually exclusive experiments.
To start your experiment iterations:
1. Navigate to the **Experiments** list.
2. Click on "Promo modal."
3. Click **Start**.
4. Repeat steps 1-3 for the remaining two experiments. You are now running three mutually exclusive experiments, with no overlap between the contexts included in each.
## Read results
When you are finished running your experiments, you can look at which variation has the highest probability to be best, or the highlighted p-value, to decide which features to ship to your customers. To learn more, read [Analyzing experiments](/home/experimentation/analyze).
## Conclusion
In this guide, you learned how to create layers to prevent contexts from being included in multiple concurrent experiments.
Mutually exclusive experiments are not limited to two or three at a time. When it's time to create your own, you can create as many mutually exclusive experiments as you need to prevent collisions between experiments running on similar parts of your app or infrastructure.
To get started building your own experiment, follow our [Quickstart for Experimentation](/home/experimentation/quickstart).
Snowflake users who want to explore this data more in-depth can send all of the experiment data to a Snowflake database using the Snowflake Data Export integration. By exporting your LaunchDarkly experiment data to the same Snowflake warehouse as your other data, you can build custom reports in Snowflake to answer product behavior questions. To learn more, read [Snowflake Data Export](/integrations/data-export/snowflake).
You can also run experiments using warehouse native metrics. To learn more, read [Snowflake native Experimentation](/home/warehouse-native/snowflake).