> ## Documentation Index
> Fetch the complete documentation index at: https://launchdarkly-preview.mintlify.site/llms.txt
> Use this file to discover all available pages before exploring further.
# Example experiments
> This guide provides examples of experiments you can build in LaunchDarkly.
> For the complete documentation index, see [llms.txt](/llms.txt). For the full documentation snapshot, see [llms-full.txt](/llms-full.txt).
## Overview
This guide provides examples of experiments you can build in LaunchDarkly.
The three examples include:
* [Determining the best time to ask customers to opt-in to notifications](#example-1-notifications-opt-in)
* [Deciding which third-party libraries to use](#example-2-third-party-library-assessment)
* [Finding out if longer trial times results in higher conversions to paid accounts](#example-3-trial-account-conversions)
## Example 1: Notifications opt-in
When a customer downloads your app onto their phone or tablet for the first time, it may ask them to opt-in to notifications from the app. Some apps ask the customer to opt-in right away, and others wait until the customer has interacted with your app for a certain amount of time before asking.
Asking the customer to opt-in right away may feel premature, as the customer might not know yet if they like your app enough to want notifications. However, waiting too long may also result in fewer opt-ins, as the customer may have become comfortable using your app without notifications.
The Apple app store allows apps to ask customers to opt-in only once. This means it's important to time your one opt-in request at a point when the customer is most likely to opt-in. You can use Experimentation to find out when this time is.
### Hypothesis
To begin, create a hypothesis for your experiment. Here is an example:> If we prompt a customer to opt-in to notifications on the fifth time they open our app, customers will opt-in to notifications significantly more often than those who are prompted the first time they open our app, and slightly more often than those who are prompted on the tenth time they open our app. This is because they will have had more time to use the product, but won't have gotten used to using it without notifications.
### Sample size
Next, determine the sample size you need for your experiment. If you are running a [frequentist](/guides/experimentation/bayesian-frequentist) experiment, we recommend you use LaunchDarkly's [sample size calculator](https://launchdarkly.com/sample-size-calculator/) to determine your sample size and run time.
If you are running a Bayesian experiment, we generally recommend you run experiments for at least one week. After you begin running an experiment, the experiment's **Results** tab displays a sample size estimator in the "Summary" section that gives an estimate of how much more traffic needs to encounter your experiment before reaching your chosen probability to be best.
In this example, you know that about 2,000 people download your app per day, and you'd like to have at least 40,000 customers in your experiment. You decide to include 100% of your new customers in the sample to get the fastest results. So, you will run this experiment for 21 days to include about 42,000 customers.
Here is the sample size calculation:`2,000 customers x 21 days x 100% of customers = 42,000 customers in experiment`As you decide on the sample size, you may want to consider the number of Experimentation keys you have available in the LaunchDarkly plan you subscribe to. For example, if you have 50,000 Experimentation keys per month included in your plan, and you run ten experiments per month, you may want to limit your experiment audiences to no more than 5,000 keys each. To learn more, read [Experimentation keys](/home/account/calculating-billing#experimentation-keys).
### Metric
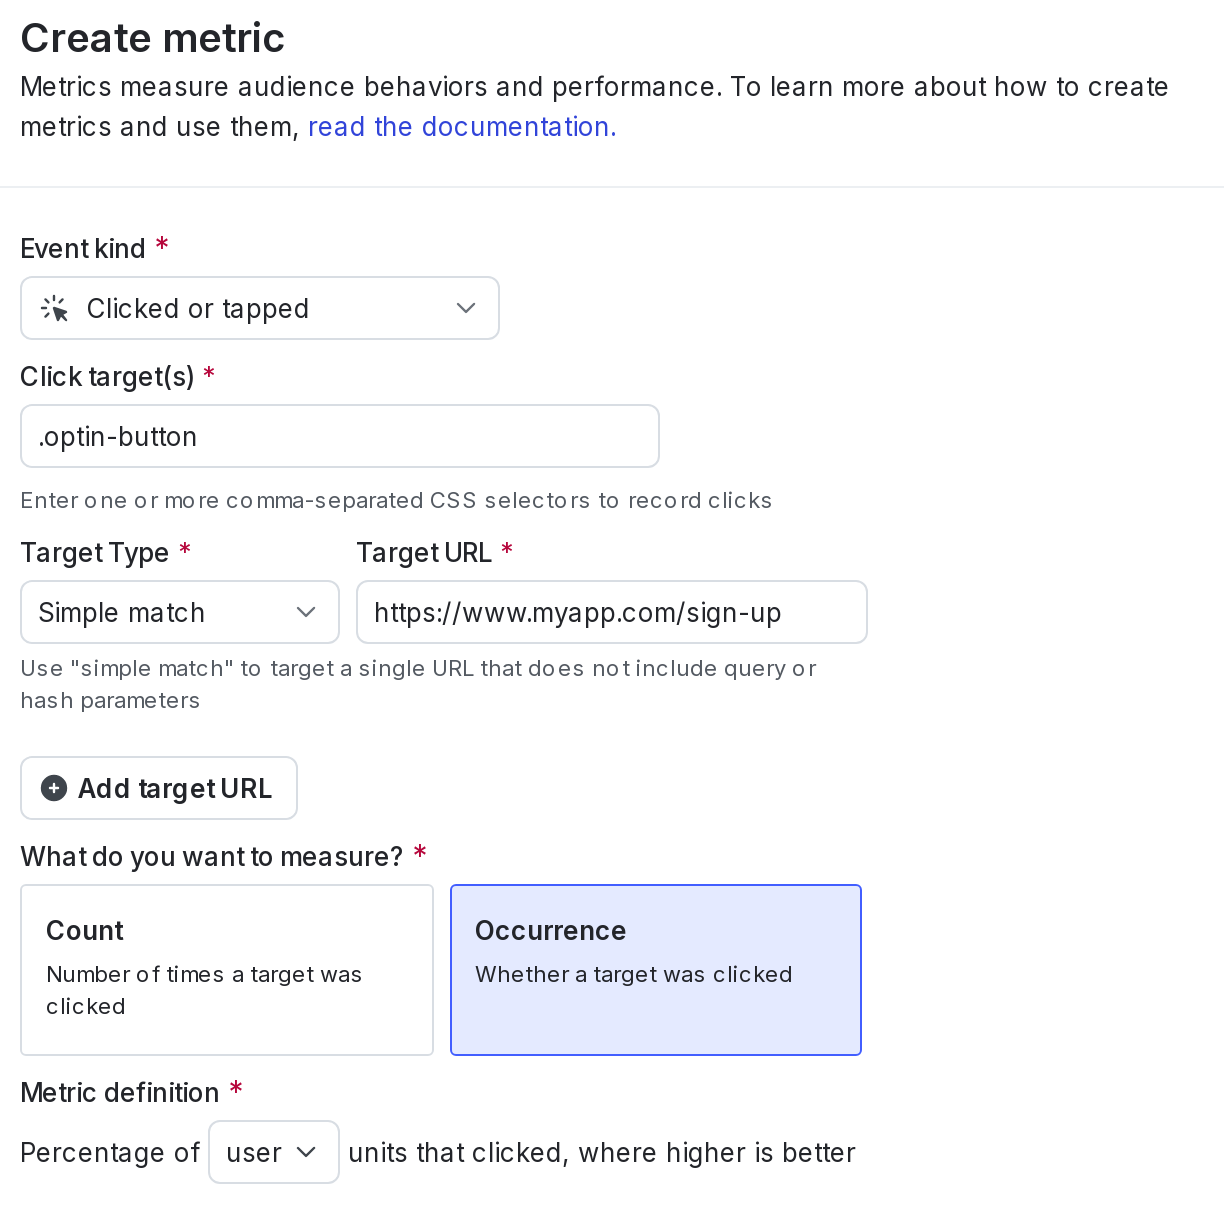
You will use a clicked or tapped conversion metric to track when customers opt-in to notifications. To learn how to create a clicked or tapped conversion metric, read [Clicked or tapped conversion metrics](/home/metrics/click).
Select the following options for the metric:
* measure **Occurrence**
* for the percentage of **User** units that clickedHere is what your metric will look like:
### Variations
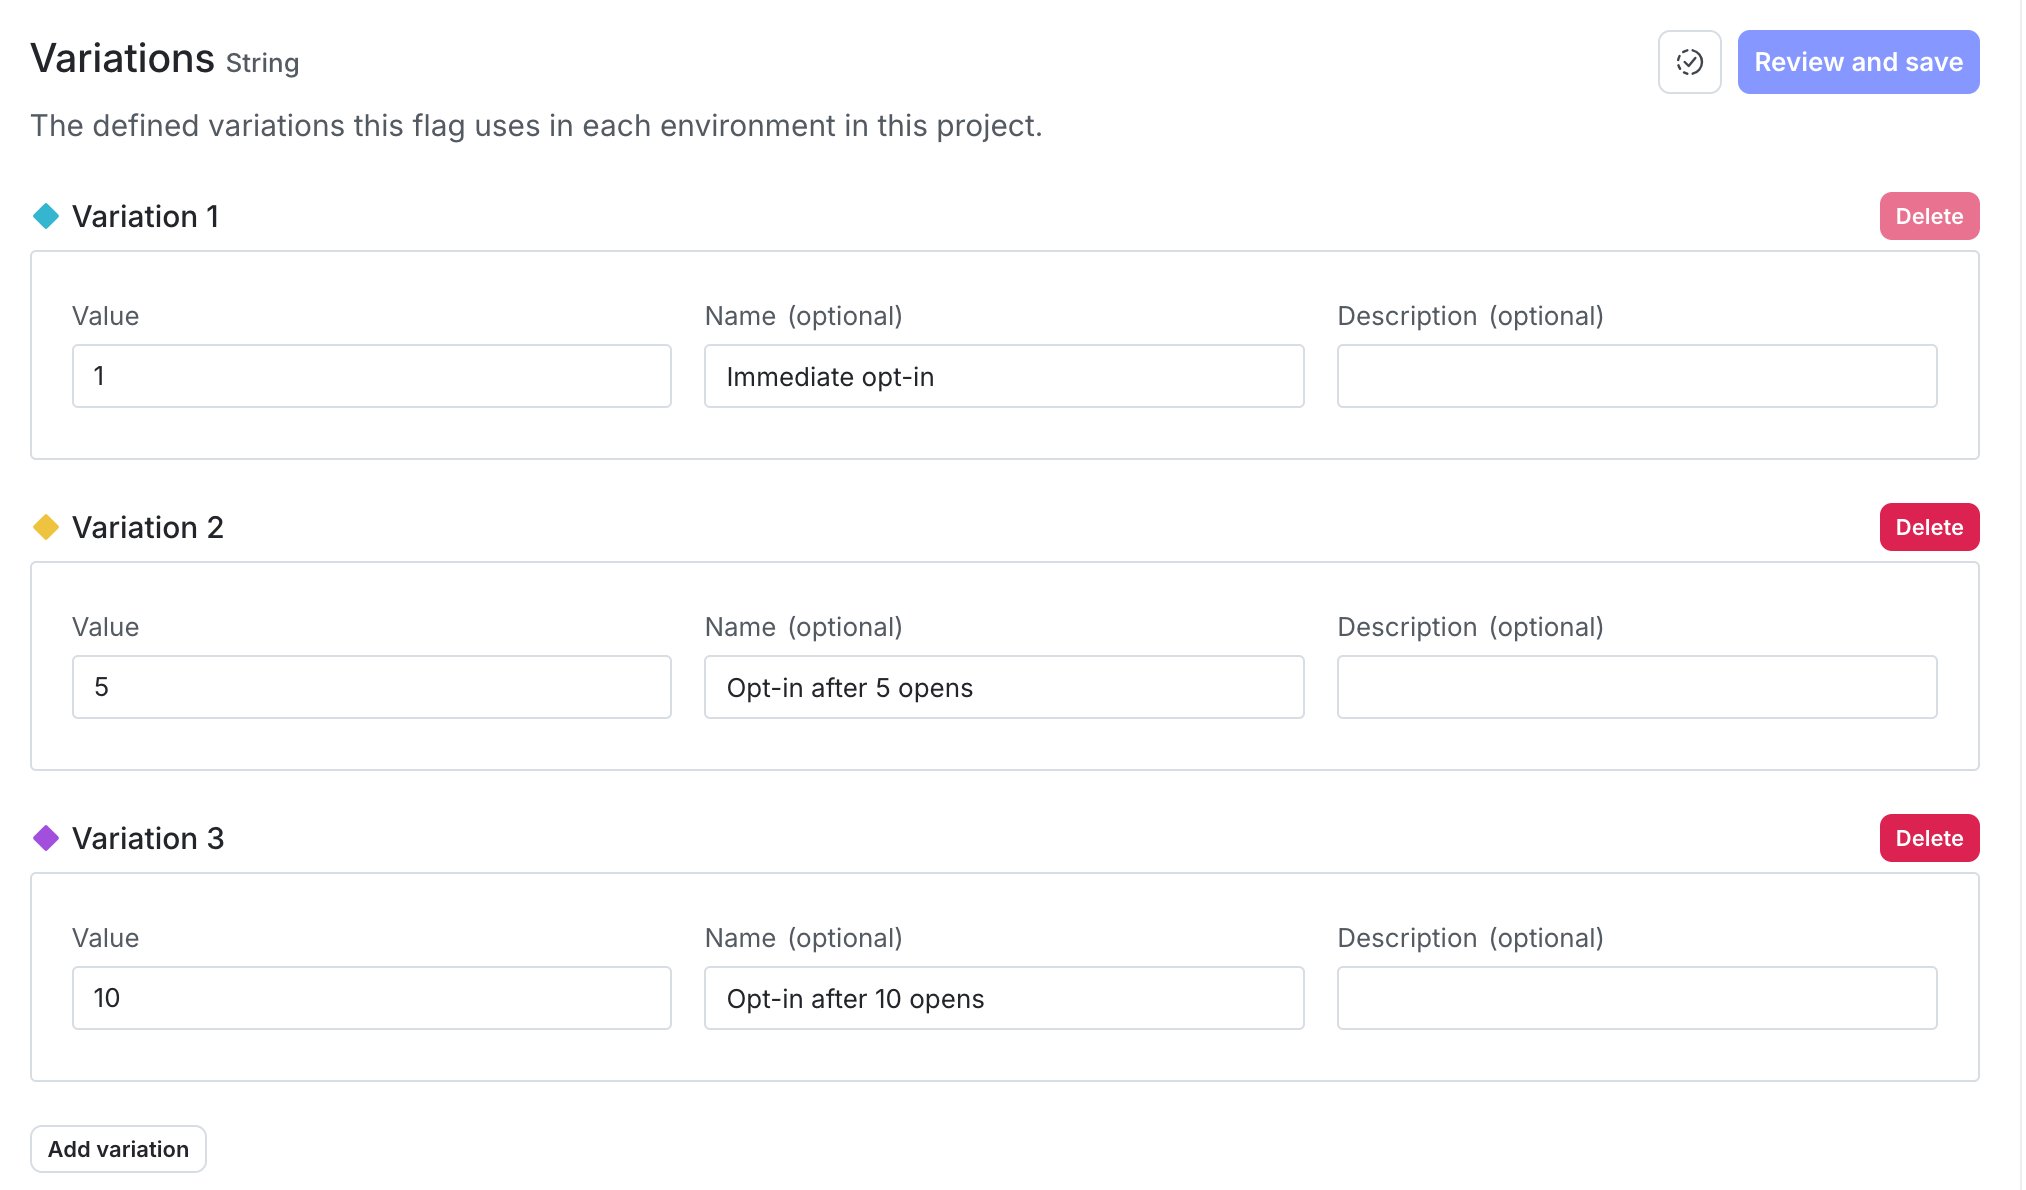
Create your flag with three variations. Use the **Experiment** flag template and **Number** flag type:
* Opt-in prompt on 1st open, which acts as the control
* Opt-in prompt on 5th open
* Opt-in prompt on 10th openHere is what your flag's variations will look like:
### Audience
You want to include only customers who have newly downloaded the app. To accomplish this, you can build a rule on your flag to exclude customers that have already made an opt-in decision. To learn how, read [Target with flags](/home/flags/target).
Here is what your flag's **Targeting** tab will look like with a targeting rule:
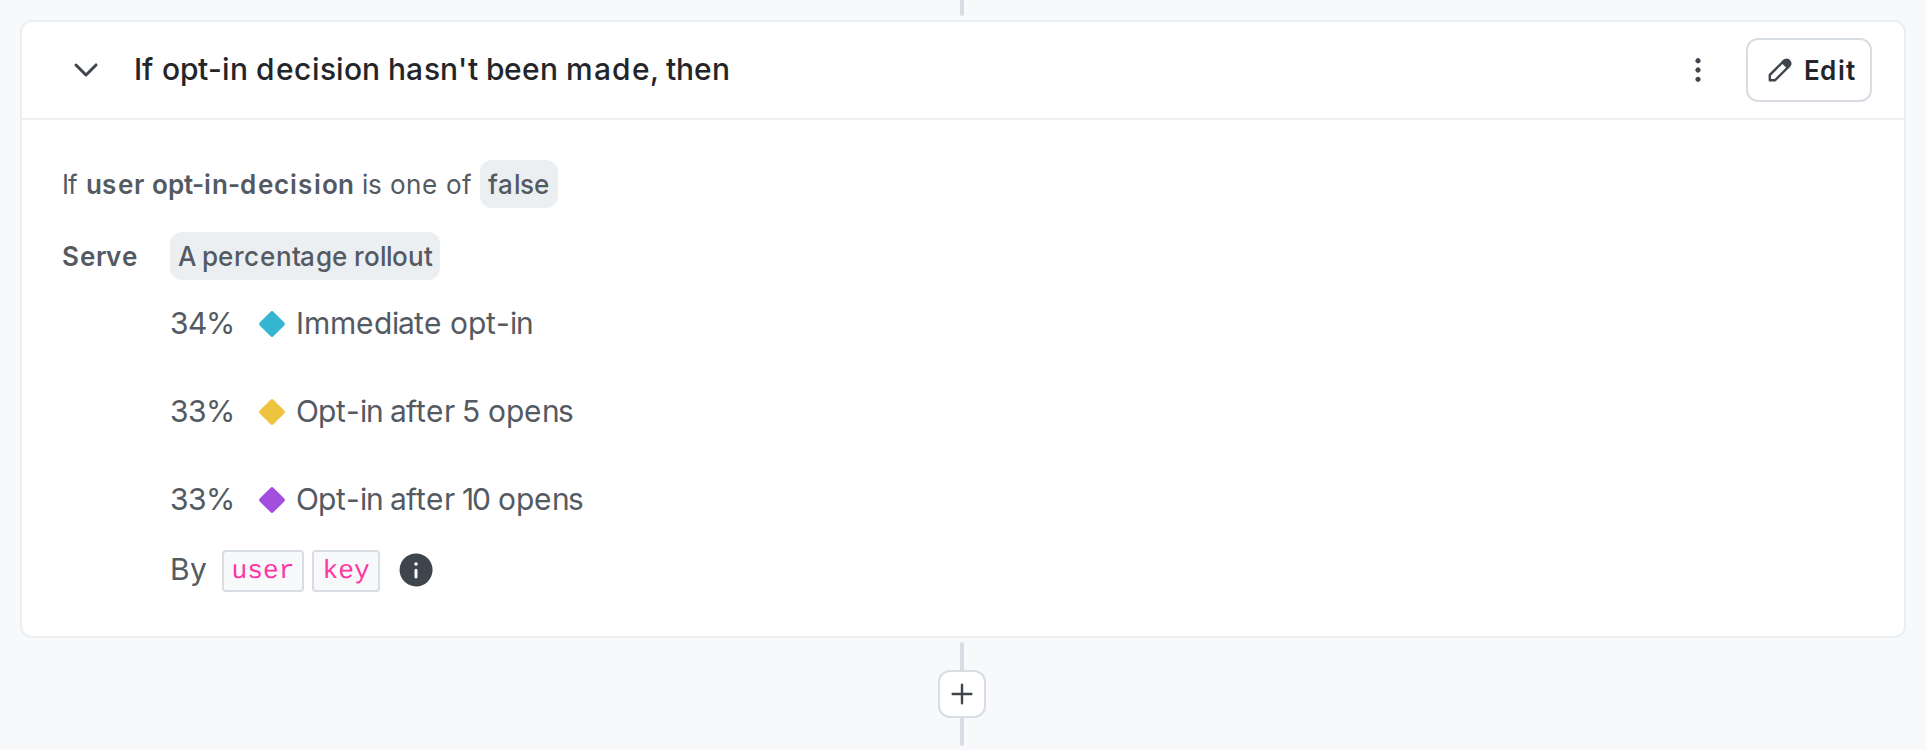
When you build an experiment, you can choose which flag targeting rule to run the experiment on. This ensures you include the right group of customers in your experiment. In this example, run the experiment on the flag’s targeting rule that you just created, not the flag’s default rule.
### Experiment design
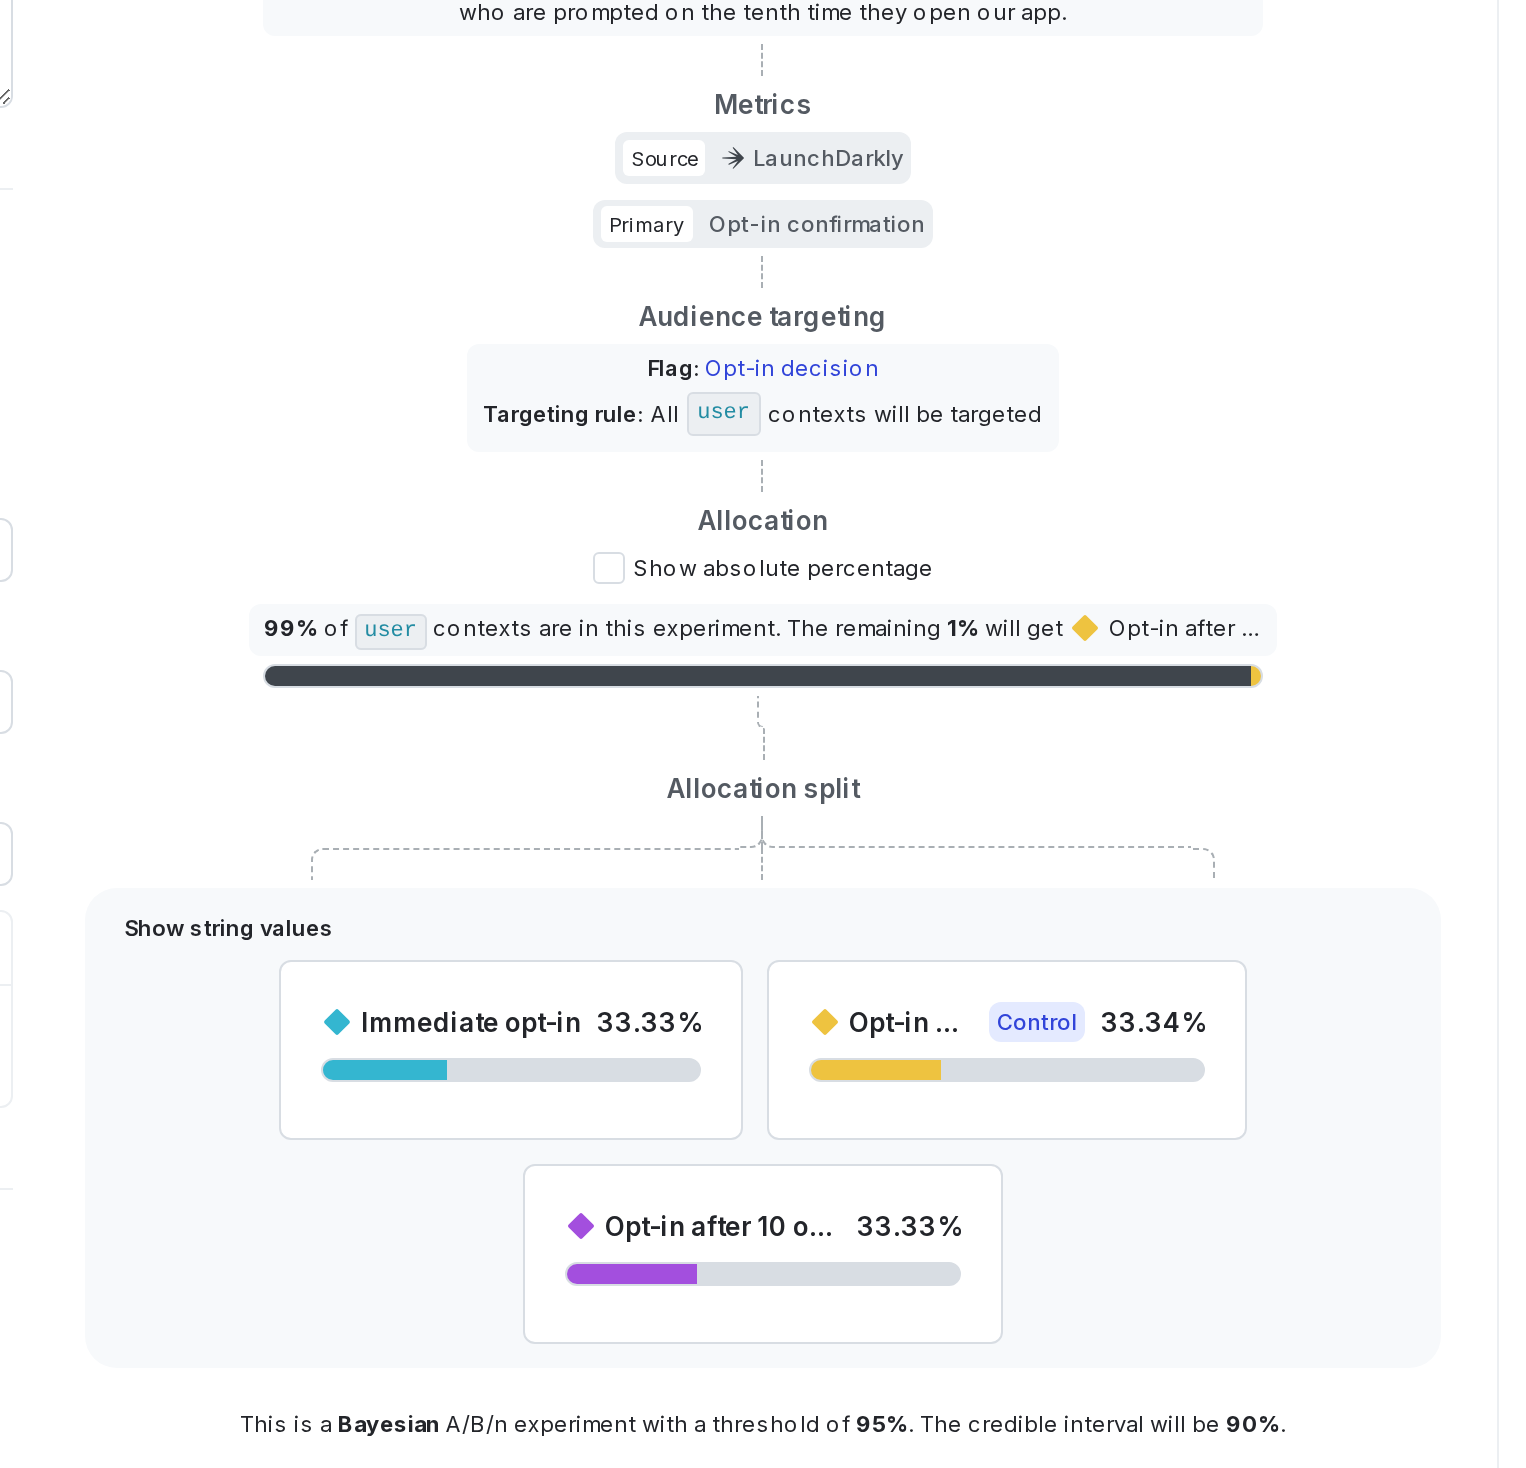
Finally, combine your hypothesis, metric, flag, and audience into an experiment. To learn how, read [Creating experiments](/home/experimentation/create).
Here is what your finished experiment will look like in LaunchDarkly:
## Example 2: Third-party library assessment
Adding JavaScript libraries to your front end has both benefits and drawbacks. Each library adds latency to your site load time, but can also enable functionality with benefits to your organization such as analytics, personalization, ad revenue, audience assessment, surveys, and more.
To find the balance between site load time and total revenue, you can use experimentation to measure your site revenue with different third-party JavaScript libraries installed.
### Hypothesis
To begin, create a hypothesis for your experiment. Here is an example:> If we install third-party libraries X and Y on two different versions of our site will yield total revenue increases for both versions, compared to the control with neither library X nor library Y installed, because customers will spend more when the site offers more functionality.
### Sample size
Next, determine the sample size you need for your experiment. In this example, you do not want to include your entire user base in your experiment, so decide to limit your experiment to 10% of your customers. You know that about 60,000 people visit your site per day, and you'd like to have at least 120,000 customers in your experiment. So, you will run this experiment for 20 days.
Here is the sample size calculation:`60,000 customers x 20 days x 10% of customers = 120,000 customers in experiment`As you decide on the sample size, you may want to consider the number of Experimentation keys you have available in the LaunchDarkly plan you subscribe to.
### Metric
You will use a custom numeric metric to track total revenue. To learn how to create a custom numeric metric, read [Custom numeric metrics](/home/metrics/custom-numeric).
Select the following options for the metric:
* **Average** for multiple event value aggregation
* **Average** `value`
* of the per **User** event `average`
* where **Higher is better**Here is what your metric will look like:
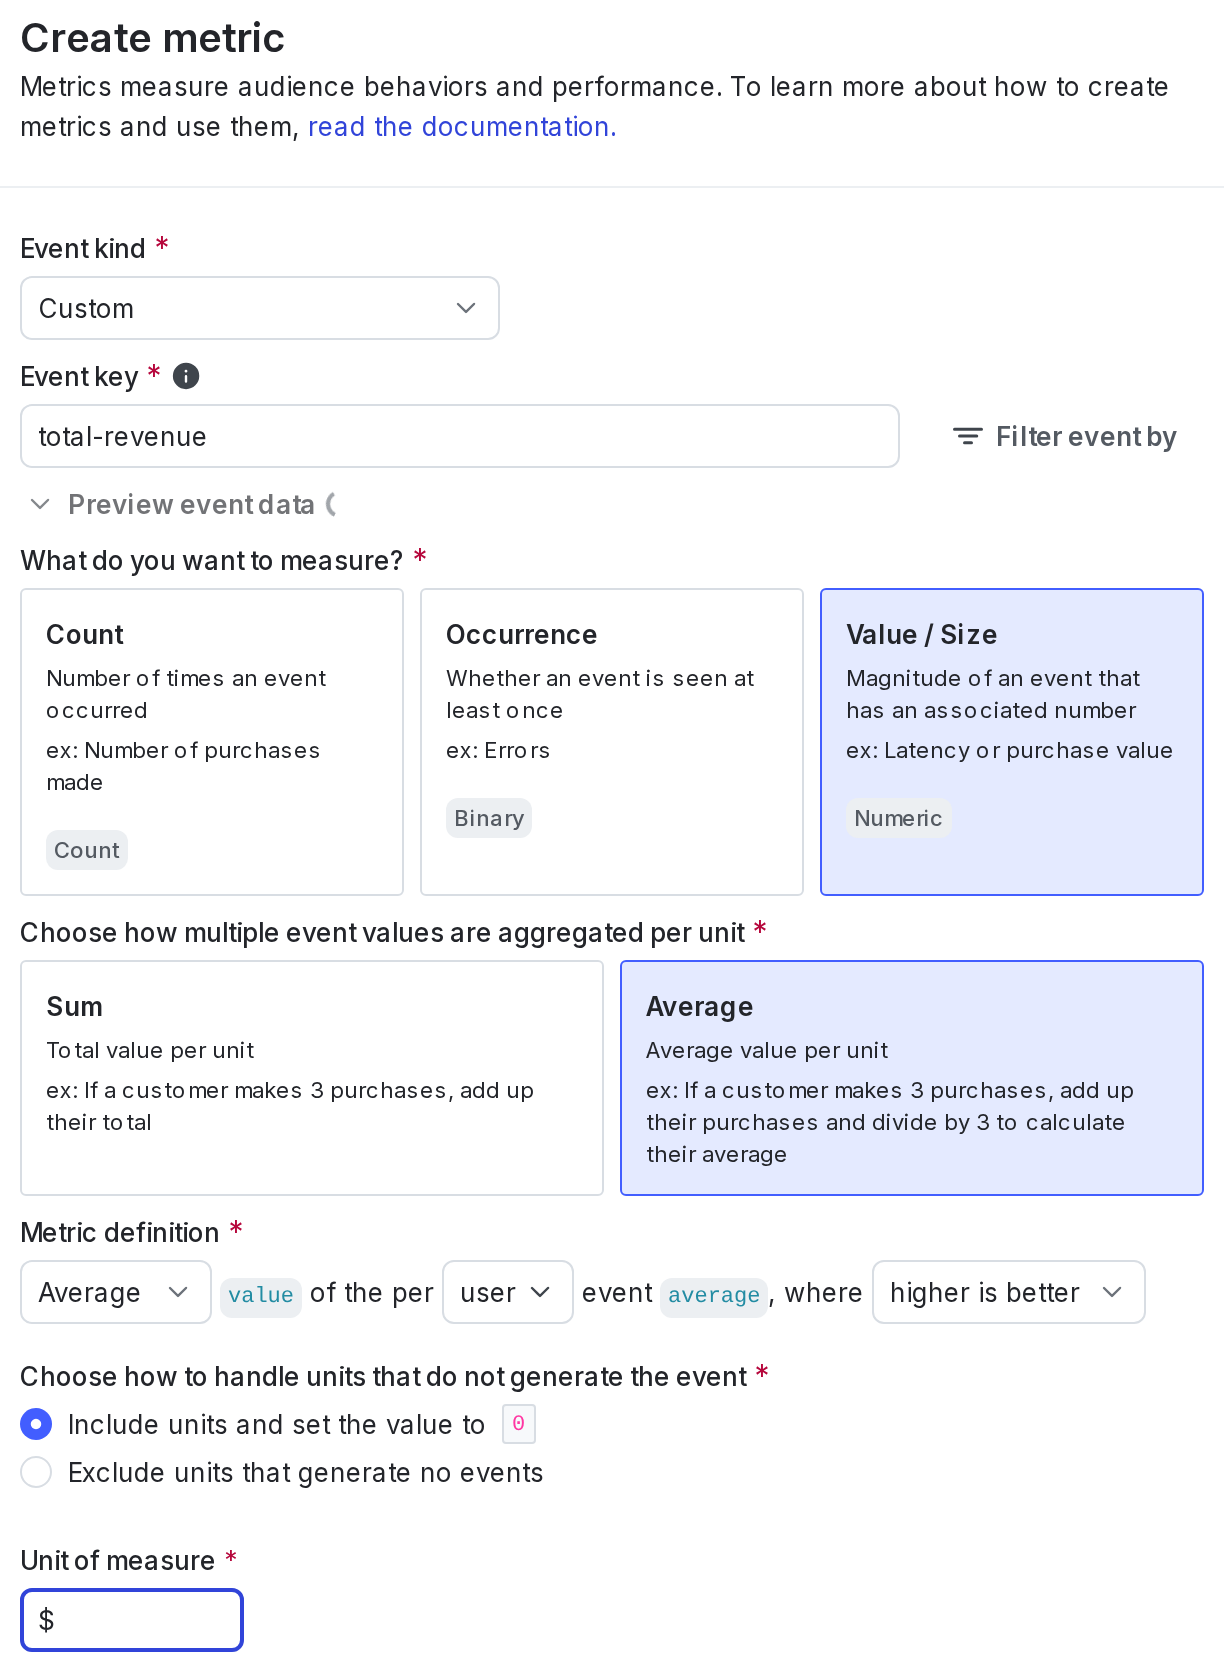
When you create the metric, enter the appropriate event key from your codebase. In this example, the event key is "Total revenue."
Sending custom events to LaunchDarkly requires a unique **event key**. You can set the event key to anything you want. Adding this event key to your codebase lets your SDK track actions customers take in your app as events. To learn more, read [Sending custom events](/sdk/features/events).
LaunchDarkly also automatically generates a **metric key** when you create a metric. You only use the metric key to identify the metric in API calls. To learn more, read [Creating and managing metrics](/home/metrics/create-metrics).
Although you will limit your decision-making based on the results of your primary metric, you are also curious about the latency time each third-party library adds. You will add a secondary custom numeric metric with a "lower is better" success criteria to measure time to first byte (TTFB) for each variation.
Select the following options for the metric:
* **Average** for multiple event value aggregation
* **Average** `value`
* of the per **Request** event `average`
* where **Lower is better**
* Exclude units that that did not send any events from the analysisHere is what your secondary metric will look like:
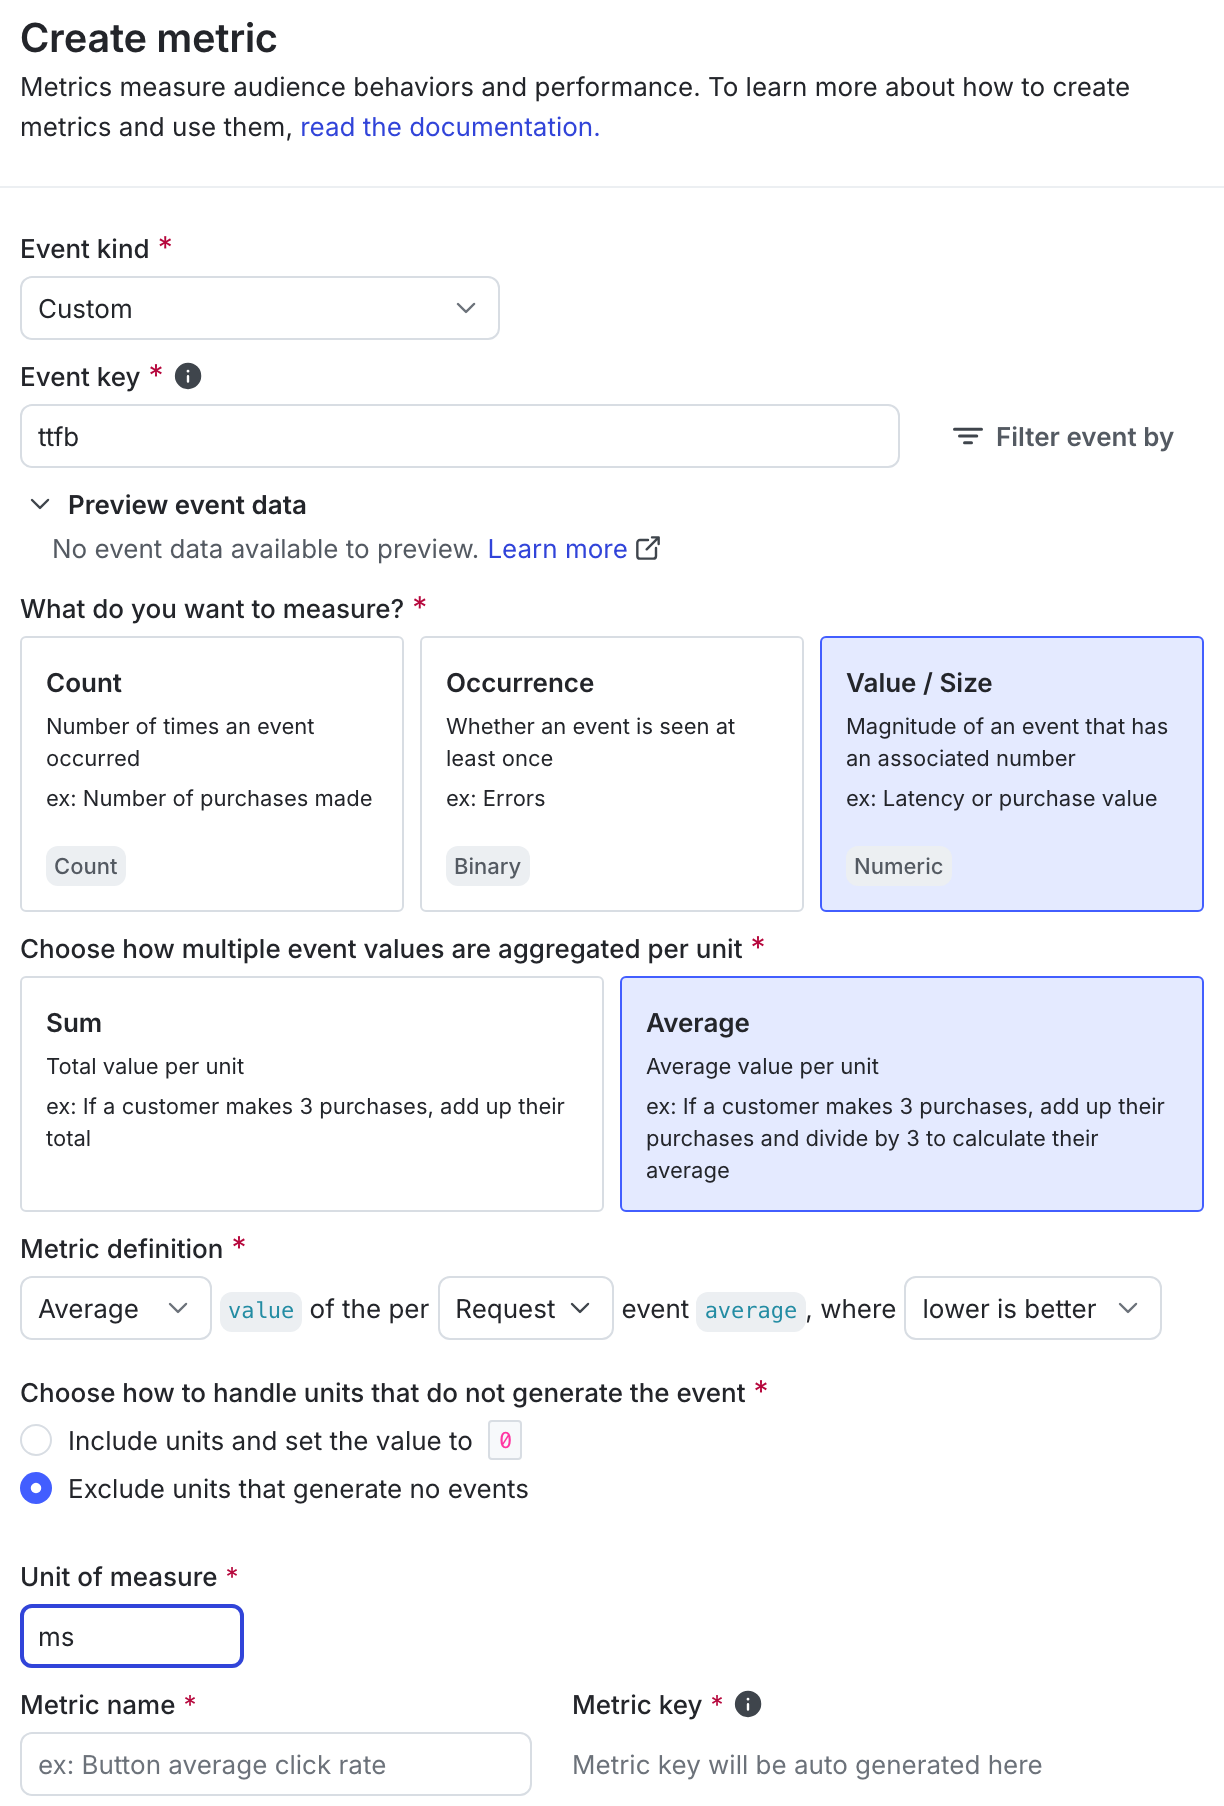
When you create the metric, enter the appropriate event key from your codebase. In this example, the event key is "Time to first byte."
### Variations
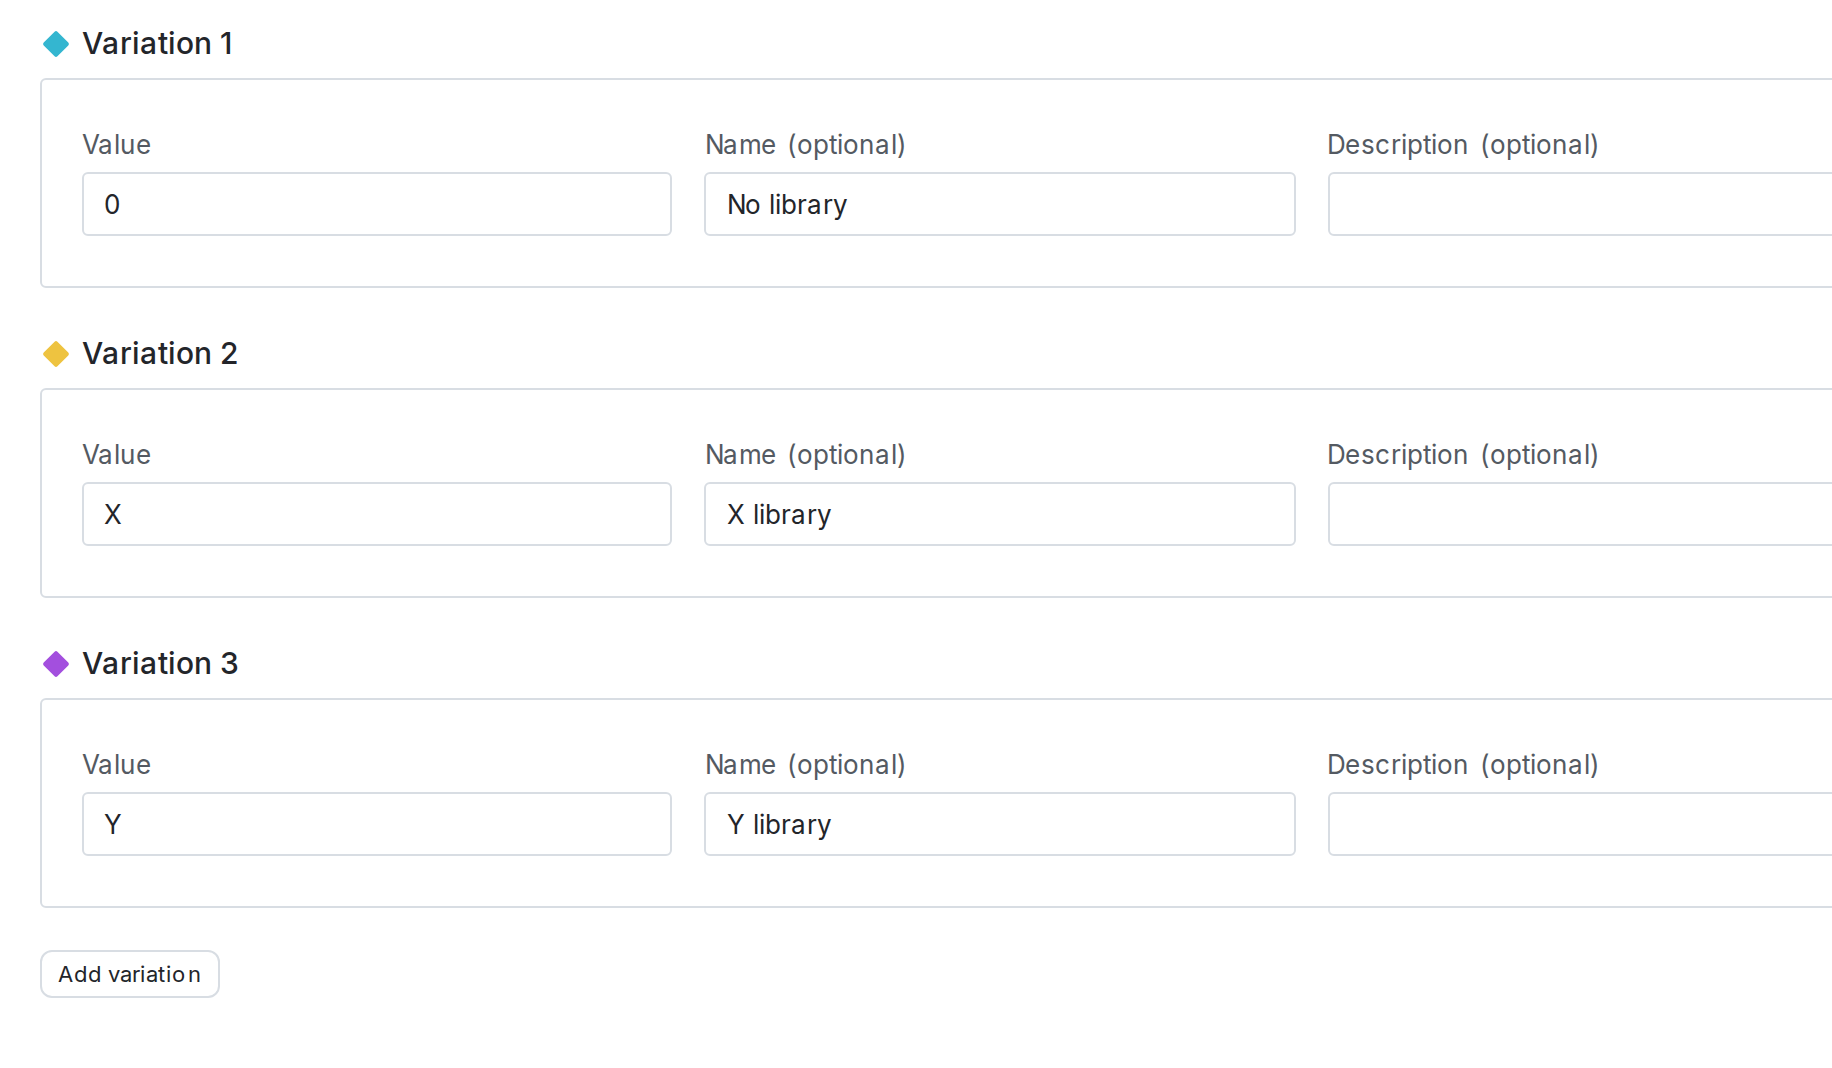
Create your flag with three variations. Use the **Experiment** flag template and **String** flag type:
* No third-party library installed, which acts as the control
* Library X installed
* Library Y installedHere is what your flag's **Variations** tab will look like:
### Audience
In this experiment, you want a random sample of your entire user base in the experiment, so you will not create any targeting rules for the flag.
### Experiment design
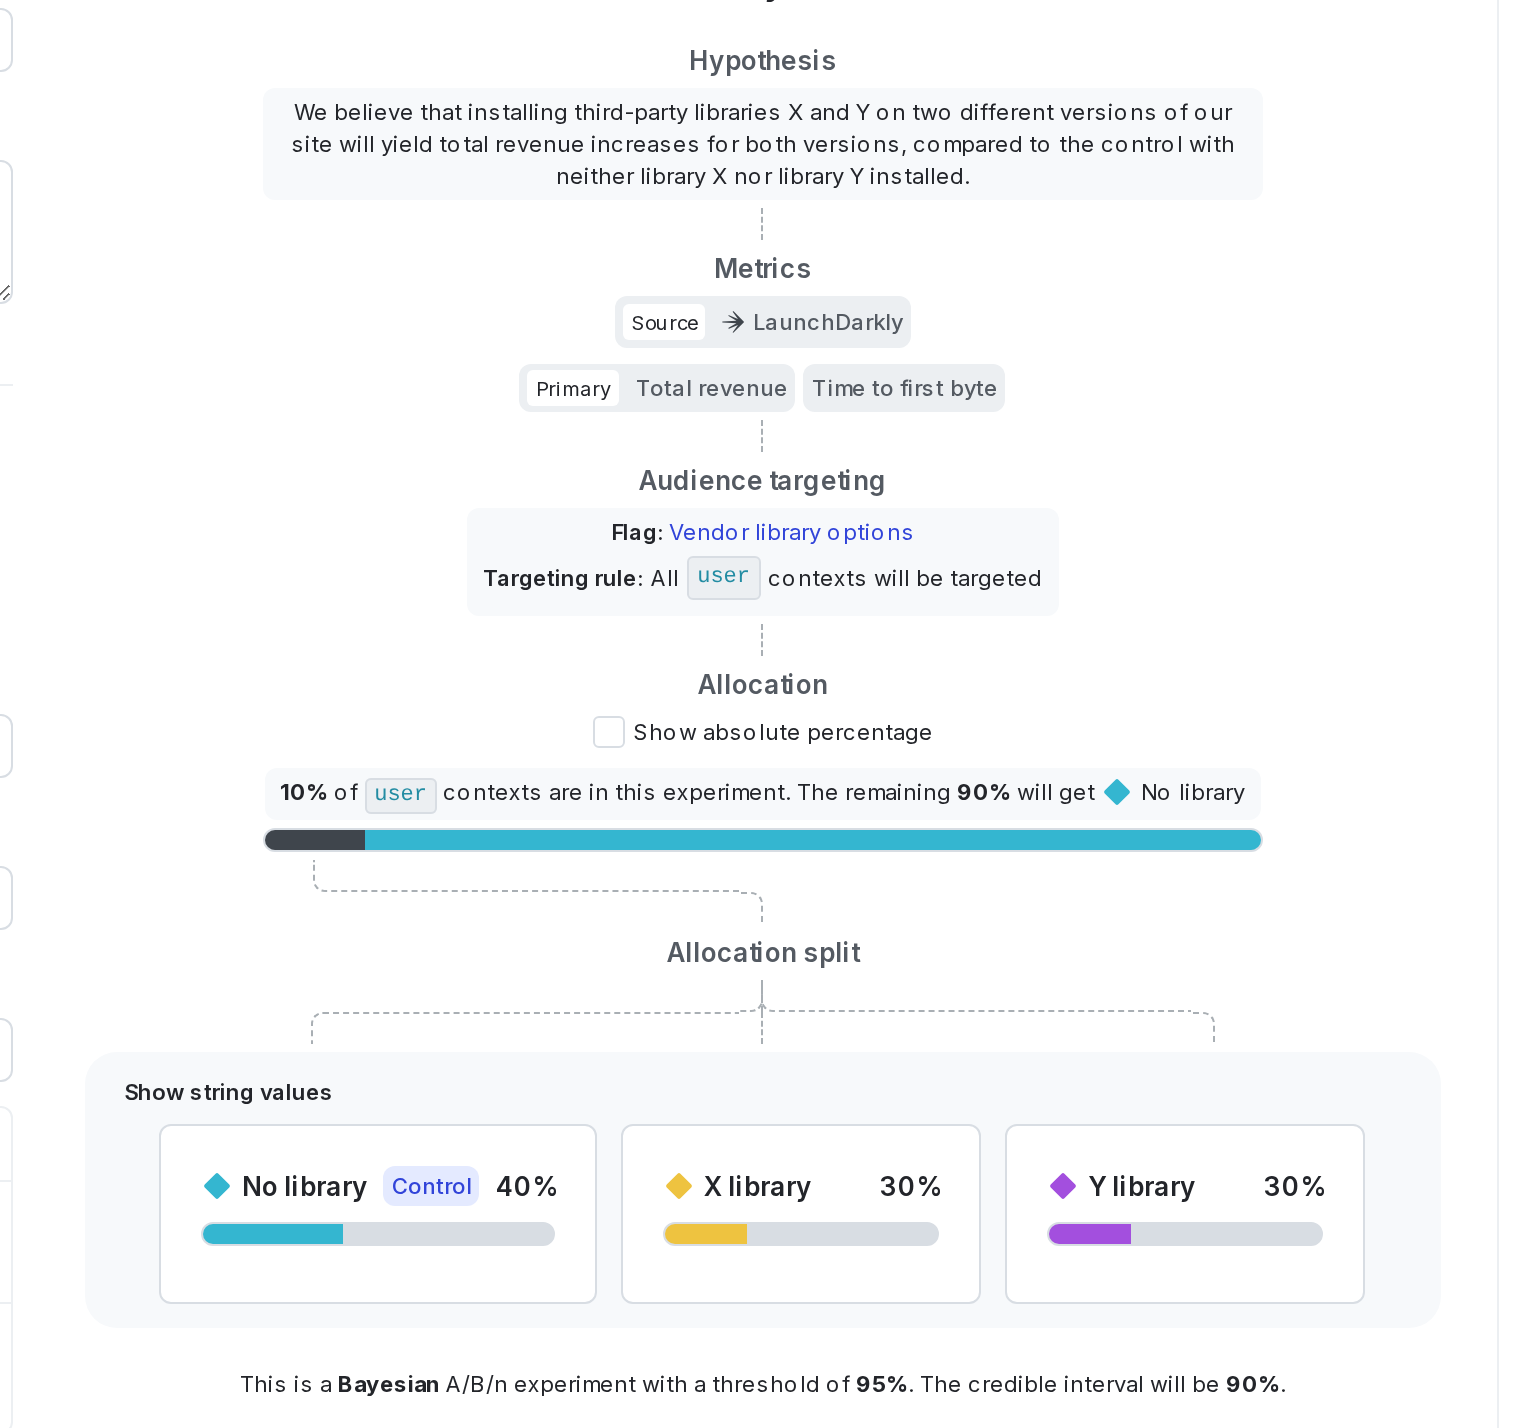
Finally, combine your hypothesis, metrics, flag, and audience into an experiment. To learn how, read [Creating experiments](/home/experimentation/create).
Here is what your finished experiment will look like in LaunchDarkly:
## Example 3: Trial account conversions
You offer 14-day trial accounts to potential customers. When the 14-day trial ends, customers have the option to convert to a paid account. You chose the 14-day trial arbitrarily, and would like to find out if giving customers a longer trial period results in more conversions to paid accounts.
### Hypothesis
To begin, create a hypothesis for your experiment. Here is an example:> If we give customers an extra week in their free trial for a total of 21 days, it will increase conversions to a paid account compared to the control of 14 days because customers will have more time to use the product.
### Sample size
Next, determine the sample size you need for your experiment. In this example, you know that about 750 customers sign up for a free trial per day, and you'd like to have at least 10,000 customers in your experiment. So, you will run this experiment for 14 days to include about 10,500 customers.
Here is the sample size calculation:`750 customers x 14 days x 100% of customers = 10,500 customers in experiment`As you decide on the sample size, you may want to consider the number of Experimentation keys you have available in the LaunchDarkly plan you subscribe to.
### Metric
You will use a custom conversion binary metric to track conversions to paid accounts. To learn how to create a custom conversion binary metric, read [Custom conversion binary metrics](/home/metrics/custom).
Select the following options for the metric:
* Percentage of **User** units that sent the event
* where **Higher is better**Here is what your metric will look like:
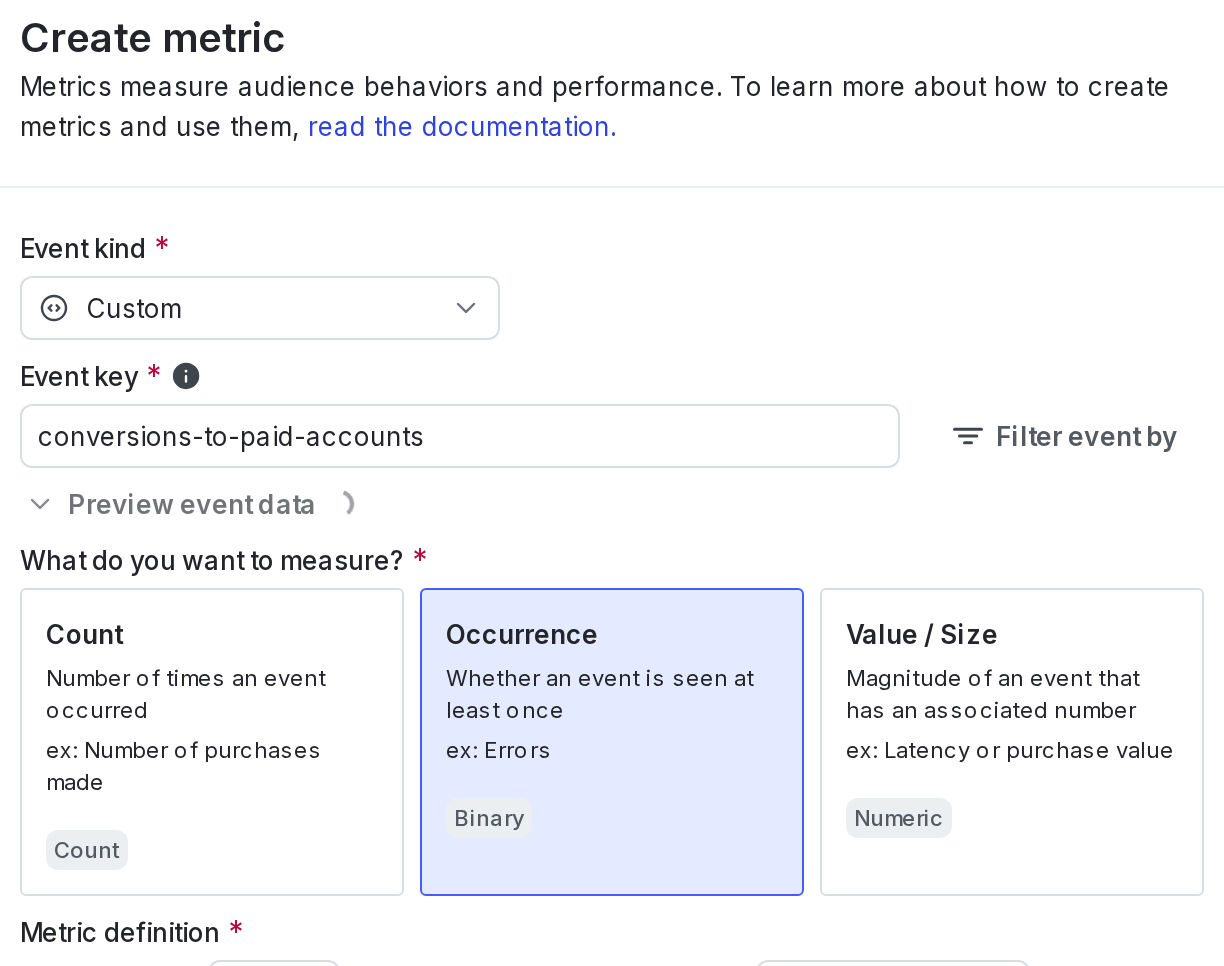
When you create the metric, enter the appropriate event key from your codebase. In this example, the event key is "Conversion to paid accounts."
### Variations
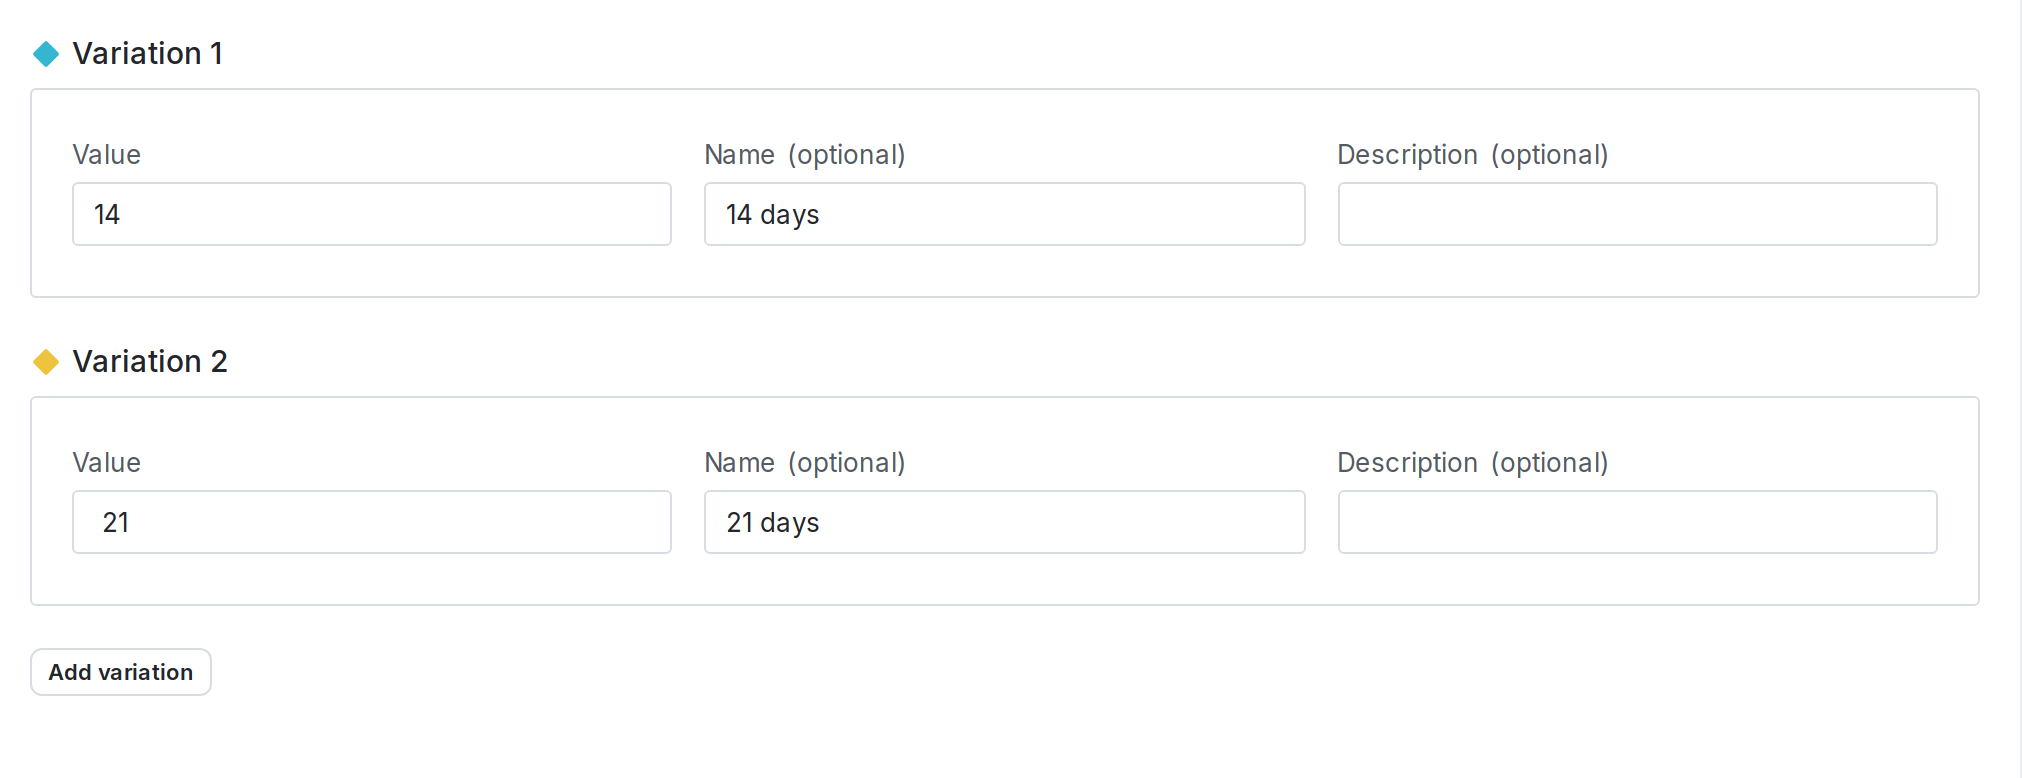
Create your flag with two variations. Use the **Experiment** flag template and **String** flag type:
* A 14-day trial, which acts as the control
* A 21-day trialHere is what your flag's variations will look like:
### Audience
In this experiment, you do not want to include students who may be using your trial service for school projects, so you will exclude customers with email addresses that end with `.edu`. To accomplish this, you can build a rule on your flag. To learn how, read [Target with flags](/home/flags/target).
Here is what your flag's **Targeting** tab will look like with a targeting rule:
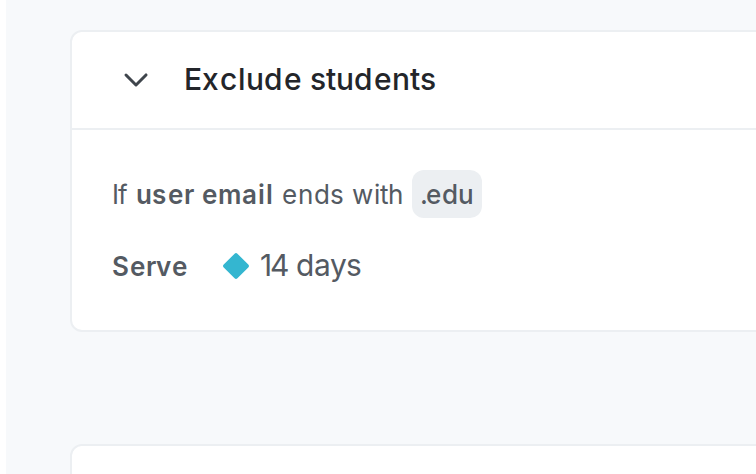
When you build an experiment, you can choose which flag targeting rule to run the experiment on. This ensures you include the right group of customers in your experiment. In this example, run the experiment on the flag’s targeting rule that you just created, not the flag’s default rule.
### Experiment design
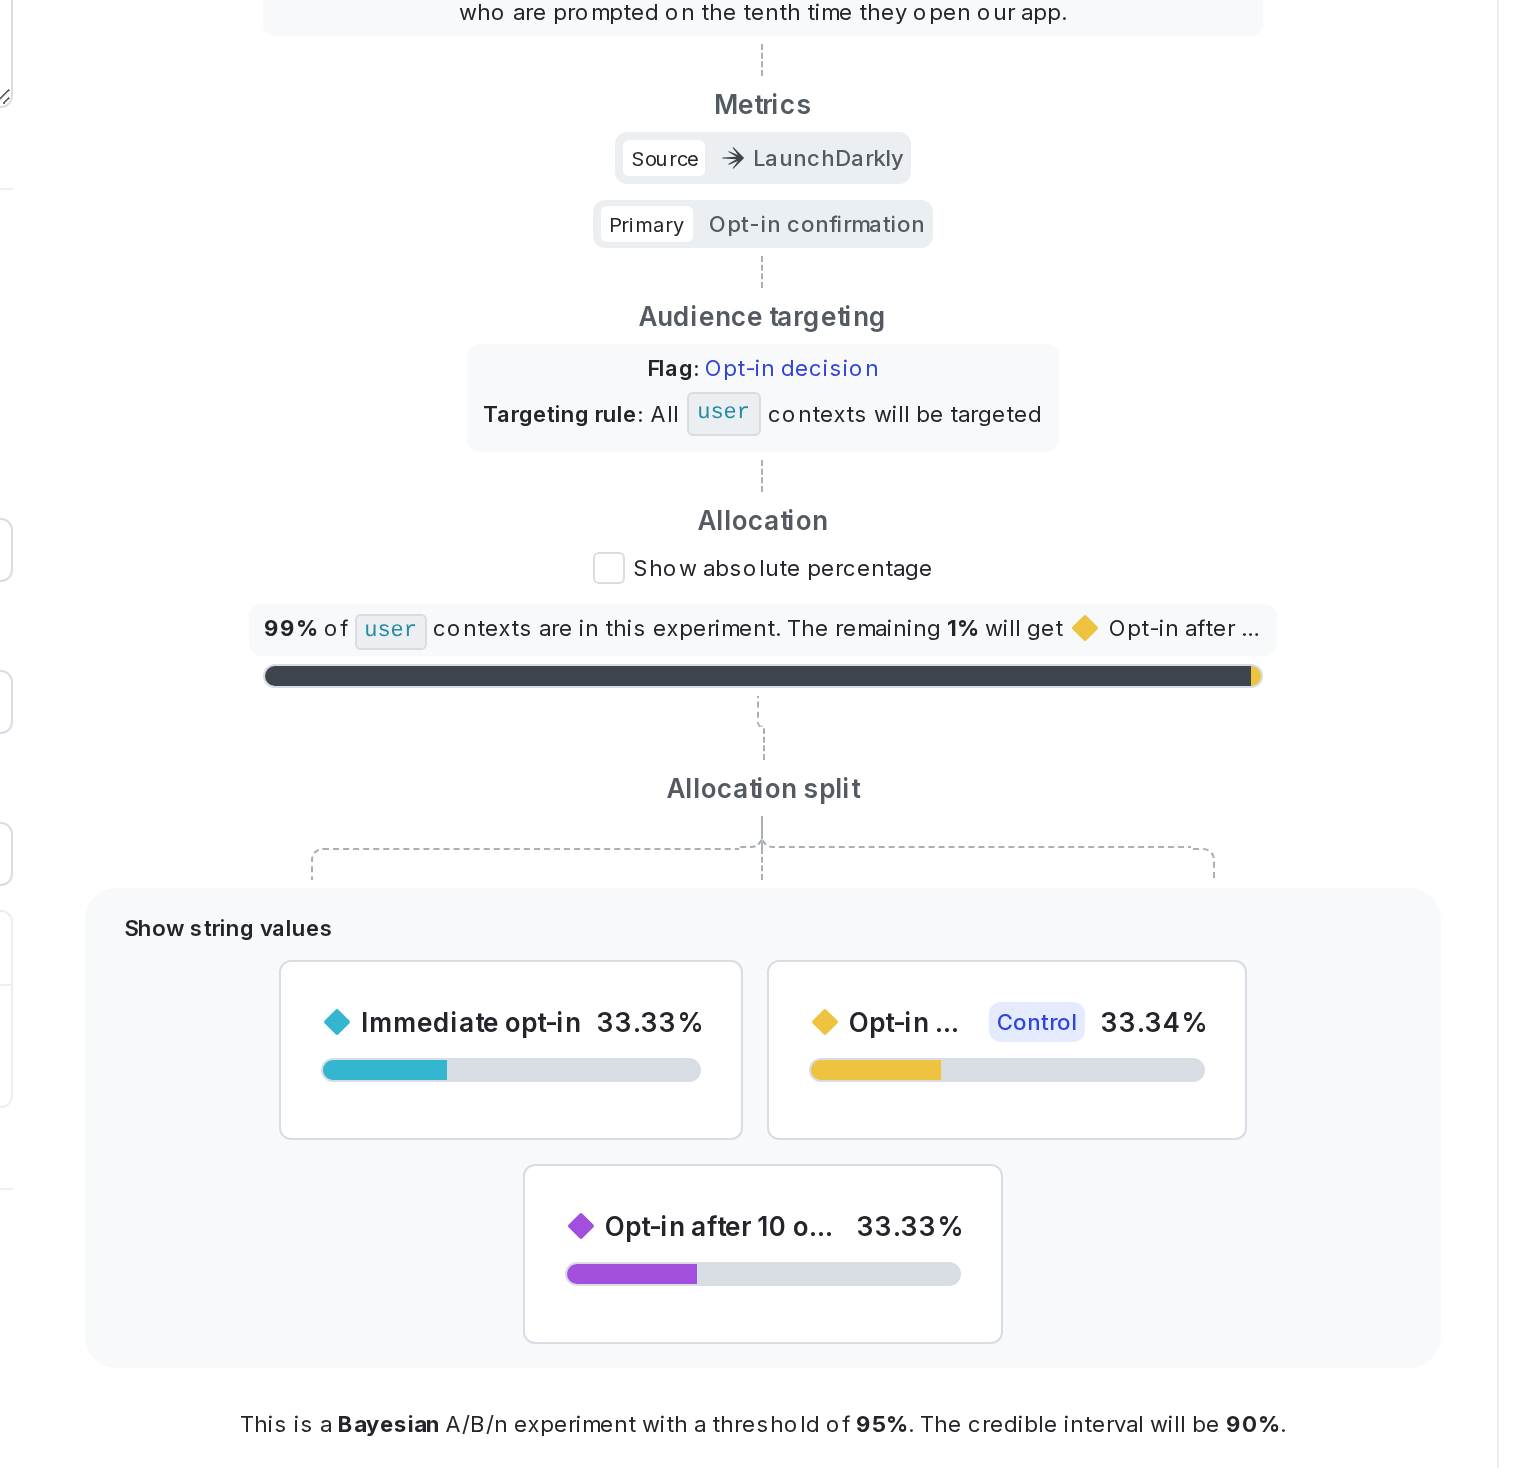
Finally, combine your hypothesis, metric, flag, and audience into an experiment. To learn how, read [Creating experiments](/home/experimentation/create).
Here is what your finished experiment will look like in LaunchDarkly:
## Conclusion
In this guide, we present three use cases for LaunchDarkly Experimentation that cover app notification optimization, measuring the value of third-party libraries, and testing trial account conversions. For more examples of what you can measure with metrics, read [Choose a metric type](/home/metrics/choose).
Snowflake users who want to explore this data more in-depth can send all of the experiment data to a Snowflake database using the Snowflake Data Export integration. By exporting your LaunchDarkly experiment data to the same Snowflake warehouse as your other data, you can build custom reports in Snowflake to answer product behavior questions. To learn more, read [Snowflake Data Export](/integrations/data-export/snowflake).
You can also run experiments using warehouse native metrics. To learn more, read [Snowflake native Experimentation](/home/warehouse-native/snowflake).
We hope this guide gets you started on the path to creating your own experiments. To get started building your own experiment, follow our [Quickstart for Experimentation](/home/experimentation/quickstart).